반응형
<출처 : http://javaora.tistory.com/entry/Learning-the-JavaFX-Script-Programming-Language-Lesson-5-Sequences >

목차
- 사퀀스(Sequence) 만들기
- Boolean Expression 과 시퀀스 만들기
- 시퀀스 아이템(Item) 접근하기
- 시퀀스에 아이템 인서트 하기
- 시퀀스의 아이템 삭제하기
- 시퀀스의 아이템 거꾸로 정렬 하기
- 시퀀스 비교하기
- 시퀀스 슬라이스(Slice) 사용하기

* 사퀀스(Sequence) 만들기

JavaFX에서는 앞서 배운 5개의 기본적인 데이터 타입 외에 추가적으로 시퀀스(Sequence)라 불리우는 데이터 구조(data structure) 를 제공한다. 시퀀스는 순서가 있는 List 객체(Ordered List) 를 나타내며, 시퀀스의 내부의 각각의 객체를 아이템(item) 이라 한다. 시퀀스는 대괄호([], bracket)를 사용하여 선언하며, 각각의 아이템은 콤마(,)로 구분한다.

var weekDays = ["Mon","Tue","Wed","Thu","Fri"];

선언된 시퀀스는 weekDays라 명명된 변수에 할당된다. 개별 아이템이 String 으로 선언되어 있어 우리가 "String 형식의 시퀀스(sequence of strings)"를 생성하려는 의도를 컴파일러는 알게 된다. 만일 시퀀스가 Integer들로 선언되었다면 컴파일러는"Integer 형식의 시퀀스"가 우리가 원하는 것임을 알게 된다.

물론 명시적으로 시퀀스의 아이템 형(type)을 지정 할 수도 있다. 형 지정 방식은 선언하는 변수명 다음에 콜론(:) 과 함께 원하는 데이터타입을 적어주고, 끝에는 대괄호를 사용한다.

var weekDays: String[] = ["Mon","Tue","Wed","Thu","Fri"];

시퀀스는 또한 다른 시퀀스를 포함한 중첩된 시퀀스를 만들 수도 있다.

var days = [weekDays, ["Sat","Sun"]];

이렇게 중첩된 시퀀스의 경우 컴파일러는 자동으로 내포된 시퀀스들의 아이템을 꺼내어 등가의 중첩없는(혹은 평평한, flatten) 시퀀스로 만든다.(위 와 아래의 표현은 동일하다.)

var days = ["Mon","Tue","Wed","Thu","Fri","Sat","Sun"];

또한 약식 표기법도 가능하다. 이는 순차적으로 증/감하는 숫자로 시퀀스를 구성하기 쉽게 해준다. 숫자 1 부터 100 까지로 구성되는 시퀀스를 생성하기 위한 방법은 아래와 같다.

var nums = [1..100];


* Boolean Expression 과 시퀀스 만들기

boolean expression 과 서술형 방식을 통해 기존의 시퀀스을 가지고 하위 서브셋(subset)을 구성하여 새로운 시퀀스를 선언 할 수도 있다.

아래 예에서 두번째 시퀀스는 첫번째 시퀀스에 기반을 두고 있으나 오직 숫자가 2보다 큰것만 포함하고 있다.

var nums = [1,2,3,4,5];
var numsGreaterThanTwo = nums[n | n > 2];
print();


결과 : [ 3, 4, 5 ]

var nums = [1,2,3,4,5];
var numsGreaterThanTwo = for (n in nums where n > 2) n ;
print();


결과 : [ 3, 4, 5 ]


* 시퀀스 아이템(Item) 접근하기

시퀀스의 아이템에 대한 접근은 인덱스(index)를 통해 접근하며, 인덱스의 시작은 0 이다. 사용방법은 먼저 시퀀스의 이름을 쓰고, 대괄호를 사용하며 그 안에 인덱스 값을 넣는다.

var days = ["Mon","Tue","Wed","Thu","Fri","Sat","Sun"];

println(days[0]);
println(days[1]);
println(days[2]);
println(days[3]);
println(days[4]);
println(days[5]);
println(days[6]);

그 결과는 다음과 같다.

Mon
Tue
Wed
Thu
Fri
Sat
Sun

또한 시퀀스의 크기를 구하기 위해 sizeof 키워드를 사용하며, 사용방식은 sizeof 다음에 시퀀스의 변수명을 적어준다.

var days = ["Mon","Tue","Wed","Thu","Fri","Sat","Sun"];
println(sizeof days);

위 코드의 실행결과는 7 이다.


* 시퀀스에 아이템 인서트 하기

insert 키워드는 특정 값을 into 키워드 다음의 시퀀스로 값을 끼워넣는 역할을 한다. 이때 before 와 after 키워드를 사용하여 특정 위치를 지정 할 수 있다.
Note : 사실 시퀀스는 불변형(immutable)이다. 이는 한번 생성되면 그 값이 변하지 않는다는 뜻이다. 그래서 만약 시퀀스에 insert나 delete 작업이 이루어진다면, 새로이 시퀀스를 생성하고 주어진 작업을 처리하고 이를 변수에 재 할당하는 작업이 이루어진다.
var days = ["Mon"];
insert "Tue" into days;
insert "Fri" into days;
insert "Sat" into days;
insert "Sun" into days;

print(days);

이를 실행하면 아래와 같은 결과가 나온다.

[ "Mon", "Tue", "Fri", "Sat", "Sun" ]

before 키워드를 이용하여 insert 될 element의 위치를 지정해보자.

insert "Thu" before days[2];
print(days);

이를 실행하면 아래와 같은 결과가 나온다.

[ "Mon""Tue", "Thu", "Fri""Sat""Sun" ]

after 키워드를 이용하여 insert 될 element의 위치를 지정해보자.

insert "Wed" after days[1];
print(days);

이를 실행하면 아래와 같은 결과가 나온다.

[ "Mon""Tue", "Wed", "Thu", "Fri""Sat""Sun" ]


* 시퀀스의 아이템 삭제하기

delete 와 from 키워드를 이용하여 시퀀스로 부터 쉽게 삭제가 가능하다.

delete "Sun" from  days;
print(days);

이를 실행하면 아래와 같은 결과가 나온다.

[ "Mon""Tue", "Wed", "Thu", "Fri""Sat" ]

또한 인덱스를 이용한 삭제도 가능하다.

delete days[0];
print(days);

이를 실행하면 아래와 같은 결과가 나온다.

[ "Tue", "Wed", "Thu", "Fri""Sat" ]

시퀀스의 모든 아이템을 삭제하려면 delete 키워드 다음에 시퀀스 변수명을 넣으면 된다.

delete days; // Delete all data

주의할 것은 delete 키워드는 단지 시퀀스 변수 내의 아이템을 삭제하는 것이지 변수 자체를 삭제하는 것은 아니다.

* 시퀀스의 아이템 거꾸로 정렬 하기

시퀀스의 순서를 쉽게 바꿀 수 있다.

var nums = [1..5];
reverse nums; // returns [5, 4, 3, 2, 1]


* 시퀀스 비교하기

시퀀스는 비교 가능하며, 동일한 시퀀스는 그 길이와 아이템과 순서가 동일한 것을 의미한다.

var seq1 = [1,2,3,4,5];
var seq2 = [1,2,3,4,5];
println(seq1 == seq2); // true

seq1 = [1,2,3,4,5];
seq2 = [1,2,3,4,5,6]; // 아이템이 한가지 증가했다. 순서는 바뀌지 않았다.
println(seq1 == seq2); // false

seq1 = [1,2,3,4,5];
seq2 = [1,3,2,4,5];  // 아이템은 동일하나 순서가 바뀌었다.
println(seq1 == seq2); // false


* 시퀀스 슬라이스(Slice) 사용하기

seq 키워드를 사용하여 시퀀스 내의 아이템을 분할 가능하다.

var days = ["Mon","Tue","Wed","Thu","Fri","Sat","Sun"];

var weekend = days[5..6]; // ["Sat","Sun"] 인덱스 5 와 6 사이의 아이템을 가져온다.

var weekdays = days[0..<5];//["Mon","Tue","Wed","Thu","Fri"] 인덱스 0 과 4(=5보다 작은) 사이의
                                         // 아이템을 가져온다.

weekend = days[5..]; // ["Sat","Sun"] 인덱스 5 부터 끝까지의 아이템을 가져온다.

var days2 = days[0..<]; // ["Mon","Tue","Wed","Thu","Fri","Sat"] 인덱스 0부터 마지막보다 작은 사이의
                                  // 아이템을 가져온다.(마지막은 제외)
반응형

<출처: http://javaora.tistory.com/entry/Learning-the-JavaFX-Script-Programming-Language-Lesson-4-Data-Types >

목차
- String
- Number and Integer
- Boolean
- Duration
- Void
- Null

* String

String은 홑('') 또는 겹(쌍, "") 따옴표로 선언한다.

var s1 = 'Hello';
var s2 = "Hello";

홑/겹따옴표는 대칭적으로 홑따옴표 사이에 겹따옴표를 넣거나, 반대로 겹따옴표 안에 홑따옴표를 포함시킬 수 있다. 홑 따옴표와 겹따옴표 사이의 차이는 없다.

추가적으로 String 내부에 중괄호({})를 이용하여 expression 를 사용하는 것도 가능하다.

def name = 'Joe';
var s = "Hello {name}"; // s = 'Hello Joe'

내포된 expression 은 그 자신 안에 따옴표로 둘러싸인 String을 사용 할 수 있으며, 그 String 안에 또 다른 expression 을 포함 시킬 수도 있다.

def answer = true;
var s = "The answer is {if (answer) "Yes" else "No"}"; // s = 'The answer is Yes'

런타임(runtime) 시에, 컴파일러는 answer 의 값에 따라 적절히 Yes 와 No 를 선택하게 된다.

여러개의 String을 연결하는 작업은 따옴표 내에 중괄호들을 사용하여 연결한다.

def one = "This example ";
def two = "joins two strings.";
def three = "{one}{two}"; // join string one and string two
println(three); // 'This example joins two strings.'


* Number and Integer

Number 와 Integer 는  수적인(numerical) 데이터를 나타내며, 대부분의 경우 값을 할당하면 컴파일러에서 자동으로 추론하여 올바른 형(type)을 선택한다.

def numOne = 1.0; // compiler will infer Number
def numTwo = 1; // compiler will infer Integer

물론 정확한 변수의 타입을 지정 할 수도 있다.

def numOne : Number = 1.0;
def numTwo : Integer = 1;

Number 는 부동소수점 숫자를 나타내며, Integer 는 오직 정수를 표시한다. 따라서 Number는 정밀한 부동소수점 계산시 필수적인 것이고, 일반적인 경우 대부분 Integer를 사용하면 될 것이다.


* Boolean

Boolean 형은 true 와 false 라는 두가지 값(상태)를 나타낸다. 이 형식은 어떤 애플리케이션의 특정 내부적인 상태를 나타내기에 좋으며 주로 조건문의 값을 선택할때 많이 사용된다.

var isAsleep = true;
if (isAsleep) { wakeUp(); }

위 조건문의 괄호("()")안의 값이 true 이면 중괄호({}) 내부의 함수 호출 문장이 실행된다. 조건문과 관련한 좀 더 자세한 사항은 다음시간의 Expression 편에서 알아보도록 하겠다.


* Duration

Duration 형은 고정된 단위시간(밀리초, 초, 분, 시간 등) 을 나타낸다.

5ms; // 5 milliseconds
10s; // 10 seconds
30m; // 30 minutes
1h; // 1 hour

Duration 형은 시간단위(time literals) 와 함께 표시된다. - 예를들면, 5m에서 m은 분(minute) 을 나타낸다. 시간단위는 대부분 애니메이션을 사용할 때 필요로 한다.(애니메이션과 관련된 사항은 차후 레슨에서 배우게 될것이다.)


* Void

Void는 함수의 리턴 형이 없는 것을 나타낼때 사용된다.

function printMe() : Void {
     println("I don't return anything!");
}

위 코드는 명시적으로 함수의 리턴형을 생략하는 것과 동일하다.

function printMe() { 
     println("I don't return anything!"); 
}

JavaFX의 Void 키워드는 대문자 V로 시작된다. Java의 경우 소문자 void로 사용하는데 주의해야 한다.

* Null

Null은 특수한 값(value)으로 값이 없는 상태를 나타내는 값이다. Null은 0이나 빈 String 값("")과는 다르다. Null을 0이나 빈 String 값과 비교한 결과는 false 이다.(같지 않다.)

Null 키워드는 비교하는 것은 가능하며, 일반적으로 아래와 같은 형식으로 사용된다.

function checkArg(arg1: Address) {
     if(arg1 == null) {
          println("I received a null argument.");
     } else {
          println("The argument has a value.");
     }
}

위 함수는 하나의 인자를 받아 인자의 값이 null인지를 체크하고 결과를 프린트한다.
반응형
<출처 : http://javaora.tistory.com/entry/Learning-the-JavaFX-Script-Programming-Language-Lesson-3-Using-Objects >

목차
- 객체란?
- 객체구(Object Literal) 선언
- 객체구 문법
- 인스턴스(Instance) 함수 호출

* 객체(Object)란?

객체란 무엇인가? 객체는 상태와 행동으로 구성된 개별의 소프트웨어 꾸러미이다. 간단히 말해 :

  • 객체의 상태는 자신의 변수를 나타낸다.
  • 객체의 행동은 자신의 함수를 나타낸다.
개념적으로 버튼, 체크박스, 레이블 같은 GUI 컴포넌트부터 보이지 않는 추상적 개념의 날씨 데이터, 재정 상태, 상품 등록 정보 등의 어떤것이든 객체로 만들어 낼 수 있다. 

Note : 좀 더 많은 정보를 알고 싶으면 자바 튜터리얼 의  "객체란 무엇인가" 를  보도록 하자.

* 객체구 선언(= 객체 생성, 인스턴스 생성)

JavaFX 스크립트 개발언어에서는 객체는 객체구(object literal) 로서 생성된다.(인스턴스를 생성한다. - 본 글에서 "객체를 생성한다"와 "인스턴스를 생성한다" 는 동일한 의미로 보면 된다.)


Address {
     street: "1 Main Street";
     city: "Santa Clara";
     state: "CA";
     zip: "95050";
}


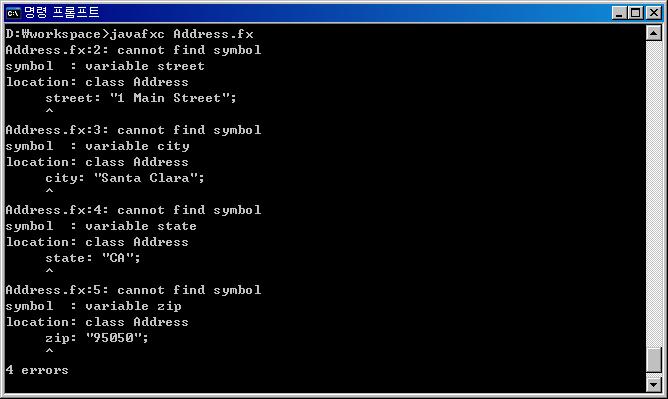
위 예제는 가상의 주소록 애플리케이션에서 사용되는 Address 객체를 생성한다. 본 소스를 적당한 이름을 저장하고 컴파일 하면 다음과 같은 에러가 발생한다.
  

위 코드는 마치 자바 문법의 생성자와 비슷하며 다음과 같은 의미로 보면 된다.

new Address("1 Main Street", "Santa Clara", "CA", "95050");

그리고 위 에러는 참조해야할 Address 클래스가 존재하지 않아 발생한 문제이다.

위 Address.zip 을 다운받아 풀면 두개의 .class 파일과 하나의 AddressBook.fx 파일이 있다.(AddressBook.fx 는 위 코드와 동일한 내용이다.)

이제 다시 컴파일 해보자.


이젠 아무런 에러없이 컴파일이 될 것 이다.


* 객체구 문법 

객체구의 문법은 배우기 쉽고 직관적인 사용이 가능하다.

Address {
     street: "200 Pine Street",
     city: "San Francisco",
     state: "CA",
     zip: "94101",
}
Address {
     street: "200 Pine Street"
     city: "San Francisco"
     state: "CA"
     zip: "94101"
}
Address {
     street: "200 Pine Street",
     city: "San Francisco",
     state: "CA",
     zip: "94101",
}

위 코드에서 첫번째 단어 Address는 생성하려는 객체의 타입을 나타낸다. 중괄호 내부의 블럭은 객체의 내용을 정의하며, 변수들은 각각 객체의 멤버변수를 초기화 시킨다. 객체구를 선언할때는 인스턴스의 멤버변수를 콤마나 빈칸 또는 세미콜론으로 구분된다.

또한 아래와 같은 방식으로 생성된 객체를 변수에 할 당 할 수도 있다.

def addressOne = Address {
     street: "1 Main Street";
     city: "Santa Clara";
     state: "CA";
     zip: "95050";
}

def addressTwo = Address {
     street: "200 Pine Street";
     city: "San Francisco";
     state: "CA";
     zip: "94101";
}

또한 아래 코드와 같이 객체 내부에 다른 객체를 포함 시킬 수도 있다.

def customer = Customer {
     firstName: "John";
     lastName: "Doe";
     phoneNum: "(408) 555-1212";
     address: Address {
          street: "1 Main Street";
          city: "Santa Clara";
          state: "CA";
          zip: "95050";
     }
}

위 코드에서 Customer 객체는 원 address 라고 명명된 변수에 할당된 Address 객체를 포함한 몇가지 새로운 변수들을 가지고 있다. 내포된 객체(nested object) 구문은 일반적으로 많이 사용되는 형식이다.

아래 Customer.zip을 다운로드 받아 위에서 다운받은 Address.zip 과 같은 곳에 압축을 푼다. 그리고 위 코드를 적당한 이름으로 저장 후 컴파일 하면 제대로 컴파일 되는 것을 알 수 있다.


* 인스턴스(Instance) 함수 호출

JavaFX에는 함수(function)이 포함된  사용가능한 많은 클래스들이 있다. 일단 함수를 생성하는 방법은 다음 레슨에서 살펴볼 것이며, 이번엔 먼저 존재하는 함수를 어떻게 사용하는지에 대해 알아보자.

객체의 인스턴스 함수(instance function)는 객체명 다음에 마침표(.)를 붙이고 다음에 호출하기 원하는 함수명을 입력하여 호출한다.

def customer = Customer {
     firstName: "John";
     lastName: "Doe";
     phoneNum: "(408) 555-1212";
     address: Address {
          street: "1 Main Street";
          city: "Santa Clara";
          state: "CA";
          zip: "95050"; }
}
customer.printName();
customer.printPhoneNum();
customer.printAddress();

그 결과는 아래와 같다.

Name: John Doe
Phone: (408) 555-1212
Street: 1 Main Street
City: Santa Clara
State: CA
Zip: 95050

아마 위 코드를 보고 이런 의문을 갖게 될것이다.
"저 함수 이름은 어디서 온거지? 내가 객체속에든 인스턴스 변수나 함수명을 어떻게 한번에 알 수가 있겠어?"
만약 library나 클래스를 사용하고 싶다면, API 문서를 참고하면 된다. API 문서에는 객체들의 변수명과 함수명이 리스트업 되어 있다. API 문서를 참고하는 것만이 주어진 객체의 기능을 파악 할 수 있는 가장 확실한 방법이다.

반응형

목차

- 간단한 계산기 작성
- 스크립트 변수 선언
- 스크립트 함수 정의 및 호출
- 스크립트 함수에 인자 넘기기
- 스크립트 함수의 리턴 값
- Command-Line 인자 접근

* 간단한 계산기 작성

에디터를 열고 아래 코드를 입력한다.

def numOne = 100;
def numTwo = 2;
var result;

add();
subtract();
multiply();
divide();

function add() {
     result = numOne + numTwo;
     println("{numOne} + {numTwo} = {result}");
}

function subtract() {
     result = numOne - numTwo;
     println("{numOne} - {numTwo} = {result}");
}

function multiply() {
     result = numOne * numTwo;
     println("{numOne} * {numTwo} = {result}");
}

function divide() {
     result = numOne / numTwo;
     println("{numOne} / {numTwo} = {result}");
}


컴파일과 실행은 자바와 유사함을 알 수 있다.

* 스크립트 변수 선언

이제 calculator.fx 를 자세히 들여다 보자.(차후 이 예제를 확장 할 것이다.)

코드의 첫번째 부분은 변수의 선언으로 시작된다.

def numOne = 100;
def numTwo = 2;
var result;

스크립트의 변수 선언엔 var 와 def 키워드 두가지가 사용된다. var 는 스크립트 전체에 통해 계속적으로 새로운 값을 할당 할 때 사용하며(그야말로 진정한 변수이다.), def 는 변수 선언 처음에 값을 할당하여 상수로서 사용되어진다.

위 코드에서도 계속적으로 사용되어질 상수와 같은 값은 def 로 선언하고 초기값을 할당하였고, 매 계산시 마다 값을 저장할 result 는 var 로 선언하고 초기화하지 않음을 알 수 있다.

우리는 result 변수에 숫자만 들어간다는 타입설정을 하지 않았음에도 컴파일시 문제가 없다. 이는  컴파일러가 사용자가 작성한 코드상의 변수의 사용을 보고 그 의도를 파악하여 자동으로 타입을 계산(추측) 해낸다. 이를 형 추론(Type Inference)라 한다. 이 형 추론은 스크립트 프로그래머에게 데이터 타입 선언이라는 짐을 덜어주므로서 당신의 일을 좀 더 쉽게 해준다.

* 스크립트 함수 정의 및 호출

소스의 남은 부부은 두 숫자의 덧셈/뺄셈/곱셈/나눗셈 의 스크립트 함수를 정의한다.

function add() {
     result = numOne + numTwo;
     println("{numOne} + {numTwo} = {result}");
}
...

함수는  특정 업무를 수행하는 실행가능한 코드의 블럭이다. 이 예에서 각 함수는 4칙연산중 하나를 수행하고 그 결과를 프린트 한다. 함수로 코드를 구조화(블럭화) 하는 것은 일반적인 것으로서 이는 프로그램을 읽기 쉽고, 쓰기 쉽고, 디버그 하기 쉽게 만들어 준다. 함수의 몸체(body)부분은 중괄호(brace)를 이용해 시작과 끝을 나내 가독성을 높인다.

함수는 명시적으로 호출(invoke)되기 전까지 실행되지 않는다. 이는 스크립트상 어느 위치에서든 함수가 실행 가능하게 만든다. 함수를 호출하는 것은 함수를 선언하기 전이든 후든 큰 문제가 되지 않는다. 위 예제에서도 함수가 실제 소스코드상에 선언되기 전 호출되어지고 있다.

함수의 호출은 아래와 같다.

add();
subtract();
multiply();
divide();


* 스크립트 함수에 인자 넘기기

다음으로 이전의 calculator.fx 의 함수를 인자(arguments)를 받도록 수정 해보자. 인자는 함수를 호출하면서 함수로 넘기는 특정 값(specific value)이다. 이 수정으로 위 사칙연산 함수는 하드코딩된 고정된 값이 아닌 어떤 임의의 두 숫자라도 계산을 할 수 있게 해준다.

var result;

add(100,10);
subtract(50,5);
multiply(25,4);
divide(500,2);

function add(argOne: Integer, argTwo: Integer) {
     result = argOne + argTwo;
     println("{argOne} + {argTwo} = {result}");
}

function subtract(argOne: Integer, argTwo: Integer) {
     result = argOne - argTwo;
     println("{argOne} - {argTwo} = {result}");
}

function multiply(argOne: Integer, argTwo: Integer) {
     result = argOne * argTwo;
     println("{argOne} * {argTwo} = {result}");
}

function divide(argOne: Integer, argTwo: Integer) {
     result = argOne / argTwo;
     println("{argOne} / {argTwo} = {result}");
}

컴파일 후 재실행 한 결과는 아래와 같다.


위 코드에는 제일 위에 정의된 numOne 과 numTwo 변수가 더 이상 필요가 없어 삭제되었다. 대신 함수에 정의된 인자를 통해 두 숫자를 넘겨 받도록 수정 되었다. 각 인자는 각각의 이름과 콜론(:) 로 구분된 타입으로 나타내진다. 하나 이상의 인자는 콤마(,)로 구분한다.

* 스크립트 함수의 리턴 값

함수는 선택적으로 값을 함수를 호출한 코드로 리턴할 수 있다. 예를 들면, add 함수의 결과 값이 리턴되도록 수정 되어질 수도 있다. - Bold 표시 참고

function add(argOne: Integer, argTwo: Integer) : Integer {
     result = argOne + argTwo;
     println("{argOne} + {argTwo} = {result}");
     return result;
}

이 add 함수는 아래와 같이 사용한다.

var total;
total = add(1,300) + add(23,52);

리턴되는 값이 없는 경우 함수는 default 로 Void 를 리턴한다.

* Command-Line 인자 접근

우리는 위 코드를 command-line 인자를 받아들이도록 수정 할 수도 있다. 이를 통해 런타임시 계산되는 숫자를 입력 할 수 있다.

var result;

function run(args : String[]) {

     // Strings 을 Integers 로 변환
     def numOne = java.lang.Integer.parseInt(args[0]);
     def numTwo = java.lang.Integer.parseInt(args[1]);

     // 함수 호출 
     add(numOne,numTwo);
     subtract(numOne,numTwo);
     multiply(numOne,numTwo);
     divide(numOne,numTwo);
}

function add(argOne: Integer, argTwo: Integer) {
     result = argOne + argTwo;
     println("{argOne} + {argTwo} = {result}");
}

function subtract(argOne: Integer, argTwo: Integer) {
     result = argOne - argTwo;
     println("{argOne} - {argTwo} = {result}");
}

function multiply(argOne: Integer, argTwo: Integer) {
     result = argOne * argTwo;
     println("{argOne} * {argTwo} = {result}");
}

function divide(argOne: Integer, argTwo: Integer) {
     result = argOne / argTwo;
     println("{argOne} / {argTwo} = {result}");
}

위 소스를 보면 눈에 띄는 점이 있는데 바로 run() 함수 블럭의 추가이다. 이 run() 함수는 일반적인 함수와는 다른 특별한 함수로 모든 스크립트의 시작점이 된다.(Java의 main() 함수와 같은 역할을 한다.) run() 함수는 모든 command-line 인자를 args 라는 String 형의 시퀀스(Sequence)에 저장해두고 있다.(Sequence는 순서가 있는 리스트로서 다른 언어의 배열과 비슷하다. 시퀀스는 세부적으로 Expressions 와 Operators로 나뉜다. - Lesson 6과 7 에서 상세히 설명함.)

이 스크립트를 실행하려면, 계산하려는 두 숫자를 런타임시 입력해야 한다. 실행 결과는 아래와 같다.


이번 소스에도 numOne과 numTwo 변수가 있다. 하지만 이번에 변수의 Scope는 run() 메소드 안으로 제한된다. 이 calculator 함수는 숫자를 인자로 받으므로 String 형식의 command-line 인자를 Integer로 컨버팅 한다. 이때 Java API의 도움을 받아 형변환을 수행한다.
run() 함수는 명시적으로 입력하지 않더라도 컴파일러가 컴파일시 자동으로 run() 함수를 생성한다. 마치 자바의 생성자 처럼 말이다. 따라서 컴파일된 bytecode 상에선 run() 함수를 명시한것과 명시하지 않을 것 사이의 큰 차이는 없다.
반응형

SWT 애플리케이션의 JWS를 통한 배포는 전통적인 자바 애플리케이션과 달리 OS의 리소스에 접근해야 한다.

시스템 리소스에 접근하기 위해서는 JWS 로 배포시 인증을 받아야 하며 이에 관한 한글 번역 문서를 찾아보았다.

아래 링크는 Java Web Start developer's Guide 한글 번역 문서이다.

http://xrath.com/javase/ko/6/docs/ko/technotes/guides/javaws/
반응형
< 원문: http://blog.sdnkorea.com/blog/683 >

기고인: JCO 양사열 부회장

필자는 작년부터 Web 2.0과 함께 부상한 RIA(Rich Internet Application)에 대해 귀가 따갑게 들어왔다. 필자가 현재 몸담고 있는 JCO내에서도 JCO가 직간접적으로 관여하는 각종 세미나 및 행사에서도 RIA는 큰 화두였으며 지금까지도 관심을 끄는 이슈로 부각되고 있다. 이런 이슈에 호응(?)하기 위해 Sun, Adobe, MS에서 JavaFX, Flex, Silverlight 라는 삼총사를 내놓았다. 세가지를 비교하는 것도 재미있는 일이겠지만 본인은 자바 프로그래머로만 10년 가까이 먹고 살았다. Silverlight는 어떤 것 이라는 것만 아는 편이고 Flex는 약간 끄적거려 보았다. 결국 가장 자신있는 Java 진영에서 나온 JavaFX 를 다루어 보기로 했다.

JavaFX를 처음 접한 것은 2007 JavaOne 이 끝난 후였다. 국내 유일의 자바 챔피언인 양수열 고문이(참고로 본인의 친형이다) JavaOne이 끝나고 귀국하고 만난 자리에서 JavaFX가 앞으로 엄청난 발전을 할 것이라고 흥분해서 말했던 기억이 있다. 그 후 몇 가지 관련된 글을 보았었고 2008년 JavaOne에 운이 좋게 참석하게 되어 다시 보게 된 JavaFX는 정말 놀라울 정도로 발전해 있었다. 예전에 간단한 Flash ActionScript 같았던 모습에서 Multimedia 쪽이 대폭 강화되어 수많은 동영상이 화면에 Display되면서 자유롭게 떠도는 Demo를 보고 그 놀라운 Performance에 놀라움을 금치 못했다. 그러면서도 ‘저 Demo가 일반적인 PC에서도 저만큼 가능할까?’ 라는 의문이 들었다. 그래서 결국 만들어 보게 되었으니…

시작하기
JavaFX를 처음 접하면서 느낀점은 JavaFX 문법이 JavaScript와 상당히 닮아 있다는 점이었다. JavaScript와 Java의 절묘한 짬뽕(?)이랄까? JavaFX Application을 물론 메모장으로도 개발할 수 있지만 IDE에 길들여진 개발자들이 메모장으로 개발할리가 없다. 그리고 JavaFX를 전면에 내세운 Sun에서도 개발자들이 편하고 능률적으로 개발할 수 있도록 NetBeans 최신버전에 JavaFX plugin을 추가해 놓았다. 이전에는 JavaFX Pad라는 응용 프로그램을 활용했었으나 좀 더 융통성있고 편하게 개발할 수 있도록 NetBeans에 통합해 놓은 것이다. JavaFX Pad에서와 같이 Source Edit 창에서 코드를 변경하면 위쪽 Preview 영역에서 바로 변경된 결과물을 볼 수 있고 오른쪽 팔레트를 이용해 각종 콤포넌트나 노드 이벤트 등을 원클릭으로 소스에 적용할 수 있다.
NetBeans JavaFX plugin 설치는 신상철 박사님이 운영하시는 JavaPassion을 참고하면 편하게 설정할 수 있다. (http://www.javapassion.com/handsonlabs/javafx_basics1/)

사용자 삽입 이미지
그림1: JavaFX plugin을 설치하고 실행중인 모습


본론으로
JavaFX를 이용해 Multimedia 파일을 컨트롤 하기 위해 필요한 정보와 샘플들을 우선 수집하였다. 일차적으로 Sample Code를 몇 개 받아 mp3 파일을 재생하는 테스트 코드를 만들었을 때 mp3 파일은 아주 잘 재생되었다. 하지만 동영상 파일로 바꾸었을 때는 아래와 같은 에러를 발생시켰다.

FX Media Object caught Exception com.sun.media.jmc.MediaUnsupportedException: Unsupported media: file:/D:/Projects/NetBeans/SimpleMovie/build/classes/simplemovie/SoHot.avi
source ='file:/D:/Projects/NetBeans/SimpleMovie/build/classes/simplemovie/SoHot.avi'


사용자 삽입 이미지
그림2 동영상 테스트시 발생한 에러메시지

Exception의 이름으로 인해 해당 동영상 파일이 FX 에서 지원하지 않는 Media 형식인걸 확인하였고 빠르게 손가락은 구글링을 하여 JavaFX가 지원하는 미디어 포멧을 찾아내었다.

JavaFX Media 지원타입
Container Types:
•  ASF (Advanced Systems Format),MPEG-1, AVI (Audio-Video Interleaved),WAVE, MIDI (Standard MIDI)

Encoding Types:
•  WMAUDIO8 (WindowsMedia Audio 2/7/8),WMSCREEN (Windows Media Screen), WMVIDEO9 (Windows Media Video 9), Voxware, MS MPEG-4, WMVIDEO7 (Windows Media Video 7), MPEG11 Video, MPEG-1 Audio, Uncompressed video (RGB/YUV/RLE), PCM, ADPCM, MP3, MIDI

Protocol Types:
•  HTTP, FILE ( Known not to work at present are media with DRM (Digital Rights Management), and media played directly from DVD or CD.)

Multimedia 파일을 컨트롤 하기 위해서는 항상 Codec이 문제인데 JavaFX에서는 생각보다 많은 종류의 Codec을 지원해주어 특별히 Codec에 신경 쓰지 않아도 되었다. (물론 가지고 있는 많은 수의 동영상은 실행되지 않았다.)

몇 가지 문제를 잡아나가면서 만들어 낸 결과물은 CustomNode를 사용해 재사용할 수 있는MediaViewNode를 만들었고 Timeline을 이용해 이 Node에 Animation 효과를 보여주는 프로그램을 만들어 보았다. 아래 소스를 실행하면 0.2 배율 스케일의 동영상 화면이 정지된 채로 실행되고 클릭시 회전하며 원래 비율로 커지고 실행되는 프로그램이다.

Main.fx

/*
* Main.fx
*
* Created on 2008. 11. 8, 오후 1:29:49
*/

package simplemovie;

import javafx.ext.swing.*;
import javafx.scene.*;
import javafx.scene.media.*;
import javafx.scene.effect.*;
import javafx.scene.paint.Color;

/**
* @author eclips
*/
SwingFrame {
title: "Movie Player"
width: 800
height: 600
closeAction: function() {
java.lang.System.exit( 0 );
}
visible: true

menus: [ ]

content: Canvas {
width:800
height:600
background: Color.WHITE
content: [
MediaViewNode {
// {__DIR__}은 클래스 파일이 있는 디렉토리이다
mediaURL: "{__DIR__}Nobody.avi"
viewX: 10
viewY: 10
}
]
}
}


MediaViewNode.fx

/*
* MediaViewNode.fx
*
* Created on 2008. 11. 8, 오후 6:48:47
*/

package simplemovie;

/**
* @author eclips
*/

import java.lang.System;

import javafx.scene.CustomNode;
import javafx.scene.*;
import javafx.input.*;
import javafx.scene.media.*;
import javafx.scene.effect.*;
import javafx.scene.paint.Color;
import javafx.scene.geometry.*;
import javafx.scene.transform.*;
import javafx.animation.Timeline;
import javafx.animation.KeyFrame;
import javafx.animation.Interpolator;

public class MediaViewNode extends CustomNode {
/**
* 동영상 화면의 X Sacle
*/
public attribute viewScaleX:Number = 0.2;

/**
* 동영상 화면의 Y Scale
*/
public attribute viewScaleY:Number = 0.2;

/**
* MediaViewNode의 회전 반경
*/
public attribute rotation:Number = 0.0;

public attribute viewX:Number = 50;
public attribute viewY:Number = 40;

/**
* 현재 활성화 여부
*/
private attribute actived:Boolean = false;
/**
* 현재 Animation 중인지 여부
*/
private attribute moving:Boolean = false;

private attribute media:Media;
private attribute mediaView:MediaView;

private attribute strokeColor:Color = Color.DARKGRAY;

// 동영상 미디어 객체 URL
public attribute mediaURL:String on replace {
media = Media {
source: mediaURL
};
}

// Media Player 객체
private attribute player =
MediaPlayer {
media: media,
autoPlay: false
}


private attribute choiceTimeLine =
Timeline {
keyFrames : [
KeyFrame {
time: 0ms
values: [
viewScaleX => 0.2,
viewScaleY => 0.2,
viewX => 10,
viewY => 10,
rotation => 0.0,
moving => true
]
},
KeyFrame {
time : 500ms
values: [
viewScaleX => 1.0 tween Interpolator.LINEAR,
viewScaleY => 1.0 tween Interpolator.LINEAR,
viewX => 40 tween Interpolator.LINEAR,
viewY => 40 tween Interpolator.LINEAR,
rotation => 360 tween Interpolator.LINEAR,
moving => false
]
action: function():Void {
player.play();
mediaView.toFront();
actived = true;
}
}
]
};

private attribute unchoiceTimeLine =
Timeline {
keyFrames : [
KeyFrame {
time: 0ms
values: [
viewScaleX => 1.0,
viewScaleY => 1.0,
viewX => 40,
viewY => 40,
rotation => 360,
moving => true
]
},
KeyFrame {
time : 500ms
values: [
viewScaleX => 0.2 tween Interpolator.LINEAR,
viewScaleY => 0.2 tween Interpolator.LINEAR,
viewX => 10 tween Interpolator.LINEAR,
viewY => 10 tween Interpolator.LINEAR,
rotation => 0.0 tween Interpolator.LINEAR,
moving => false
]
action: function():Void {
player.pause();
mediaView.toBack();
actived = false;
}
}
]
};

public function create():Node {
Group {
content: [
this.mediaView = MediaView {
mediaPlayer: player
scaleX: bind viewScaleX
scaleY: bind viewScaleY
translateX: bind viewX
translateY: bind viewY
transform: bind [Transform.rotate(rotation,200,150)]

onMouseEntered:
function(me:MouseEvent):Void {
strokeColor = Color.BLACK
}
onMouseExited:
function(me:MouseEvent):Void {
strokeColor = Color.DARKGRAY
}
onMouseClicked:
function(me:MouseEvent):Void {
System.out.println("clicked => " + actived);
if(moving == false) {
if(actived) {
unchoiceTimeLine.start();
System.out.println("inactive - " + viewScaleX);
}
else {
choiceTimeLine.start();
System.out.println("active - " + viewScaleX);
}
}
}
},
Rectangle {
width: 708
height: 472
scaleX: bind viewScaleX
scaleY: bind viewScaleY
translateX: bind viewX
translateY: bind viewY
stroke: strokeColor
strokeWidth: 10
transform: bind [Transform.rotate(rotation,200,150)]

onMouseEntered:
function(me:MouseEvent):Void {
strokeColor = Color.BLACK
}
onMouseExited:
function(me:MouseEvent):Void {
strokeColor = Color.DARKGRAY
}
}
]
}
}
}


실행 결과
사용자 삽입 이미지
그림3. 실행 결과
 

Clip을 클릭하면 해당 동영상 클립이 회전하면서 1:1 스케일로 커지면서 동영상이 실행된다.
 
사용자 삽입 이미지
그림4. 실행 결과


아쉬운 것들
-JavaFX Document의 부실함

작업을 위해 다운 받아 펼쳐본 Document는 한마디로 부실함이었다. 물론 아직 초기 버전이라 그런 것이라 생각되지만 현재의 Document는 그냥 어떤 것이 있다는 것을 설명하기 위해 만들어 놓은 수준이라고 봐야 할 것 같다. JDK SE 버전의 Document에 비하면 정말 완성도가 떨어졌다.
-NetBeans JavaFX plugin
미디어 이름에 한글이 들어가거나 공백이 있을 경우 실행시 에러가 발생
실시간으로 코딩시 에러 내용이 표시되는데 간혹 이런 에러 내용이 잘못 표시되는 문제
미디어의 이름을 바꿀 경우 간혹 미디어 적용이 안되 Rebuild 해야하는 불편함
소스에서 사용되는 클래스에 대해 자동으로 import 되지 않는 불편함
 
이런 문제들은 앞으로 JavaFX 1.0 정식 버전이 나오고 plugin이 업그레이드 되면서 점점 좋아질 것이라고 생각하지만 아직까지는 약간의 불편함을 감수하고 개발해야 한다.

JavaFX로 간단한 동영상 실행 Application을 만들면서 어떻게 이렇게 간단할 수 있지? 하는 생각이 들었다. 이해하기 쉬운 코드 몇 줄로 꽤 대단한 애니메이션 효과를 줄 수 있었고 동영상 플레이도 코드 몇 줄로 끝났다. 자바 Application으로 만들려 했으면 엄청난 소스 코드 속에서 헤메야 간신히 나올만한 프로그램을 JavaFX의 스크립트 몇 줄이 해낸것이다. 물론 이런 힘이 JavaFX 에만 있는 것이 아니다. JavaFX가 경쟁하고 있는 Flex나 Silverlight도 비슷한 수준으로 지원하고 있거나 더 월등히 앞선 기능과 툴을 지원하고 있기도 하다. 지금 현재도 간단한 Application은 만들기 너무 쉽지만 정식 버전이 나올 시점이 되면 지금보다 모든 면에서 더욱 편하고 강력해져야 할 거라고 생각한다. 위쪽에서 지적한대로 Document도 현재 JDK 만큼 완성도가 높아져야 하며 IDE의 발전과 JavaFX가 적용될 수 있는 Platform도 더욱 넓어진다면 다양한 분야에서 JavaFX 가 활약하는 것을 볼 수 있을거라 생각한다.

참조사이트
http://www.javapassion.com/javafx/
http://www.javafx.com
http://java.sun.com/javafx/index.jsp
http://openjfx.dev.java.net


글쓴이에 대해..


양사열

현재 JCO 부회장이며 프리랜서를 하고 있다. 주로 웹 프로젝트와 Database 동기화 솔루션을 개발했으며RIA 쪽에 관심을 갖고 있다. 10년째 개발자로 살면서 앞으로 남은 몇십년도 개발자로 살고 싶은 욕심을 갖고 있다.

반응형


이클립스를 에서 BUILD_PATH를 변경해서 사용하자.

- 왜?   자바 API 코드를 보고 싶으니까..

그리고 Java API Docs(도움말) 설정하는 방법도 알아보도록 하자.

-왜? 도움말을 한글 도움말로 설정도 할수 있고 외부라이브러리 도움말도 볼수 있게 할수 있으니까.

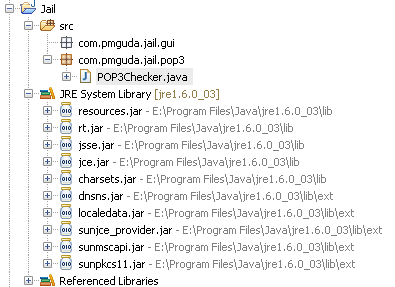
일단 설정을 위해 이클립스 프로젝트 구조를 보도록 하자.


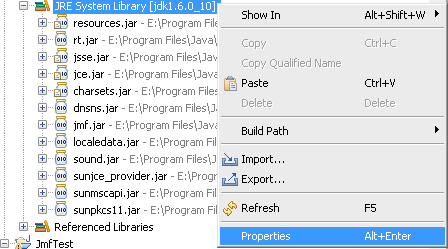
일단 설정을 위해 주의깊게 봐야할 것은 JRE System Libray[jre1.6.0_03] 이부분이다.

일단 어느 부분때문에 설정을 하면 더 편리한지 이유나 알아보고 설정하자.


왼쪽은 Declaration 뷰의 모습이고 오른쪽에 떠있는 것은 Java API Docs (이하 도움말이라 칭하자) 의

출력 상태를 보여준것이다.

기본적으로 Java 에서 지원하는 클래스의 메소드의 도움말은 영문 도움말이 뜰것이고 Declaration은 볼수가 없다.

아.. 굳이 내가 영어가 약하기 때문에 한글로 된 도움말이 필요한게 아니다. ㅡㅡ;

단지 도움말이 한글로 떳으면 바랄 뿐이고 자바의 클래스나 메소드의 소스 코드를 볼수 있길 바랄 뿐이다.

원하는 메소드를 클릭하고 F3 을 눌러 소스코드를 한번 보라..

소스코드 대신 다른 것이 나온다. 소스코드를 찾을수 없다는 것이다.

소스코드를 보기 위해서는 먼저 플러그인을 추가해 줘야 한다.


방법1. 플러그인 추가.

<자바디컴파일러 추가부분 09년 1월 6일 >

http://www.pmguda.com/276 (Jad Decompiler 사용법)

이클립스 디컴파일러인 JAD를 설치하는 방법입니다.

이클립스로 개발을하다보면 F3버튼으로 열심히 따라가는 경우가생깁니다.

그러다 라이브러리로 묶여있는 클래스파일들을 로딩하게되면 읽긴읽되 내용을 분석하지못하죠~

그래서 디컴파일러 ~ 컴파일한클래스파일을 다시 자바파일로 보여주는 도구를 설치하게되면

클래스파일도 자바파일처럼 열수있게됩니다^^~

우선 jad.exe, jadclipse_3.1.0.jar를 다운로드 합니다.

jad.exe파일은 이클립스 폴더에 jadclipse_3.1.0.jar파일은 플러그인 폴더에 카피합니다.

window->preference->general->editors->file assosiationsd에서 *.class선택후

하단의 JadClipse Class File Viewr 를 선택후 default 를 선택합니다.

window->preference->java->JadClipse를 선택한후 ignore existing source를 체크해줍니다.

이렇게하시고 이클립스를 실행시키시면 *.class파일을 찾아갈경우 자동으로 디컴파일해줍니다~

http://sourceforge.net/projects/jadclipse

</자바디컴파일러>

방법2. JDK 설정

JRE System Libray[jre1.6.0_03] 이부분 문제인 것이다. JRE에는 소스코드가 포함되어 있지 않기 때문

Java Runtime Environment  이기 때문에 실행만을 위한 것이기 때문이다.

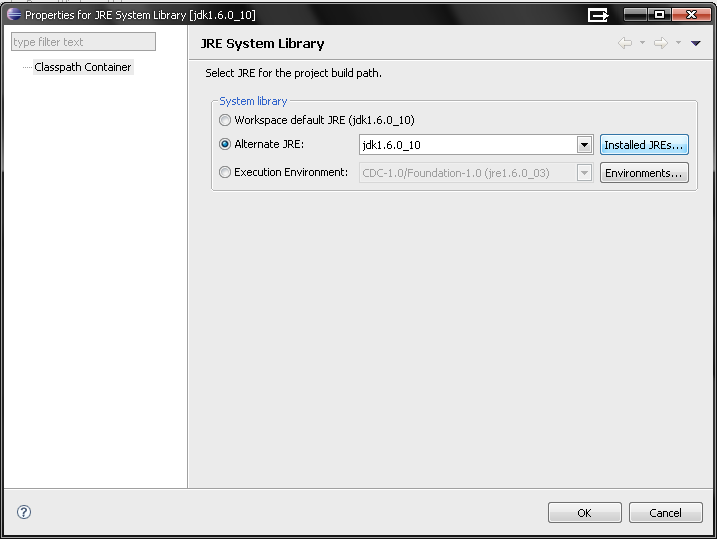
build path 를 JRE 가 아닌 JDK로 바꿔주면 된다. JRE 와 JDK 의 차이는 모두다 알고 있을꺼라 생각한다.^^

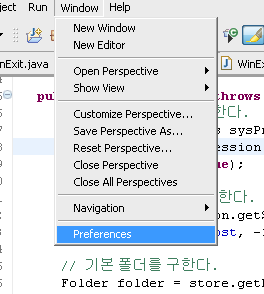
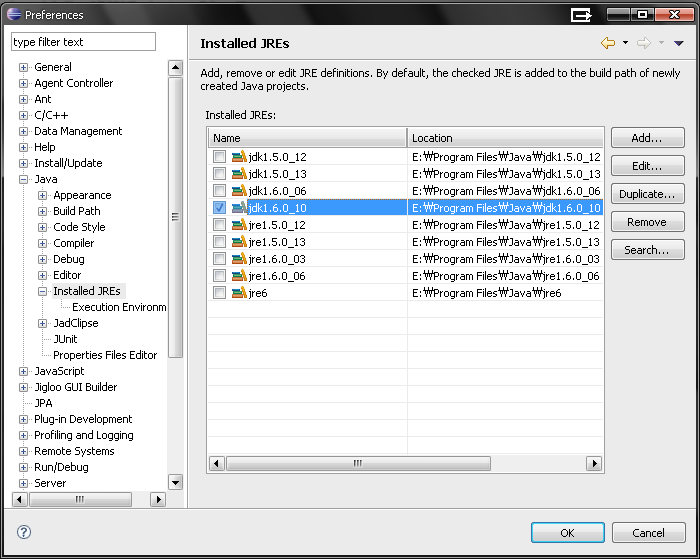
메뉴 항목에서 Window -> Preferences 를 선택한다.


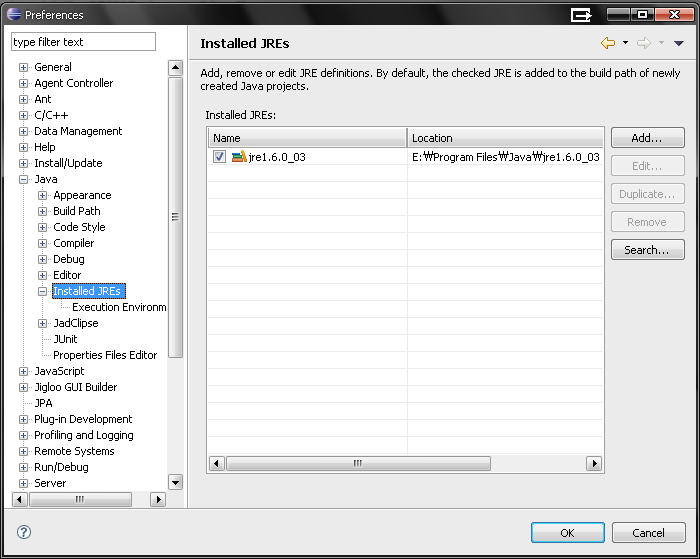
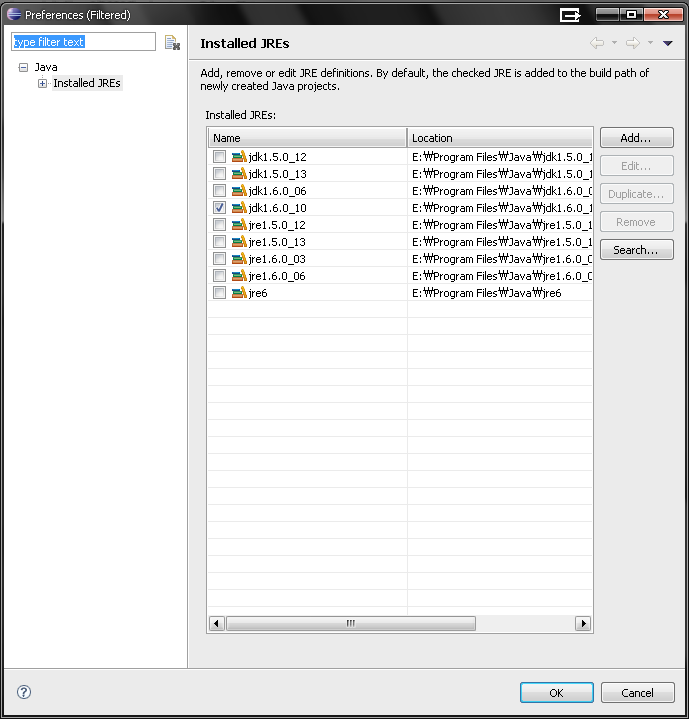
Java -> Installed JREs

이클립스에서 인식하고 있는 JRE 목록이 출력된다.

나는 각 버전별로 설치가 되어있지만 나타나지 않는군.. Search로 찾아보자.

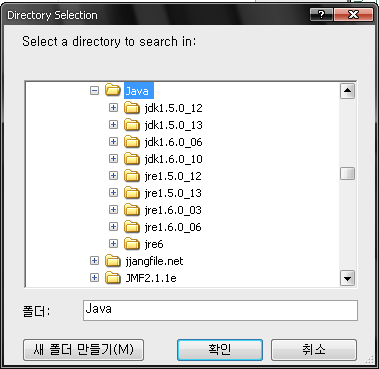
Java 가 설치된 경로를 찾아 지정해 준다.  그러면 지정한 위치에서 설치된 Java 목록을 추가해서 보여준다.


다 검색되서 나온다.. 여기서 JDK 버전을 원하는 것으로 선택하고 OK 하면 된다.

일단 여기까지가 F3키를 누르거나 Declaration 뷰를 통해서 소스코드를 볼수 있게 하는 설정방법이다.

이렇게 해도 소스코드가 보이지 않는다 하면 설정부분을 또 확인해 보자.


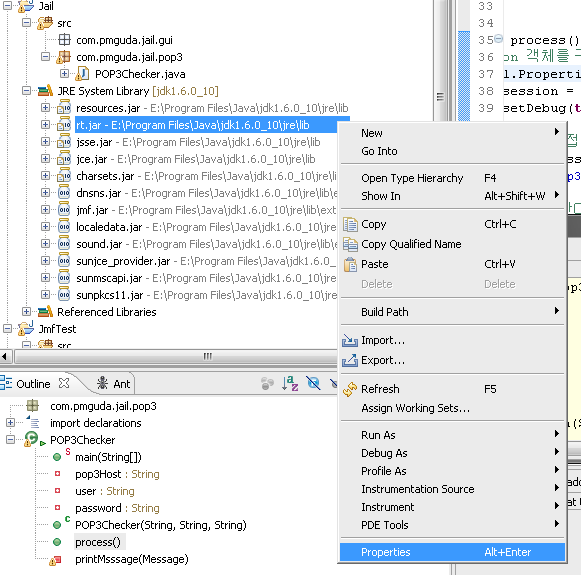
Explorer -> JRE System Libray -> rt.jar -> 마우스 오른쪽 클릭 -> Properties 선택

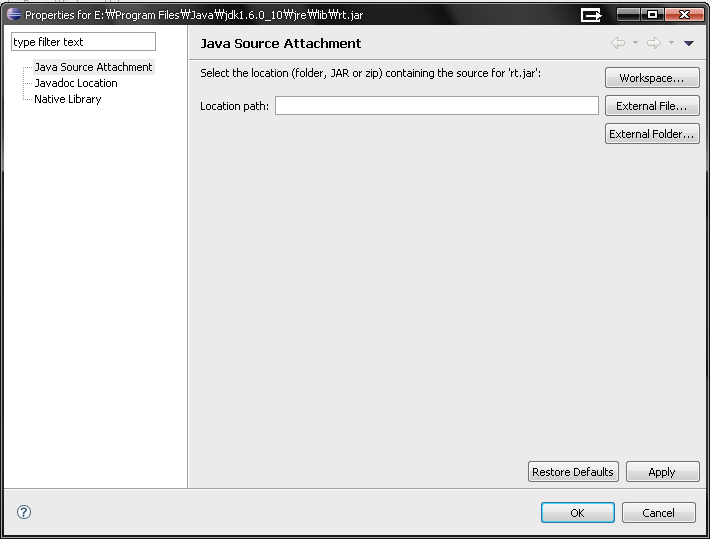
Location path에 설정한 JDK디렉토리에 가보면 src.zip 이라고 압축되어져 있는 소스 파일이 있다.

설정하도록 하자 기본적으로 PATH는 아래와 같다.

ex) C:\Program Files\Java\jdk1.6.0_10\src.zip  <-- 이런식으로 설정해주면 소스 내용을 볼수 있다. 

방법1은 라이브러리에 포함된 클래스 파일을 디컴파일해 보여주는 것이고
방법2는 JDK에 포함된 소스 코드를 보여주는 것이다. 

이젠 도움말이 한글로 뜨길 바랄 뿐이고.. ㅎㅎ 시작해보자.

이것 또한 Package Explorer(탐색창) 에 있는 JRE System Libray 를 보도록 하자.

JRE System Libray 옆 + 아이콘을 클릭하면 jar 파일들의 목록이 나온다.

여기서 rt.jar  runtime java를 나타내는 즉 jvm이 돌아갈 때 기본적인 자바 api를 담고 있는 파일이다.

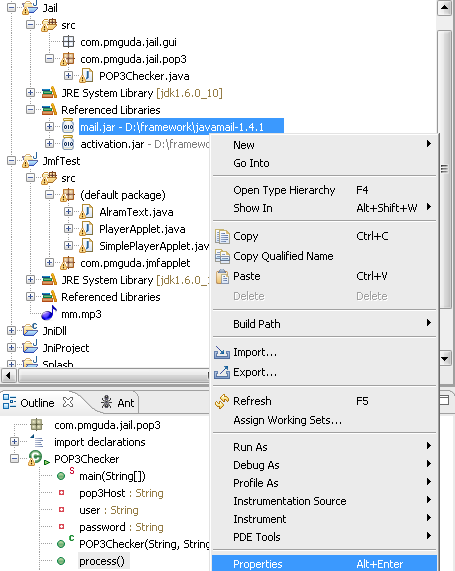
Package Explorer -> JRE System Libray -> rt.jar -> 마우스 오른쪽 클릭 -> Properties 선택

Location path를 지워준다.
이런 이걸 지우면 Declaration 뷰에서 소스 코드가 보이지 않는다.
(방법1 플러그인 설치시) F3 을 이용하면 볼수 있으니 도움말을 한글로 보기 위해서 과감히 지워주도록 하자.


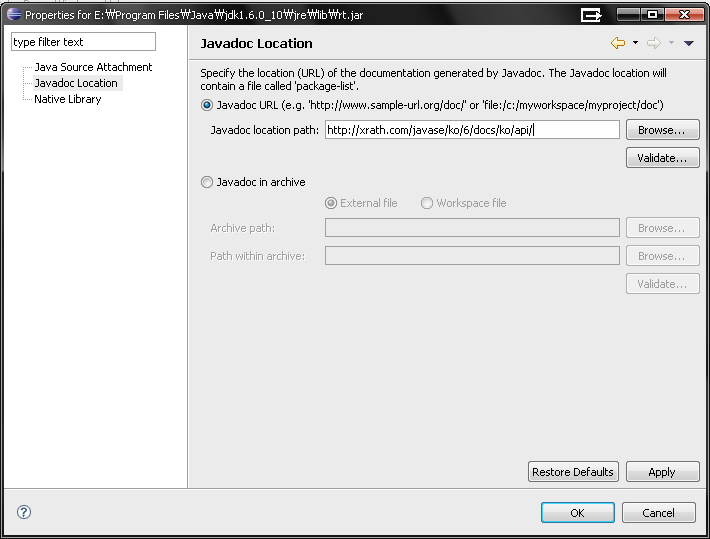
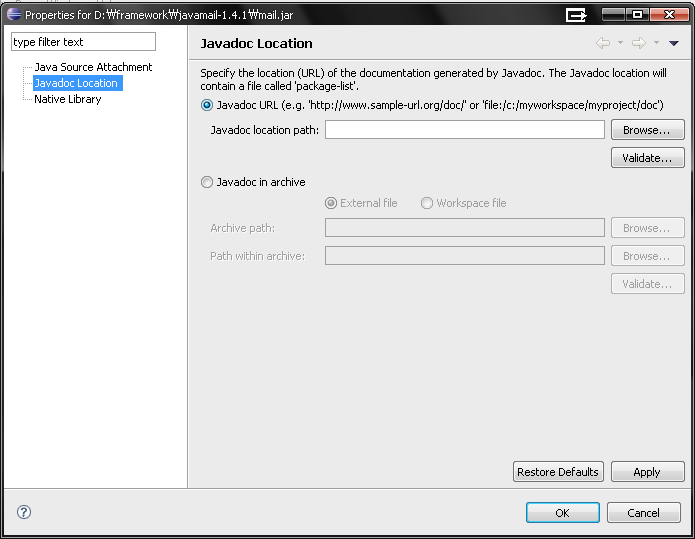
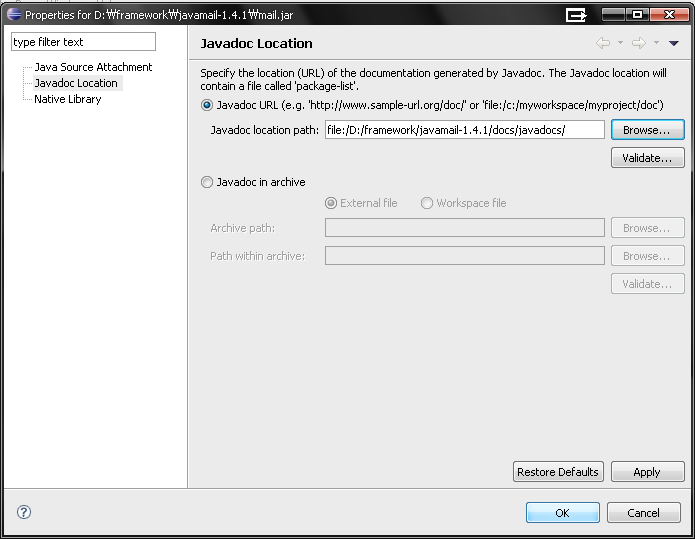
그리고 Javadoc Location 에 한글 api 경로를 입력해주자.
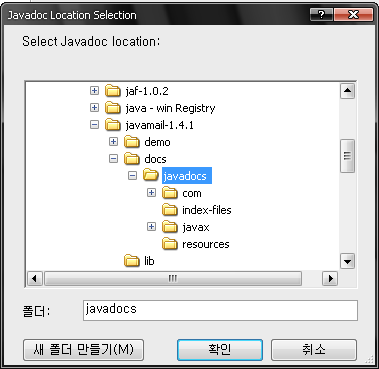
한글API가 파일시스템에 있다면 파일시스템의 경로를 입력하고 없다면 웹주소를 입력해주도록 하자.
(내가 사용하는 한글API URL이다. http://xrath.com/javase/ko/6/docs/ko/api/ )

JRE System Libray 설정은 위에서 하는 방법 외에도 프로젝트 단위로 설정할수도 있다.

이 부분은 앞에서 설명한 것과 유사하니 스샷만으로 감을 잡을수 있으리라 생각한다.

그리고 도움말 부분도 좀 더 응용하면 외부 라이브러리를 포함한 도움말도 Java Docs 경로를 설정하면 ㅎㅎ

해당 외부라이브러리의 JavaDoc Location 을 설정하자.


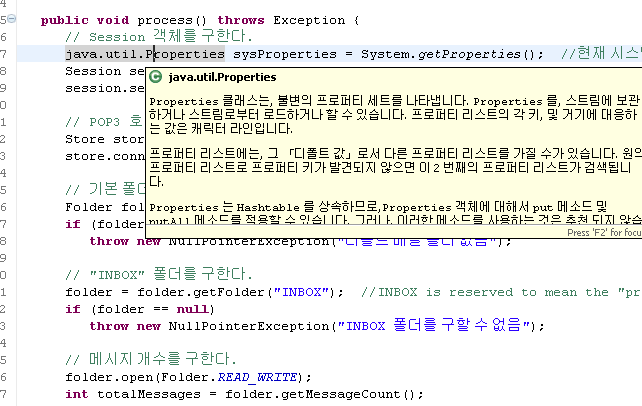
이제 이클립스 설정을 통해 더 편리해진 이클립스에서 Java 소스 코드와 도움말을 체험해 보도록 하자.

앞에서 설정했던 도움말 한글로 뜬다..떠 ㅋㅋ ^^;; 

F3키를 누르면 새로운 창이뜨고 Java 소스가 보인다 보여.. ㅎㅎ  열공되겠넹.. ㅎㅎ


이렇게 해서 이클립스에서 자바 API 도움말을 한글로 볼수 있게 하는 방법과
 
자바 API 소스를 볼수 있게 되었다.

정리를 해보자면 Explorer -> JRE System Libray -> rt.jar -> 마우스 오른쪽 클릭 -> Properties 에서

Java Source Attachment 항목에  src.zip 경로설정하면 자바소스를 볼수가 있고

Javadoc Location 항목에서는 자바 API 문서에 대한 설정을 할수 있다.

여기서 유의 할것은 한글 api 문서를 보기 위해서는 Java Source Attachment  항목을 공백으로 해야 된다는 것이다.

양자택일을 해야 한다는 말이 되는것이다. 소스를 볼수 있게 하던지 아니면 한글 API를 보던지...

둘다 택한다면 디컴파일러를 활용하는 방법1을 사용하도록 하자.

외부 라이브러리의 API 도움말도 설정 할수 있다는 것을 알게 되었으니 아주 편리하게 사용할 수 있다는것 ㅎㅎ

스샷을 남발하느라..글이 길어지고.. 장황해지고 .. 또 글재주가 없다보니 참 도움이 될런지 ㅠㅠ.

<참고 : http://byeonely.tistory.com/entry/이클립스에서-Java-API-Docs-도움말-한글화 , http://blog.kfmes.com/207 >

반응형

반응형

Java Swing Events

Events are an important part in any GUI program. All GUI applications are event-driven. An application reacts to different event types which are generated during it's life. Events are generated mainly by the user of an application. But they can be generated by other means as well. e.g. internet connection, window manager, timer. In the event model, there are three participants:

  • event source
  • event object
  • event listener

The Event source is the object whose state changes. It generates Events. The Event object (Event) encapsulates the state changes in the event source. The Event listener is the object that wants to be notified. Event source object delegates the task of handling an event to the event listener.

Event handling in Java Swing toolkit is very powerful and flexible. Java uses Event Delegation Model. We specify the objects that are to be notified when a specific event occurs.

An event object

When something happens in the application, an event object is created. For example, when we click on the button or select an item from list. There are several types of events. An ActionEvent, TextEvent, FocusEvent, ComponentEvent etc. Each of them is created under specific conditions.

Event object has information about an event, that has happened. In the next example, we will analyze an ActionEvent in more detail.

import java.awt.event.ActionEvent;
import java.awt.event.ActionListener;

import java.text.DateFormat;

import java.util.Calendar;
import java.util.Date;
import java.util.Locale;

import javax.swing.DefaultListModel;
import javax.swing.JButton;
import javax.swing.JFrame;
import javax.swing.JList;
import javax.swing.JPanel;


public class EventObject extends JFrame {


    private JList list;
    private DefaultListModel model;

    public EventObject() {

        setTitle("Event Object");

        JPanel panel = new JPanel();
        panel.setLayout(null);

        model = new DefaultListModel();
        list = new JList(model);
        list.setBounds(150, 30, 220, 150);

        JButton ok = new JButton("Ok");
        ok.setBounds(30, 35, 80, 25);

        ok.addActionListener(new ActionListener() {
            public void actionPerformed(ActionEvent event) {

                Calendar cal = Calendar.getInstance();
                cal.setTimeInMillis(event.getWhen());
                Locale locale = Locale.getDefault();
                Date date = new Date();
                String s = DateFormat.getTimeInstance(DateFormat.SHORT,
                    locale).format(date);

                if ( !model.isEmpty() )
                    model.clear();

                if (event.getID() == ActionEvent.ACTION_PERFORMED)
                    model.addElement(" Event Id: ACTION_PERFORMED");

                model.addElement(" Time: " + s);

                String source = event.getSource().getClass().getName();
                model.addElement(" Source: " + source);

                int mod = event.getModifiers();

                StringBuffer buffer = new StringBuffer(" Modifiers: ");

                if ((mod & ActionEvent.ALT_MASK) > 0)
                    buffer.append("Alt ");

                if ((mod & ActionEvent.SHIFT_MASK) > 0)
                    buffer.append("Shift ");

                if ((mod & ActionEvent.META_MASK) > 0)
                    buffer.append("Meta ");

                if ((mod & ActionEvent.CTRL_MASK) > 0)
                    buffer.append("Ctrl ");

                model.addElement(buffer);
            }
        });

        panel.add(ok);
        panel.add(list);
        add(panel);

        setSize(420, 250);
        setLocationRelativeTo(null);
        setDefaultCloseOperation(EXIT_ON_CLOSE);
        setVisible(true);
    }

    public static void main(String[] args) {
        new EventObject();
    }
}

The code example shows a button and a list. If we click on the button, information about the event is displayed in the list. In our case, we are talking about an ActionEvent class. The data will be the time, when the event occured, the id of the event, the event source and the modifier keys.

 public void actionPerformed(ActionEvent event) {

Inside the action listener, we have an event parameter. It is the instance of the event, that has occured. In our case it is an ActionEvent.

 cal.setTimeInMillis(event.getWhen());

Here we get the time, when the event occured. The method returns time value in milliseconds. So we must format it appropriately.

 String source = event.getSource().getClass().getName();
 model.addElement(" Source: " + source);

Here we add the name of the source of the event to the list. In our case the source is a JButton.

 int mod = event.getModifiers();

We get the modifier keys. It is a bitwise-or of the modifier constants.

 if ((mod & ActionEvent.SHIFT_MASK) > 0)
     buffer.append("Shift ");

Here we determine, whether we have pressed a Shift key.


Event Object
Figure: Event Object

Implementation

There are several ways, how we can implement event handling in Java Swing toolkit.

  • Anonymous inner class
  • Inner class
  • Derived class

Anonymous inner class

We will illustrate these concepts on a simple event example.

import java.awt.event.ActionEvent;
import java.awt.event.ActionListener;

import javax.swing.JButton;
import javax.swing.JFrame;
import javax.swing.JPanel;


public class SimpleEvent extends JFrame {


    public SimpleEvent() {

        setTitle("Simle Event");

        JPanel panel = new JPanel();
        panel.setLayout(null);

        JButton close = new JButton("Close");
        close.setBounds(40, 50, 80, 25);

        close.addActionListener(new ActionListener() {
            public void actionPerformed(ActionEvent event) {
                System.exit(0);
            }

        });

        panel.add(close);
        add(panel);

        setSize(300, 200);
        setLocationRelativeTo(null);
        setDefaultCloseOperation(EXIT_ON_CLOSE);
        setVisible(true);
    }

    public static void main(String[] args) {
        new SimpleEvent();
    }
}

In this example, we have a button that closes the window upon clicking.

 JButton close = new JButton("Close");

The button is the event source. It will generate events.

 close.addActionListener(new ActionListener() {
     public void actionPerformed(ActionEvent event) {
         System.exit(0);
     }
 });

Here we register an action listener with the button. This way, the events are sent to the event target. The event target in our case is ActionListener class. In this code, we use an anonymous inner class.

Inner class

Here we implement the example using an inner ActionListener class.

import java.awt.event.ActionEvent;
import java.awt.event.ActionListener;

import javax.swing.JButton;
import javax.swing.JFrame;
import javax.swing.JPanel;


public class InnerClass extends JFrame {

    public InnerClass() {

        setTitle("Using inner class");

        JPanel panel = new JPanel();
        panel.setLayout(null);

        JButton close = new JButton("Close");
        close.setBounds(40, 50, 80, 25);

        ButtonListener listener = new ButtonListener();
        close.addActionListener(listener); 

        panel.add(close);
        add(panel);

        setSize(300, 200);
        setLocationRelativeTo(null);
        setDefaultCloseOperation(EXIT_ON_CLOSE);
        setVisible(true);
    }

    class ButtonListener implements ActionListener {
        public void actionPerformed(ActionEvent e)
        {
            System.exit(0);
        }
      }

    public static void main(String[] args) {
        new InnerClass();
    }
}
 ButtonListener listener = new ButtonListener();
 close.addActionListener(listener); 

Here we have a non anonymous inner class.

 class ButtonListener implements ActionListener {
    public void actionPerformed(ActionEvent e)
    {
        System.exit(0);
    }
 }

The button listener is defined here.

A derived class implementing the listener

The following example will derive a class from a component and implement an action listener inside the class.

import java.awt.event.ActionEvent;
import java.awt.event.ActionListener;

import javax.swing.JButton;
import javax.swing.JFrame;
import javax.swing.JPanel;


public class UsingInterface extends JFrame {


    public UsingInterface() {

        setTitle("Using inner class");

        JPanel panel = new JPanel();
        panel.setLayout(null);

        MyButton close = new MyButton("Close");
        close.setBounds(40, 50, 80, 25);

        panel.add(close);
        add(panel);

        setSize(300, 200);
        setLocationRelativeTo(null);
        setDefaultCloseOperation(EXIT_ON_CLOSE);
        setVisible(true);
    }

    class MyButton extends JButton implements ActionListener {

        public MyButton(String text) {
            super.setText(text);
            addActionListener(this);
        }

        public void actionPerformed(ActionEvent e)
        {
            System.exit(0);
        }

    }

    public static void main(String[] args) {
        new UsingInterface();
    }
}

In this example, we create a MyButton class, which will implement the action listener.

 MyButton close = new MyButton("Close");

Here we create the MyButton custom class.

 class MyButton extends JButton implements ActionListener {

The MyButton class is extended from the JButton class. It implements the ActionListener interface. This way, the event handling is managed within the MyButton class.

 addActionListener(this);

Here we add the action listener to the MyButton class.

Multiple sources

A listener can be plugged into several sources. This will be explained in the next example.

import java.awt.BorderLayout;
import java.awt.event.ActionEvent;
import java.awt.event.ActionListener;

import javax.swing.BorderFactory;
import javax.swing.JButton;
import javax.swing.JFrame;
import javax.swing.JLabel;
import javax.swing.JPanel;
import javax.swing.border.EtchedBorder;


public class MultipleSources extends JFrame {

    JLabel statusbar;

    public MultipleSources() {

        setTitle("Multiple Sources");
        JPanel panel = new JPanel();
        statusbar = new JLabel(" ZetCode");

        statusbar.setBorder(BorderFactory.createEtchedBorder(
                EtchedBorder.RAISED));

        panel.setLayout(null);

        JButton close = new JButton("Close");
        close.setBounds(40, 30, 80, 25);
        close.addActionListener(new ButtonListener());

        JButton open = new JButton("Open");
        open.setBounds(40, 80, 80, 25);
        open.addActionListener(new ButtonListener());

        JButton find = new JButton("Find");
        find.setBounds(40, 130, 80, 25);
        find.addActionListener(new ButtonListener());

        JButton save = new JButton("Save");
        save.setBounds(40, 180, 80, 25);
        save.addActionListener(new ButtonListener());

        panel.add(close);
        panel.add(open);
        panel.add(find);
        panel.add(save);

        add(panel);
        add(statusbar, BorderLayout.SOUTH);

        setSize(400, 300);
        setLocationRelativeTo(null);
        setDefaultCloseOperation(EXIT_ON_CLOSE);
        setVisible(true);
    }

    class ButtonListener implements ActionListener {
        public void actionPerformed(ActionEvent e)
        {
            JButton o = (JButton) e.getSource();
            String label = o.getText();
            statusbar.setText(" " + label + " button clicked");
        }
      }


    public static void main(String[] args) {
        new MultipleSources();
    }
}

We create four buttons and a statusbar. The statusbar will display an informative message upon clicking on the button.

 close.addActionListener(new ButtonListener());
 ...
 open.addActionListener(new ButtonListener());
 ...

Each button will be registered against a ButtonListener class.

 JButton o = (JButton) e.getSource();
 String label = o.getText();

Here we determine, which button was pressed.

 statusbar.setText(" " + label + " button clicked")

We update the statusbar.


Multiple Sources
Figure: Multiple Sources

Multiple listeners

We can register several listeners for one event.

import java.awt.BorderLayout;
import java.awt.event.ActionEvent;
import java.awt.event.ActionListener;

import java.util.Calendar;

import javax.swing.BorderFactory;
import javax.swing.JButton;
import javax.swing.JFrame;
import javax.swing.JLabel;
import javax.swing.JPanel;
import javax.swing.JSpinner;
import javax.swing.SpinnerModel;
import javax.swing.SpinnerNumberModel;
import javax.swing.border.EtchedBorder;


public class MultipleListeners extends JFrame {

    private JLabel statusbar;
    private JSpinner spinner;
    private static int count = 0;

    public MultipleListeners() {

        setTitle("Multiple Listeners");
        JPanel panel = new JPanel();
        statusbar = new JLabel("0");

        statusbar.setBorder(BorderFactory.createEtchedBorder(
                EtchedBorder.RAISED));

        panel.setLayout(null);

        JButton add = new JButton("+");
        add.setBounds(40, 30, 80, 25);
        add.addActionListener(new ButtonListener1());
        add.addActionListener(new ButtonListener2());

        Calendar calendar = Calendar.getInstance();
        int currentYear = calendar.get(Calendar.YEAR);

        SpinnerModel yearModel = new SpinnerNumberModel(currentYear,
                                       currentYear - 100,
                                       currentYear + 100,
                                       1);

        spinner = new JSpinner(yearModel);
        spinner.setEditor(new JSpinner.NumberEditor(spinner, "#"));

        spinner.setBounds(190, 30, 80, 25);

        panel.add(add);
        panel.add(spinner);

        add(panel);
        add(statusbar, BorderLayout.SOUTH);

        setSize(300, 200);
        setLocationRelativeTo(null);
        setDefaultCloseOperation(EXIT_ON_CLOSE);
        setVisible(true);
    }

    class ButtonListener1 implements ActionListener {
        public void actionPerformed(ActionEvent e)
        {
            Integer val = (Integer) spinner.getValue();
            spinner.setValue(++val);
        }
      }

    class ButtonListener2 implements ActionListener {
        public void actionPerformed(ActionEvent e)
        {
            statusbar.setText(Integer.toString(++count));
        }
      }


    public static void main(String[] args) {
        new MultipleListeners();
    }
}

In this example, we have a button, spinner and a statusbar. We use two button listeners for one event. One click of a button will add one year to the spinner component and update the statusbar. The statusbar will show, how many times we have clicked on the button.

 add.addActionListener(new ButtonListener1());
 add.addActionListener(new ButtonListener2());

We register two button listeners.

 SpinnerModel yearModel = new SpinnerNumberModel(currentYear,
                              currentYear - 100,
                              currentYear + 100,
                              1);
 spinner = new JSpinner(yearModel);

Here we create the spinner component. We use a year model for the spinner. The SpinnerNumberModel arguments are initial value, min, max values and the step.

 spinner.setEditor(new JSpinner.NumberEditor(spinner, "#"));

We remove the thousands separator.

 Integer val = (Integer) spinner.getValue();
 spinner.setValue(++val);

Here we increase the year number.


Multiple Listeners
Figure: Multiple Listeners

Removing listeners

The Java Swing toolkit enables us to remove the registered listeners.

import java.awt.event.ActionEvent;
import java.awt.event.ActionListener;
import java.awt.event.ItemEvent;
import java.awt.event.ItemListener;

import javax.swing.JButton;
import javax.swing.JCheckBox;
import javax.swing.JFrame;
import javax.swing.JLabel;
import javax.swing.JPanel;


public class RemoveListener extends JFrame {

    private JLabel text;
    private JButton add;
    private JCheckBox active;
    private ButtonListener buttonlistener;
    private static int count = 0;

    public RemoveListener() {

        setTitle("Remove listener");
        JPanel panel = new JPanel();

        panel.setLayout(null);

        add = new JButton("+");
        add.setBounds(40, 30, 80, 25);
        buttonlistener = new ButtonListener();

        active = new JCheckBox("Active listener");
        active.setBounds(160, 30, 140, 25);

        active.addItemListener(new ItemListener() {
            public void itemStateChanged(ItemEvent event) {
                if (active.isSelected()) {
                  add.addActionListener(buttonlistener);}
                else {
                  add.removeActionListener(buttonlistener);
                }
            }
        });

        text = new JLabel("0");
        text.setBounds(40, 80, 80, 25);

        panel.add(add);
        panel.add(active);
        panel.add(text);

        add(panel);

        setSize(310, 200);
        setLocationRelativeTo(null);
        setDefaultCloseOperation(EXIT_ON_CLOSE);
        setVisible(true);
    }

    class ButtonListener implements ActionListener {
        public void actionPerformed(ActionEvent e)
        {
            text.setText(Integer.toString(++count));
        }
      }

    public static void main(String[] args) {
        new RemoveListener();
    }
}

We have three components on the panel. A button, check box and a label. By toggling the check box, we add or remove the listener for a button.

 buttonlistener = new ButtonListener();

We have to create a non anonymous listener, if we want to later remove it. We need a reference to it.

 if (active.isSelected()) {
     add.addActionListener(buttonlistener);}
 else {
     add.removeActionListener(buttonlistener);
 }

We determine, whether the check box is selected. Then we add or remove the listener.


Remove listener
Figure: Remove listener

Moving a window

The following example will look for a position of a window on the screen.

import java.awt.Font;
import java.awt.event.ComponentEvent;
import java.awt.event.ComponentListener;

import javax.swing.JFrame;
import javax.swing.JLabel;
import javax.swing.JPanel;


public class MovingWindow extends JFrame implements ComponentListener {

    private JLabel labelx;
    private JLabel labely;

    public MovingWindow() {

        setTitle("Moving window");

        JPanel panel = new JPanel();
        panel.setLayout(null);

        labelx = new JLabel("x: ");
        labelx.setFont(new Font("Serif", Font.BOLD, 14));
        labelx.setBounds(20, 20, 60, 25);

        labely = new JLabel("y: ");
        labely.setFont(new Font("Serif", Font.BOLD, 14));
        labely.setBounds(20, 45, 60, 25);

        panel.add(labelx);
        panel.add(labely);

        add(panel);

        addComponentListener(this);

        setSize(310, 200);
        setLocationRelativeTo(null);
        setDefaultCloseOperation(EXIT_ON_CLOSE);
        setVisible(true);
    }

    public void componentResized(ComponentEvent e) {
    }

    public void componentMoved(ComponentEvent e) {
        int x = e.getComponent().getX();
        int y = e.getComponent().getY();
        labelx.setText("x: " + x);
        labely.setText("y: " + y);
    }

    public void componentShown(ComponentEvent e) {
    }

    public void componentHidden(ComponentEvent e) {
    }


    public static void main(String[] args) {
        new MovingWindow();
    }
}

The example shows the current window coordinates on the panel. To get the window position, we use the ComponentListener

 labelx.setFont(new Font("Serif", Font.BOLD, 14));

We make the font bigger, the default one is a bit small.

 int x = e.getComponent().getX();
 int y = e.getComponent().getY();

Here we get the x and the y positions.

Notice, that we have to implement all four methods, that are available in the ComponentListener. Even, if we do not use them.


Moving a window
Figure: Moving a window

Adapters

Adapters are convenient classes. In the previous code example, we had to implement all four methods of a ComponentListener class. Even if we did not use them. To avoid unnecessary coding, we can use adapters. Adapter is a class that implements all necessary methods. They are empty. We then use only those methods, that we actually need. There is no adapter for a button click event. Because there we have only one method to implement. The actionPerformed() method. We can use adapters in situations, where we have more than one method to implement.

The following example is a rewrite of the previous one, using a ComponentAdapter.

import java.awt.Font;
import java.awt.event.ComponentAdapter;
import java.awt.event.ComponentEvent;

import javax.swing.JFrame;
import javax.swing.JLabel;
import javax.swing.JPanel;


public class Adapter extends JFrame {

    private JLabel labelx;
    private JLabel labely;

    public Adapter() {

        setTitle("Adapter");

        JPanel panel = new JPanel();
        panel.setLayout(null);

        labelx = new JLabel("x: ");
        labelx.setFont(new Font("Serif", Font.BOLD, 14));
        labelx.setBounds(20, 20, 60, 25);

        labely = new JLabel("y: ");
        labely.setFont(new Font("Serif", Font.BOLD, 14));
        labely.setBounds(20, 45, 60, 25);


        panel.add(labelx);
        panel.add(labely);

        add(panel);
        addComponentListener(new MoveAdapter());

        setSize(310, 200);
        setLocationRelativeTo(null);
        setDefaultCloseOperation(EXIT_ON_CLOSE);
        setVisible(true);
    }


    class MoveAdapter extends ComponentAdapter {
      public void componentMoved(ComponentEvent e) {
          int x = e.getComponent().getX();
          int y = e.getComponent().getY();
          labelx.setText("x: " + x);
          labely.setText("y: " + y);
      }
     }

    public static void main(String[] args) {
        new Adapter();
    }
}

This example is a rewrite of the previous one. Here we use the ComponentAdapter.

 addComponentListener(new MoveAdapter());

Here we register the component listener.

 class MoveAdapter extends ComponentAdapter {
     public void componentMoved(ComponentEvent e) {
         int x = e.getComponent().getX();
	 int y = e.getComponent().getY();
	 labelx.setText("x: " + x);
         labely.setText("y: " + y);
     }
 }

Inside the MoveAdapter inner class, we define the componentMoved() method. All the other methods are left empty.
반응형

Substance look and feel - getting started

This document describes the steps to create a sample Swing application and run it under Substance look and feel.

Since Substance requires JDK 6.0 or higher, if you don't have such an installation on your machine, you need to download it from this site and install it. The command-prompt examples below assume that java executable is in the path. This executable is part of JRE (under bin folder) as well as part of JDK (under bin folder). Consult your OS manual on how to add the relevant folder to the path. Alternatively, you can put the entire path to the java executable in the scripts below.

After you have JDK 6.0+ installed on your machine, create the following Walkthrough.java class:

public class Walkthrough extends JFrame {
  public Walkthrough() {
    super("Sample app");
    this.setLayout(new FlowLayout());
    this.add(new JButton("button"));
    this.add(new JCheckBox("check"));
    this.add(new JLabel("label"));

    this.setSize(new Dimension(25080));
    this.setLocationRelativeTo(null);
    this.setDefaultCloseOperation(JFrame.EXIT_ON_CLOSE);
  }

  public static void main(String[] args) {
    JFrame.setDefaultLookAndFeelDecorated(true);

    SwingUtilities.invokeLater(new Runnable() {
      public void run() {
        Walkthrough w = new Walkthrough();
        w.setVisible(true);
      }
    });
  }
}

This is a simple frame (that does nothing) with a button, a checkbox and a label. You can create this class in your favourite IDE or in any text editor. Once this class is created, compile it. If you're using an IDE, consult the IDE help on the compilation process. If you're using a simple text editor, you can compile this class by using:

javac Walktrough.java

If you have problems, consult the online help for javac compiler. The compiled Walkthrough.class will be created in the same folder as your Walkthrough.java. In order to run it, use:

java -cp . Walkthrough

You will see the following frame under the default Ocean look and feel:

In order to run the same frame under Substance look and feel, you first need to choose the Substance skin that you would like to use (see the links at the end of this document). Suppose that you choose the Business skin. Now you have the following options:

  • Start your VM with -Dswing.defaultlaf=org.jvnet.substance.skin.SubstanceBusinessLookAndFeel
  • UIManager.setLookAndFeel(new SubstanceBusinessLookAndFeel())
  • UIManager.setLookAndFeel("org.jvnet.substance.skin.SubstanceBusinessLookAndFeel");

The first option doesn't require any code changes in the application above. Run the following script:

java -Dswing.defaultlaf=org.jvnet.substance.skin.SubstanceBusinessLookAndFeel -cp . Walkthrough

You will see the following exception:

Exception in thread "AWT-EventQueue-0" java.lang.Error: Cannot load org.jvnet.substance.skin.SubstanceBusinessLookAndFeel
	at javax.swing.UIManager.initializeDefaultLAF(UIManager.java:1345)
	at javax.swing.UIManager.initialize(UIManager.java:1432)
	at javax.swing.UIManager.maybeInitialize(UIManager.java:1420)
	at javax.swing.UIManager.getUI(UIManager.java:1007)
	at javax.swing.JPanel.updateUI(JPanel.java:109)
	at javax.swing.JPanel.(JPanel.java:69)
	at javax.swing.JPanel.(JPanel.java:92)
	at javax.swing.JPanel.(JPanel.java:100)
	at javax.swing.JRootPane.createGlassPane(JRootPane.java:527)
	at javax.swing.JRootPane.(JRootPane.java:347)
	at javax.swing.JFrame.createRootPane(JFrame.java:260)
	at javax.swing.JFrame.frameInit(JFrame.java:241)
	at javax.swing.JFrame.(JFrame.java:208)
	at Walkthrough.(Walkthrough.java:10)
	at Walkthrough$1.run(Walkthrough.java:25)
	at java.awt.event.InvocationEvent.dispatch(InvocationEvent.java:209)
	at java.awt.EventQueue.dispatchEvent(EventQueue.java:597)
	at java.awt.EventDispatchThread.pumpOneEventForFilters(EventDispatchThread.java:284)
	at java.awt.EventDispatchThread.pumpEventsForFilter(EventDispatchThread.java:184)
	at java.awt.EventDispatchThread.pumpEventsForHierarchy(EventDispatchThread.java:174)
	at java.awt.EventDispatchThread.pumpEvents(EventDispatchThread.java:169)
	at java.awt.EventDispatchThread.pumpEvents(EventDispatchThread.java:161)
	at java.awt.EventDispatchThread.run(EventDispatchThread.java:122)

This means that the org.jvnet.substance.skin.SubstanceBusinessLookAndFeel class in not found in the classpath. This class is located in the substance.jar that you need to download from the Documents & Files section of the Substance project page. For this example, we assume that the substance.jar is located under C:/temp folder. In order to run the frame under Substance, use the following script:

java -Dswing.defaultlaf=org.jvnet.substance.skin.SubstanceBusinessLookAndFeel -cp .;C:/temp/substance.jar Walkthrough

The result is the same frame under Substance look and feel:

The other two options for setting Substance require changing the code. Go back to your Java editor and replace the main() method by:

  public static void main(String[] args) {
    JFrame.setDefaultLookAndFeelDecorated(true);
    try {
      UIManager.setLookAndFeel(new SubstanceRavenGraphiteLookAndFeel());
    catch (Exception e) {
      System.out.println("Substance Raven Graphite failed to initialize");
    }
    SwingUtilities.invokeLater(new Runnable() {
      public void run() {
        Walkthrough w = new Walkthrough();
        w.setVisible(true);
      }
    });
  }

Note that here we are using another Substance skin, Raven Graphite. In order to compile the new Walkthrough.java, you need to add the substance.jar to the build path. Consult your IDE help if you're using IDE. For command-prompt compilation, use the additional -cp flag:

javac -cp c:/temp/substance.jar Walktrough.java

Now you can run your application without the -Dswing.defaultlaf JVM flag, but you still need to specify the location of the substance.jar as before:

java -cp .;C:/temp/substance.jar Walkthrough

If you don't want to create an explicit dependency on the Substance classes in your code, change your main() method to:

  public static void main(String[] args) {
    JFrame.setDefaultLookAndFeelDecorated(true);
    try {
      UIManager.setLookAndFeel("org.jvnet.substance.skin.SubstanceRavenGraphiteLookAndFeel");
    catch (Exception e) {
      System.out.println("Substance Raven Graphite failed to initialize");
    }
    SwingUtilities.invokeLater(new Runnable() {
      public void run() {
        Walkthrough w = new Walkthrough();
        w.setVisible(true);
      }
    });
  }

You can run the application the same way as before. Here is how it looks like:

Where to go from here?

  • Read the FAQ
  • Read about the VM flags
  • Read about the client properties
  • Read about the API
  • Read about using skins
  • Download the sources and study the test application in test/Check.java
  • Read the Javadocs of SubstanceLookAndFeel class.

<출처 : https://substance.dev.java.net/docs/getting-started.html >

+ Recent posts