반응형
1. 첫번째 방법
2. 두번째 방법
2. 두번째 방법
|
JMF에서 지원하는 미디어 포맷과 Capture Devices에 대한 리스트 여기에서는 JMF 2.1 에서 지원하는 멀티미디어 데이터 포맷과 RTP 통신 프로토콜에서 지원하는 멀티미디어 전송포맷(주의 : JMF에서는 가능한 모든 RTP 통신 포맷을 지원하지 않습니다.) 그리고 지원하는 캡쳐 장치에 대한 리스트 입니다.
JMF에서는 8KHz 부터 48KHz까지의 sample rate를 가지는 오디오 데이터 포맷을 지원합니다. 주의할점은 JMF 2.1 for Java Clinets는 단지 다음의 sample rate만을 지원합니다: 8, 11.025, 11.127, 16, 22.05, 22.254, 32, 44.1, and 48 KHz. 그러므로 여러분이 일반적으로 사용하실때에는 8KHz, 16KHz , 44.1KHz, 48KHz등을 쓰면 무난하실겁니다. JMF 2.1에서는 아래 테이블에 명시된 멀티미디어 데이터 포맷을 지원합니다.
Notes:
JMF 2.1에서는 아래 테이블에 명시된 포맷을 RTP에서 이용할 수 있습니다.
** H.263/RTP 의 경우 전송 이미지 크기에 제한이 있습니다. 다음과 같은 크기만 이용이 가능합니다. : SQCIF (128x96), QCIF (176x144) and CIF (352x288). *** MPEG/RTP 의 경우 정말 문제가 많은데.. MPEG/RTP로의 전송을 위해서는 입력되는 미디어 콘텐츠가 미리 MPEG으로 부호화된 파일이거나 MPEG이 지원되는 캡쳐 소스여야만 이용이 가능합니다. 실시간 소프트웨어 MPEG encoding은 RTP 전송에 이용할 수 없습니다.
아래 테이블에 나타난 캡쳐 장치의 경우 국내 실정과는 약간 거리가 있지만, 중요한 점은 윈도우 상에서 이용할때는 이용하고자 하는 캡쳐장치가 VFW 용의 캡쳐 드라이버를 제공해야 한다는 점 입니다.
|
JMF 강의 1~6 (이재훈님의 강좌)
JavaSound API 는 자바 플랫폼에서 audio 재생을 지원하기 위해 만들어졌다.
이 API는 J2SE 1.3 버전에서 처음 추가되었고, wav, au, aiff, midi 오디오 포멧만을 지원한
다.
mp3 나 ogg 파일 포멧을 사용하고 싶을때는 어떻게 해야 할까?
이러한 문제점을 해결하기 위해 JavaSound API 에서는 JavaSound Service Provider Interfaces (SPIs) 를 이용한 확장을 지원한다. 이 인터페이스를 통해서, 사용자가 구현하고자 하는 오디오포멧을 지원하면 된다.
이것은 JDBC와 같은 개념이다. DB서버가 각각 다르더라도, JDBC 인터페이스를 통해 통일된 DB프로그래밍을 할수 있는 것과 같은 개념이다.
JavaZoom 의 mp3 플러인
* 특징
- mp3 재생만 지원 (MPEG 1, 2 and 2.5, Layers 1, 2, and 3)
- 현재는 mp3 재생만 지원 (Encoding, Converter, Write 기능은 아직 구현되지 않음)
- 메타데이타 ID3 태그 지원 (artist, album, date, copyright, comments, 정보를 뽑아올수 있다)
mp3 를 파일에서 정보를 뽑아오는 방법
1. File 객체를 이용하여 AudioFileFormat 객체를 생성한다.
2. getFormat() 객체를 호출한다.
3. AudioFormat 인스턴스에서 값을 뽑아온다.
File file = new File("filename.mp3");
AudioFileFormat baseFileFormat = null;
AudioFormat baseFormat = null;
baseFileFormat = AudioSystem.getAudioFileFormat(file);
baseFormat = baseFileFormat.getFormat();
AudioFileFormat.Type type = baseFileFormat.getType();
float frequency = baseFormat.getSampleRate();
To play MP3, you need first to call AudioSystem.getAudioInputStream(file) to get an AudioInputStream from an MP3 file, select the target format (i.e., PCM) according to input MP3 channels and sampling rate, and finally get an AudioInputStream with the target format. If JavaSound doesn't find a matching SPI implementation supporting the MP3-to-PCM conversion, then it will throw an exception.
File file = new File("filename.mp3");
AudioInputStream in= AudioSystem.getAudioInputStream(file);
AudioInputStream din = null;
AudioFormat baseFormat = in.getFormat();
AudioFormat decodedFormat = new AudioFormat(
AudioFormat.Encoding.PCM_SIGNED,
baseFormat.getSampleRate(),
16,
baseFormat.getChannels(),
baseFormat.getChannels() * 2,
baseFormat.getSampleRate(),
false);
din = AudioSystem.getAudioInputStream(decodedFormat, in);
// Play now.
rawplay(decodedFormat, din);
in.close();
Second, you have to send the decoded PCM data to a SourceDataLine. This means you have to load PCM data from the decoded AudioInputStream into the SourceDataLine buffer until the end of file is reached. JavaSound will send this data to the sound card. Once the file is exhausted, the line resources must be closed.
private void rawplay(AudioFormat targetFormat, AudioInputStream din) throws IOException, LineUnavailableException {
byte[] data = new byte[4096];
SourceDataLine line = getLine(targetFormat);
if (line != null) {
// Start
line.start();
int nBytesRead = 0, nBytesWritten = 0;
while (nBytesRead != -1) {
nBytesRead = din.read(data, 0, data.length);
if (nBytesRead != -1) nBytesWritten = line.write(data, 0, nBytesRead);
}
// Stop
line.drain();
line.stop();
line.close();
din.close();
}
}private SourceDataLine getLine(AudioFormat audioFormat)
throws LineUnavailableException {
SourceDataLine res = null;
DataLine.Info info = new DataLine.Info(SourceDataLine.class, audioFormat);
res = (SourceDataLine) AudioSystem.getLine(info);
res.open(audioFormat);
return res;
}
If you're familiar with JavaSound API, you will notice that source code for playing MP3 is similar to the what you'd use to play a WAV file. The source code sample above has no dependencies upon the MP3 SPI implementation. It's transparent for the developer.
Notice that if the file to play was stored on a web server, we would have used:
URL url = new URL(http://www.myserver.com/filename.mp3); AudioInputStream in= AudioSystem.getAudioInputStream(url);
instead of:
File file = new File("filename.mp3");
AudioInputStream in= AudioSystem.getAudioInputStream(file);
Metadata
Most audio formats include metadata such as title, album, comments, compression quality, encoding, and copyright. ID3 tags, used for MP3, are the best-known metadata format. Depending on ID3 version (v1 or v2), they can be found either at the end or at the beginning of an MP3 file. They include information such as duration, title, album, artist, track number, date, genre, copyright, etc. They can even include lyrics and pictures. The famous (and free) SHOUTcast streaming MP3 server, from Nullsoft, uses a different scheme in order to provide additional metadata such as title streaming, which allows a player to display the current song being played from the online radio stream. All of these metadata items need to be parsed and exposed through the SPI implementation. As of J2SE 1.5, the JavaSound API standardizes the passing of metadata parameters through an immutable java.util.Map:
File file = new File("filename.mp3");
AudioFileFormat baseFileFormat = AudioSystem.getAudioFileFormat(file);
Map properties = baseFileFormat.properties();
String key_author = "author";
String author = (String) properties.get(key_author);
String key_duration = "duration";
Long duration = (Long) properties.get(key_duration);
All metadata keys and types should be provided in the SPI documentation. However, common properties include:
"duration" (Long): Playback duration of file, in microseconds
"author" (String): Name of the author of the file
"title" (String): Title of the file
"copyright" (String): Copyright message
"comment" (String): Arbitrary text
Using Multiple SPIs in an Application
Adding MP3 audio capabilities to the Java platform means adding JAR files containing the MP3 SPI implementation to the runtime CLASSPATH. Adding Ogg Vorbis, Speex, Flac, or Monkey's Audio support would be similar, but could generate conflicts that make other SPI implementations fail. The following situation could occur:
Your runtime application CLASSPATH includes both MP3 and Ogg Vorbis SPIs.
Your application tries to play an MP3 file.
JavaSound's AudioSystem tries Ogg Vorbis SPI first.
The Ogg Vorbis SPI implementation doesn't detect that incoming file isn't an Ogg-Vorbis-compliant stream, so it doesn't throw any exception.
Your application tries to play an MP3 with the Ogg Vorbis SPI. At best you will get a runtime exception (NullPointerException, ArrayIndexOutOfBoundException), and in the worst case, you will hear weird noises or just deadlock.
In the example above, it's true that the problem comes from the Ogg Vorbis SPI implementation, but it's not easy for the SPI provider to have reliable controls (just think about streaming). Thus, each SPI provider has to pay attention to the others. That's the main practical drawback of the JavaSound plugin architecture. So don't be surprised if you have problems making multiple SPIs work together in your application.
Differences with JMF
JMF stands for Java Media Framework. It's an optional J2SE packages that adds multimedia support to the Java platform. It includes audio (GSM, QuickTime, etc.), video (AVI, QuickTime, H.263, etc.) and RTP streaming features. JMF provides a plugin architecture, but it is not compliant with that of JavaSound. In fact, MP3 support was previously included in JMF, but it was removed in 2002 because of licensing issues.
Conclusion
JavaSound rocks. It provides a plugin architecture allowing any third-party provider to add custom audio format support, such as for MP3 files. API is flexible enough to plug most heterogeneous (lossy, lossless) audio formats, whatever their parameters and metadata, to the Java platform -- "Write once, play anywhere."
References and Resources
JLayer: Java library for decoding and converting MP3 files
MP3 SPI: MP3 plugin for the Java platform
Speex SPI: Speex plugin for the Java platform
Ogg Vorbis SPI: Ogg Vorbis plugin for the Java platform
Monkey's Audio SPI: Monkey's Audio plugin for the Java platform
Flac SPI: Flac plugin for the Java platform
SHOUTcast: SHOUTcast streaming MP3 server
jlGui player: Music player for the Java platform -- a WinAmp clone
JavaSound: SUN homepage
Tritonus: Tritonus project
MP3 Tech: MP3 frame header info
ID3: ID3 definition
The JavaZOOM Team are the authors of the open source projects JLayer and jlGui.
SWT 애플리케이션의 개발 과정 중에서 특히, 기본적인 프로토타입을 완성한 이후에, 전개 시 발생될 수 있는 문제에 대하여 고려하여야 합니다. 전통적인 자바 애플리케이션과는 달리, SWT 애플리케이션은 애플리케이션이 작동하기 전에 OS 스팩의 라이브러리들이 로딩되어야 합니다. 이러한 라이브러리들을 지속적으로 전개 및 관리해야 한다는 것은 쉽지 않지만 Sun의 Java Web Start가 도움이 됩니다. SWT와 Java Web Start가 결합하면 클라이언트 측 자바 애플리케이션 구축하는 데에 훌륭한 툴이 됩니다.
Standard Widget Toolkit (SWT)을 개발 커뮤니티로 도입하기가 여간 까다로운 것이 아니다. 그러한 근거로는 Sun은 Java Foundation Classes (JFC)로 클라이언트 측 애플리케이션 개발자들을 여러 해 동안 회유하고는 있지만, 많은 개발자들은 여러 가지 이유로 이 툴킷 사용을 피하고 있다. 많은 개발자와 아키텍트에게 있어서, 전통적인 데스크탑 애플리케이션처럼 작동하는 클라이언트 측 자바 애플리케이션을 개발하는 것은 아직도 꿈과 같은 일이다.
2001년 중반에, 이클립스 프로젝트가 갑자기 생겨나기 시작했다. 처음에, 이클립스 프로젝트는 자바용 유일한 오픈 소스 Integrated Development Environment (IDE)로 인식되었다. 하지만, 그의 프로젝트의 범위는 훨씬 더 광범위해 졌으며, SWT 툴킷을 탄생시켰다. JFC와 사촌격인 Abstract Window Toolkit (AWT)와 마찬가지로, SWT 툴킷은 개발자용 위젯을 제공한다. 하지만, SWT와 다른 툴킷들과의 주요한 차이점은 SWT가 OS GUI 위젯을 사용하는 방식이다. 이러한 방식은 자바 개발자들에게 크로스 플랫폼 API를 제공하여 원래의 데스크탑 애플리케이션인 것 같은 느낌을 주는 솔루션을 구현할 수 있도록 해준다.
|
어떤 언어든, 올바른 툴이 없다면 데스크탑 애플리케이션의 전개와 관리는 개발자들에게 가장 큰 고민거리가 될 것이다. 지원 부서들 조차 새로운 버전의 소프트웨어가 릴리스 될 때 모든 워크스테이션을 업데이트 해야 한다는 생각에 사로잡혀 있으며, 배포 및 관리 요구 사항들을 완화시키기 위해서, 몇년 전 Sun Microsystems는 Java Web Start를 도입했다. 이 기술은 엔드 유저의 워크스테이션에서 자바 애플리케이션의 전개, 관리, 업그레이드를 단순화 한다.
애플리케이션을 시작하는 초기 툴로서 웹 브라우저를 사용하는 Java Web Start는 Sun의 Java Runtime Environment에 포함된 로컬에서 설치된 헬퍼 애플리케이션이다. Java Network Launching Protocol (JNLP) 파일에 액세스 할 때마다, 애플리케이션은 사용자 워크스테이션으로 자동 다운로드 되어 실행을 시작한다. 전체 프로세스는 엔드 유저와의 인터랙션에 대한 필요성이 줄어들었고, 애플리케이션 분산 과정도 단순화 되었다. (참고자료)
|
Java Web Start를 사용하여 SWT 애플리케이션을 전개하는 방법을 보기 전에, 우리가 전개할 애플리케이션에 대해 잠깐 보도록 하자. 이 글에 소개된 애플리케이션은 이클립스 프로젝트에서 제공하는 예제 애플리케이션이다. 그림 1에서 보듯, 이 애플리케이션은 크로스-플랫폼(cross platform) 파일 뷰어로서 사용자들이 하드 드라이브 상의 파일과 폴더를 볼 수 있도록 한다.

SWT와 Java Web Start의 크로스 플랫폼 기능을 설명하기 위해, 이 글의 예제 애플리케이션은 Microsoft Windows와 Red Hat Linux에서 실행되도록 패키징 되어 있다.
|
본 기사에서 기술한 코드는 하단부에 명기된 링크를 통하여 다운로드 할 수 있다. Java Web Start로 파일 뷰어 애플리케이션을 테스트 하려면, 다음과 같은 조건이 충족되어야 한다. (참고자료의 다운로드 링크 참조)
Ant 빌드 스크립트를 크로스 플랫폼으로 만드는 것이 본 글의 목적이지만, 파일 뷰어 애플리케이션은 Microsoft Windows XP와 Red Hat Linux 8 OS에서만 테스트 및 확인되었다. 또한, Tomcat은 로컬 워크스테이션과 8080 포트에서 실행되는 것으로 간주한다. 예제 애플리케이션을 구현 및 설치, 실행해보자.
|
파일 뷰어 애플리케이션을 설치하려면 다음 단계를 따른다.
fileviewer.zip 파일을 임시 디렉토리에서 압축을 푼다.
|
AWT나 JFC와는 달리, SWT는 OS 본연의 윈도우 환경과 긴밀히 연관되어 있다. SWT는 시스템 라이브러리를 사용하여 플랫폼 독립 API와 기반 OS 간 통합을 관리한다. 기본적으로, Java Web Start에서 실행되는 애플리케이션은 제한된 샌드박스(sandbox)에서 실행된다. 이 환경은 워크스테이션의 파일 시스템, 시스템 라이브러리, 기타 리소스 같은 리소스로의 액세스를 제어한다. SWT는 시스템 라이브러리를 로딩하기 위해서 기본 샌드박스 밖에서 실행되어야 하므로, Java Web Start에 전개된 모든 JAR 파일들은 디지털 서명이 필요하다. 이 애플리케이션은 광범위한 사용자 베이스로 전개할 것은 아니므로 자체 서명 테스트 인증을 만들 것이다.
만일 여러분이 SWT 애플리케이션을 실행 환경에 설치하려면, Thawte 또는 VeriSign 같은 인증 기구에서 인증서를 받아두는 것이 좋다.
|
자체 서명 테스트 인증서를 만들려면 다음과 같이 한다.
keytool -genkey -keystore keystore -alias myself.
패스워드, 이름, 위치를 포함한 새로운 키에 대한 상세를 요청하는 프롬프트가 뜬다. Ant 빌드 프로세스를 사용하려면, 패스워드를 "password"로 설정한다. 패스워드를 "password"로 하지 않으려면, build.xml 파일 내에서 "sign-jars"를 편집한다. 각 JAR 파일을 서명하는 실제 프로세스는 Ant 구현 동안에 완료된다.
keytool -list-keystore keystore
결과는 다음과 같다:
Keystore type: jks
Keystore provider: SUN

Your keystore contains 1 entry

myself, Jun 3, 2003, keyEntry,
Certificate fingerprint (MD5):B8:C4:48:ED:68:E8:FE:47:83:78:F5:14:4E:28:5C:80 |
|
파일 뷰어 애플리케이션을 구현하려면, 다음 단계를 따라간다.
ant clean 명령을 실행한다.
ant 명령을 실행하여 빌드 프로세스를 시작한다. 요구 사항에 부합하는 환경이 마련되고 올바르게 설정되었다면 다음과 같은 내용을 볼 수 있다.
Buildfile: build.xml

init:

compile-common:

compile-module:
     [echo] Compiling ...

package-common:

package-swtlib:

sign-jars:
     [echo] Signing JARS...
  [signjar] Signing Jar : D:\FileViewer\dist\swt-lib.jar
  [signjar] Signing Jar : D:\FileViewer\dist\fileviewer.jar
     [copy] Copying 1 file to D:\FileViewer\dist
  [signjar] Signing Jar : D:\FileViewer\dist\swt-win32.jar

package-web:
      [war] Building war: D:\FileViewer\dist\fileviewer.war

default:

BUILD SUCCESSFUL
Total time: 6 seconds
|
|
Java Web Start를 사용하여 파일 뷰어 애플리케이션을 전개하기 전에, 애플리케이션을 로컬에서 실행해 보자. 애플리케이션을 시작하려면 소스 코드의 압축을 풀었던 디렉토리에서 ant run을 실행한다.
Ant 스크립트를 실행하면 파일 뷰어 애플리케이션이 나타난다. 그림 2는 Red Hat Linux 8에서 실행되는 애플리케이션 모습이다.

|
애플리케이션을 Tomcat 4에 전개하려면 다음과 같이 한다.
dist 디렉토리에서 webapps 디렉토리로 fileviewer.war 파일을 복사한다.
http://localhost:8080/fileviewer/index.html로 들어가서 "Launch Application" 링크를 클릭한다.
링크를 클릭하고, 애플리케이션의 JAR 파일이 워크스테이션으로 다운로드 되는 동안 다음과 같은 이미지를 볼 수 있다.(그림 3)


"Start"를 클릭하여 파일 뷰어 애플리케이션을 시작한다.
|
Sun의 Java Web Start를 사용하여 SWT 애플리케이션을 구현, 배포, 전개하는 방법을 알아보았다. 이제는 JNLP 파일을 구현하는 방법에 대해 알아보자. Java Network Launching Protocol 스팩은 Java Community Process (JCP)에서 관리된다. 이 글의 목적은 이 기술을 사용하여 SWT 애플리케이션을 전개하는 방법을 설명하는 것이기 때문에 그 외 배경 설명은 생략하도록 하겠다. Java Web Start에 대한 자세한 내용은 Steve Kim의 기술자료 "Java Web Start"를 참조하라. (참고자료)
Listing 1은 SWT 애플리케이션의 JNLP 파일에서 사용되는 다양한 태그들이다.
1 <?xmlversion="1.0" encoding="utf-8"?> 2 <jnlp spec="1.0+"codebase="http://localhost:8080/fileviewer"href="index.jnlp"> 3 <information> 4 <title>File Viewer</title> 5 <vendor>IBM developerWorks</vendor> 6 <homepage href="index.html"/> 7 <description>File Viewer</description> 8 <description kind="short">FileViewer</description> 9 </information> 10 <security> 11 <all-permissions/> 12 </security> 13 <resources> 14 <j2se version="1.4"/> 15 <jar href="fileviewer.jar"/> 16 <nativelib href="swt-lib.jar"/> 17 </resources> 18 <resources os="Windows"> 19 <jar href="swt-win32.jar"/> 20 </resources> 21 <resources os="Linux"> 22 <jar href="swt-linux.jar"/> 23 </resources> 24 <application-descmain-class="org.eclipse.swt.examples.fileviewer.FileViewer"/> 25 </jnlp> |
이 XML 파일에서 중요한 부분을 살펴보도록 하자.
nativelib 태그를 선언하여 Java Web Start에게 이 JAR 파일에 원래의 라이브러리들이 포함되어 있음을 알려주어야 한다. 예제 파일 뷰어 애플리케이션에서, 이 JAR 파일에는 Windows DLL과 리눅스용 SO 파일 시리즈가 포함된다.
os 애트리뷰트는 리소스 엘리먼트가 관여할 OS를 지정하며, 해당 값은 엔드 유저의 os.name 자바 시스템 프로퍼티에 기반한다. 이 예제에서는 사용되지 않지만, 자바 라이브러리로 액세스를 제한할 때 arch 애트리뷰트를 사용할 수 있다. arch 애트리뷰트는 엔드 유저의 os.arch 자바 시스템 속성에 기반한다. JNLP 파일의 다양한 엘리먼트와 포맷에 대한 정보는 참고자료 섹션을 참조하라.
|
SWT 사용자 인터페이스 툴킷과 Java Web Start가 결합하면 상호 작용하는 클라이언트 측 자바 애플리케이션을 전개하는 훌륭한 툴이 된다. 예제 파일 뷰어 애플리케이션은 Java Web Start를 통해 분산될 독립형 SWT 애플리케이션을 구현하는데 사용할 수 있는 빌드 및 패키징 프레임웍을 제공한다.
|
| 이름 | 크기 | 다운로드 방식 |
|---|---|---|
| os-jws/fileviewer.zip | FTP |
| 다운로드 방식에 대한 정보 | ||||
Access Windows Registry using 'pure' Java
(rehash of my old post since all those wonderful blog post drafts I was planning to publish are unfortunately out-dated or irrelevant)
One can use the private code of Sun's Preferences API to access values of type REG_SZ in the Windows Registry. Stupid hack. Maybe I should make a library out of this. I have used this soooo many times.
java.util.prefs.WindowsPreferences is the concrete implementation of AbstractPreferences in the Windows platform. This class provides methods like WindowsRegQueryValueEx, etc. Using Reflection, one can use the methods in this class to query string values under HKEY_LOCAL_MACHINE and HKEY_CURRENT_USERProxyServer setting on Windows (this is what IE uses/sets) and the Internet Explorer version
import java.lang.reflect.Method;
import java.util.prefs.Preferences;

public class JavaRegistryHack {

  private static final int HKEY_CURRENT_USER = 0x80000001;
  private static final int KEY_QUERY_VALUE = 1;
  private static final int KEY_SET_VALUE = 2;
  private static final int KEY_READ = 0x20019;

  public static void main(String args[]) {
      final Preferences userRoot = Preferences.userRoot();
      final Preferences systemRoot = Preferences.systemRoot();
      final Class clz = userRoot.getClass();
      try {
          final Method openKey = clz.getDeclaredMethod("openKey",
                  byte[].class, int.class, int.class);
          openKey.setAccessible(true);

          final Method closeKey = clz.getDeclaredMethod("closeKey",
                  int.class);
          closeKey.setAccessible(true);

          final Method winRegQueryValue = clz.getDeclaredMethod(
                  "WindowsRegQueryValueEx", int.class, byte[].class);
          winRegQueryValue.setAccessible(true);
          final Method winRegEnumValue = clz.getDeclaredMethod(
                  "WindowsRegEnumValue1", int.class, int.class, int.class);
          winRegEnumValue.setAccessible(true);
          final Method winRegQueryInfo = clz.getDeclaredMethod(
                  "WindowsRegQueryInfoKey1", int.class);
          winRegQueryInfo.setAccessible(true);


          byte[] valb = null;
          String vals = null;
          String key = null;
          Integer handle = -1;

          //Query Internet Settings for Proxy
          key = "Software\\Microsoft\\Windows\\CurrentVersion\\Internet Settings";
          handle = (Integer) openKey.invoke(userRoot, toCstr(key), KEY_READ, KEY_READ);
          valb = (byte[]) winRegQueryValue.invoke(userRoot, handle.intValue(),
                  toCstr("ProxyServer"));
          vals = (valb != null ? new String(valb).trim() : null);
          System.out.println("Proxy Server = " + vals);
          closeKey.invoke(Preferences.userRoot(), handle);

          // Query for IE version
          key = "SOFTWARE\\Microsoft\\Internet Explorer";
          handle = (Integer) openKey.invoke(systemRoot, toCstr(key), KEY_READ, KEY_READ);
          valb = (byte[]) winRegQueryValue.invoke(systemRoot, handle, toCstr("Version"));
          vals = (valb != null ? new String(valb).trim() : null);
          System.out.println("Internet Explorer Version = " + vals);
          closeKey.invoke(Preferences.systemRoot(), handle);

      } catch (Exception e) {
          e.printStackTrace();
      }
  }


   private static byte[] toCstr(String str) {
       byte[] result = new byte[str.length() + 1];
       for (int i = 0; i < str.length(); i++) {
           result[i] = (byte) str.charAt(i);
       }
       result[str.length()] = 0;
       return result;
 }
}


<출처 : http://lenkite.blogspot.com/2008/05/access-windows-registry-using-java.html >

jRegistryKey is a Java™ Native Interface (JNI) wrapper around the Microsoft® Windows® Win32® application programming interface (API) registry functions, designed to facilitate Windows® registry access for Java™ developers. jRegistry Key User Manual
ClassPath에 포함시킬 파일들 입니다.
 invalid-file
jRegistryKey.dll
public class AppMain
{
public AppMain()
{
super();
}
public static void main(String[] args)
{
RegistryKey r = new RegistryKey(RootKey.HKEY_LOCAL_MACHINE, "Software\\Ncsoft\\L2Client");
String key = "workingdir";
if(r.hasValue(key))
{
RegistryValue v = r.getValue(key);
String value = v.toString();
value = value.replaceAll(v.getName()+":", "").replaceAll("REG_SZ:", "").replaceAll("REG_DWORD:", "");
System.out.println("lineage2 working dir : " + value);
RegistryValue vs = r.getValue("global_version");
System.out.println(vs.toString());
}
else
System.out.println("Not Existed Key");
}
}
레지스트리 편집기를 이용하여 값과 결과 화면을 확인해 보세요.^^
--------------------------------------------------------------------------------------------------------------------------------------
밑에 자료는 다른 패키지를 이용하는 방법이다.
Release 3.1.3, September 11, 2003
The com.ice.jni.registry package is a Java native interface for the Windows Registry API. This allows Java program to access, modify, and export Windows Registry resources.
The com.ice.jni.registry package has been placed into the public domain. Thus, you have absolutely no licensing issues to consider. You may do anything you wish with the code. Of course, I always appreciate it when you properly credit my work.
The package will work only with Java 1.1 and greater, and uses the Javasoft native interface, not the Netscape interface. The package also includes a DLL that implements the interface. The package has been used with JDK1.2, and JDK1.3, JDK1.4, as well as JDK1.1.8.
The package includes the pre-built DLL (debug and release), source code (both the Java and the DLL's C code), as well as the compiled Java classes.
The original release was posted on November 17, 1997. The current release is 3.1.3, which was posted on September 11, 2003.
http://www.trustice.com/java/jnireg/index.shtml <-- 여기에서 다운받으면 된다.
--------------------------------------------------------------------------------------------------------------------------------------
http://sourceforge.net/projects/java-registry/ <-- 이것도 다른 패키지인듯...
 invalid-file
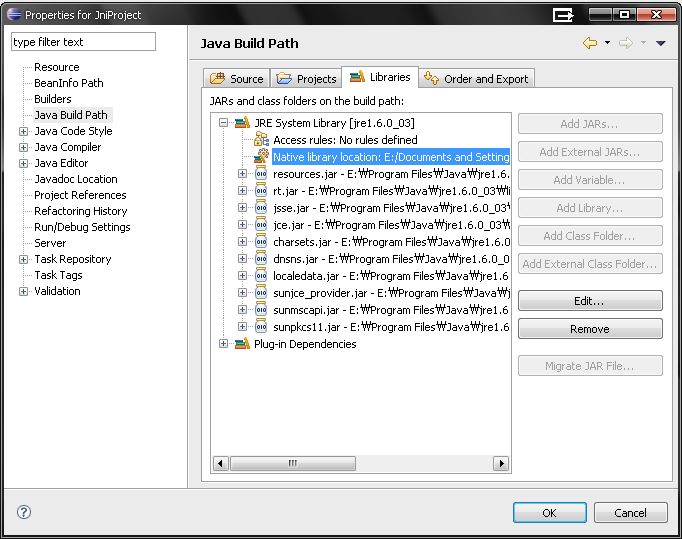
 invalid-file