반응형

JComboBox에서 선택된 값을 리턴하는 메소드를 찾아보니 없는거 같다.

별것 아닌거 같지만 이런게 없어 하는 의아한 생각이 든다.

다른메소드를 이용하여 가져오는게 가능하니 만들지 않았을 수도 있지만

이러한 경우는 많이 사용하기 때문에 있는것이 당연하지 않나 하는 의문이 든다.

므튼 메소드가 없기 때문에(내가 찾지 못했을 수도?) 방법을 정리해보자.

나중에 까먹고 그 메소드를 찾기위해 API를 또 찾기 때문에 (있을텐데 ?? 하면서 )

jcombo.getSelectedItem().toString()

jcombo.getItemAt(jcombo.getSelectedIndex()).toString()

반응형

스윙으로 GUI를 만들어 리스너에 코딩을 하고 했는데 코딩상에서 해당 컴포넌트에 걸린 이벤트를

실행하려고 별짓을 다 했다. ㅡㅡ; 그냥 이벤트 내에 들어가는 코딩을 메소드로 만들어 메소드를 호출하기도..

이건 아니다 싶어 이벤트 생성하여 해당 리스너를 참조하여 

 testListener.actionPerformed(new ActionEvent(jBtntest,ActionEvent.ACTION_PERFORMED, "openEvent"));

이렇게 해서 사용했다.. 대충 이렇게 하는게 낫나 싶어서 .. 므튼 이리저리 찾다보니 관련 자료를 찾았다.
 

원문: http://mindprod.com/jgloss/event11.html#SYNTHETICEVENTS

참조: http://www.codeguru.com/java/articles/162.shtml

JButton은 보통 doClick() 메소드를 이용하여 처리하면 되지만 다른 방법도 있으니 알아보자.

내가 주로 사용했던 방법은 2번 이었음..^^; 뭐 편법은 아닌듯.. ㅋㅋ

원문에서 필요한 부분만 발췌 하였음..

There are a number of ways to fake an event.

2) The simplest is just to call a Listener method directly with a dummy Event object, filled in with just enough data to keep the method happy.

3)Create an Event and introduce it to the Component that will handle it at the processEvent method. with:

 4)Create an Event 


 5)Generating MouseMoved Events has no effect on the screen mouse cursor. To make the underlying native GUI see your generated Events, use the Robot class to generate move clicks, moves etc. 

기본적으로 버튼에 따른 이벤트를 실행한다면 doClick()을 사용해야겠다.
그리고 일단 막히면 API 부터 제대로 뒤져봐야겠다 ㅡㅡ; 끙.. doClick 모르고 있었다는 ㅡㅡ;

2010.11.03  추가
오랫만에 기존에 작성했던 프로그램에 간단한 수정을 하면서 이벤트를 강제로 발생하는 부분을 검색

내가 기존에 포스팅 했던 글이 뜬다. ㅡㅡ;  예전에 몰라서 포스팅한걸 지금도 까먹다니 ㅠㅠ

그래서 조금 내용을 추가하여 갱신하기로 했다. 다시한번 잘 정리한다는 생각으로..^^


반응형
우리는 프로그램을 사용하면서 단축키를 많이 사용한다.

필자도 여러가지 프로그램들을 사용하면서 되도록 단축키를 활용함으로 효율성을 높이려고 한다.

자바에서 스윙으로 프로그램을 만들면서 Mnemonic 과 Accelerator 에 대해 알 필요가 있었다.

Mnemonic 과 Accelerator 을 어느 경우에 사용해야 하는지 정리도 할겸 작성해 본다. 

일반적으로 메뉴를 선택할 때는 ALT + 문자 조합을 사용한다.

그리고 메뉴 내에 있는 아이템을 선택할때의 단축키 조합은 어떻게 될것인가?

메뉴를 선택할때는 setMnemonic() 메소드를 이용하여 선택하게 할수 있다.


이렇게 하면 메뉴바의 메뉴를 선택할때 ALT + f  키를 누르면 선택된다.

그리고 메뉴 내에 메뉴 아이템을 선택할때에 2가지 방법이 존재 하게 된다.

메뉴를 선택한 상태에서 문자키를 이용한 선택과 메뉴를 선택하지 않은 상태에서

다른 키조합으로 바로 메뉴 내의 메뉴 아이템을 선택하는 방법이다.

일단 첫번째 메뉴를 선택하고 메뉴내의 아이템을 선택하는 방법은 위에 했던 방식과 별반 다를바 없다.

똑같이 setMnemonic() 메소드를 이용하면 된다.


두번째 방법에서 메뉴를 선택하지 않고 단축키로 메뉴 아이템을 선택하고자 할때는

드디어 언제 나오나 싶었던 Accelerator() 메소드를 사용하면 되는 것이다.
여기서는 CTRL + o 의 조합으로 설정해 놓았다.


이렇게 코딩을 하면 단축키가 잘 먹는다.^^

참고로 키값은 API를 참고 하도록... KeyEvent 클래스를 찾으면 나와있다. 다들 아시겠지만 ^^;
반응형
1900 Drag & Drop의 구현

스윙에서의 Drag & Drop 을 구현해 보자. 과정이 꽤 복잡하고 기능상에 약간의 제약은 있으나 한번 구현해 볼 만한 예제라고 생각을 한다. 소스코드는 자바소프트에서 발췌했음을 알아두길 바란다. 중간중간에 풍선도움말을 두겠으니 단풍잎에 마우스를 갖다대면 도움말이 뜨니 참고하길 바란다.

Drag & Drop step
Drag & Drop 을 구현하는 것은 비교적 쉽다. 그렇지만 가장 난해한 것은 모든 과정에 대해서 이해하는 것이다. 다음의 순서를 먼저 익혀두길 바란다.     [ DnD Source Download]

1. Drag source 에 대한 참조를 가진다. - DragSource.getDefaultSource() 나 new DragSource() 를 통해서.
2. Drag gesture recognizer 를 생성한다. - DragSource.createDafaultGestureRecognizer()
3. Drop target 를 생성한다. - 하나의 컴포넌트와 Drop target listener 를 명세한다.
4. Transferable 로 옮겨질 수 있는 데이타를 wrap 한다.
5. Drag 를 초기화한다. - DragSource.startDrag()
6. DropTargetLisenter, DragSource 인터페이스를 구현함으로써 Drop 를 핸들링한다.

Drag & Drop (이하 D&D) 는 하나의 datasource 와 여러개의 droptarget 에 - 흔히 콤포넌트와 연관되어져 있다 - 와 연관되어 이뤄진다. 다음에 나열된 클래스와 인터페이스는 D&D 에서 사용되는 것을 정리한 것이다. 대부분의 것들은 java.awt.dnd 패키지에 있고, 오직 하나 Transferable 은 java.awt.datatransfer 패키지에 있다.

DragGestureRecognizer : 컴포넌트에서 drag 를 수행할려고 할때 이벤트를 발사한다.
DragSource : Drag 와 DragGestureRecognizer 를 초기화한다.
DropTarget : 연관된 컴포넌트 상에서 Drop 이 일어난다.
Transferable ; D&D 를 통해서 전송되어지는 데이타를 위한 Wrapper 이다.
DragGestureListener : DragGestureRecognizer 에 의해 통보를 받고 drag 를 초기화한다.
DragSourceListener : DragSource 이벤트에 반응한다.
DropTargetListener : Drop 포함한 target 이벤트를 핸들링한다.

D&D 는 하나의 기미(Gesture) 즉, 마우스를 내려서 드래깅을 시도할때 초기화된다. 그러면 DragGestureRecognizer 는 이런 기미를 포착하고 이벤트를 발생하는 것이다.
DragSource 는 startDrag() 메소드로 초기화작업을 수행하고, createDragGestureRecognizer() 나 createDafaultDragGestureRecognizer() 를 이용하여 DragGestureRecognizer 를 생성하게 되는 것이다.
DropTarget 은 하나의 컴포넌트와 Listener 객체와 연관되어 있어서 drop target event 가 발생할때 listener 객체가 통보를 받게 된다.
DragGestureListener 는 recognizer 에 의해 drag gesture 를 통보받는데 전형적인 반응예는 DragSource.startDrag() 메소들르 호출하게 되었을 경우이다.
DragSourceListener 는 drag 가 초기화된 후 dragsource 에서 일어나게 된다.

다소 나열적인 설명이었지만 어느 정도 감을 잡기 위해서 중복 설명했다. D&D 하는 과정과 메소드호출, 클래스와 인터페이스의 API 를 꼼꼼하게 살펴보면 이해할 수 있으리라 생각한다. 가장 기본적인 D&D 를 하기 위해서는 반드시 DragSource, DropTarget, DragGestureRecognizer, Transferable 이 반드시 생성이 되어야 하고, Listener 가 구현되어야 한다는 것을 명심하길 바란다. 그러나 실제 구현은 몇가지 객체를 생성하고 데이타를 Wrapping 하고 핸들링하는 것을 빼면 나머지 동작은 프로그래머 재량에 상관없이 자체적으로 구현이 된다.
Adding D&D to Swing Component
여기서도 두가지 방법이 있을 수가 있는데 한가지 방법으로는 Swing Component 를 상속해 객체를 만들어 그것을 DragSource, DropTarget 으로 만들어 사용하는 방법과 제 3의 콤포넌트를 생성해 두가지를 수행하는 방법이 있다.
첫번째 방법으로 수행을 하면 반드시 객체만이 D&D 특성을 가질수가 있고, 표준 Component 는 그런 특성을 공유할 수 없음을 명심하길 바란다. 가령 JList 를 상속한 ListDragSource 객체를 만들어서 D&D 를 추가해 사용한다면 ListDragSource 만이 그런 동작을 할 수 있다는 것을 의미한다.

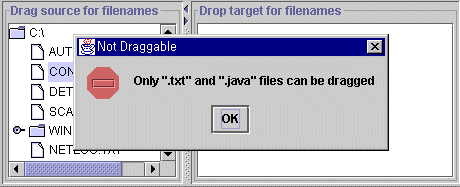
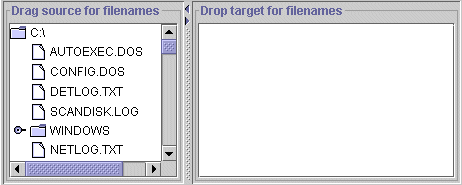
아래에 있는 그림은 이 프로그램을 실행시켰을때 볼 수 있는 화면이다. 왼쪽은 DragSource 로 JTree 를 이용해 구현했고, 오른쪽은 DropTarget 은 JTextPane 을 이용해 구현했음을 보길 바란다. 이것은 .txt 와 .java 로만 한정되어 있기 때문에 다른 확장자를 가진 파일을 D&D 했을 경우에는 에러창을 발견하게 될 것이다. 그리고 .txt 와 .java 파일은 그 내용을 JTextPane 에서 볼 수 있을 것이다.


오른쪽의 파일을 D&D 수행할 수가 있다


확장자가 .txt 와 .java 가 아닐 경우에 볼 수 있는 경고창이다.


위의 프로그램은 얼마든지 응용해서 확장할 수 있다고 생각한다. 다른 파일도 볼 수 있게끔 할 수 있고, image 도 가능하리라 생각한다.
다음 장에서는 소스코드 분석에 들어가도록 하겠다. 먼저 해당 API 를 꼼꼼히 살펴본 다음에 코드분석에 임하길 바란다.
  
Source Analysis
Test.java 소스이다. main() 와 기본 인터페이스가 설정돼 있다. 아래의 코드를 살펴보면 알겠지만
Test 생성자는 drop target 을 생성해낸다.
 즉 TextPane 을 drop target component 로 생성하는 것이다.
실제 drop 이 일어났을때 Test.drop() 메소드가 호출이 된다. drop 과 연관된 transferable 은
 String 으로써 데이타를 제공해주며 drop 을 받아들인 후에 readFile() 메소드가 호출이 돼
 file 의 내용을 TextPane 으로 로딩을 하게 된다.
Drop 이 완료된 후 e.dropComplete(true) 가 호출이 돼 실제 drop 이 완료되게 된다.
import javax.swing.*;
import javax.swing.event.*;
import javax.swing.text.*;
import java.awt.*;
import java.awt.event.*;
import java.awt.datatransfer.*;
import java.awt.dnd.*;
import java.io.*;

public class Test extends JFrame implements DropTargetListener {
	private JTextPane textPane = new JTextPane();

	public Test() {
                   super("Drag and Drop With Swing");
                   new DropTarget(textPane,DnDConstants.ACTION_COPY_OR_MOVE,this);
	   JSplitPane splitPane =
                      new JSplitPane(JSplitPane.HORIZONTAL_SPLIT,createTreePanel(),createTextPanel());
	   splitPane.setDividerLocation(250);	
	   splitPane.setOneTouchExpandable(true);
	   getContentPane().add(splitPane, BorderLayout.CENTER);
	}
	public static void main(String args[]) {
	  Test test = new Test();
	  test.setBounds(300,300,850,350);
	  test.setVisible(true);
	  test.setDefaultCloseOperation(WindowConstants.DISPOSE_ON_CLOSE);
	  test.addWindowListener(new WindowAdapter() {
	  public void windowClosed(WindowEvent e) {
                        System.exit(0);
	    }
	  });
	}
	private JPanel createTreePanel() {
	  JPanel treePanel = new JPanel();
	  DragTree tree = new DragTree();
	  treePanel.setLayout(new BorderLayout());
	  treePanel.add(new JScrollPane(tree), BorderLayout.CENTER); 
	  treePanel.setBorder(BorderFactory.createTitledBorder(
		"Drag source for filenames"));
        	return treePanel;
	}
	private JPanel createTextPanel() {
	  JPanel textPanel = new JPanel();
	  textPanel.setLayout(new BorderLayout());
	  textPanel.add(new JScrollPane(textPane),BorderLayout.CENTER);
	  textPanel.setMinimumSize(new Dimension(375,0));
	  textPanel.setBorder(BorderFactory.createTitledBorder(
	    "Drop target for filenames"));

	  return textPanel;
	}
	private void readFile(final String filename) {
	  EditorKit kit = textPane.getEditorKit();
	  Document document = textPane.getDocument();

          try {
	    document.remove(0,document.getLength());
	    kit.read(new FileReader(filename), document, 0); 
	  }
	  catch(Exception ex) {
	    ex.printStackTrace();
	  }
	}
        
	public void drop(DropTargetDropEvent e) {
	  try {
	   DataFlavor stringFlavor = DataFlavor.stringFlavor;
	   Transferable tr = e.getTransferable();
 public class DataFlavor extends Object implements Externalizable, Cloneable
 
 이 클래스는 D&D 수행할 때 클립보드에 들어가는 데이타의 형태를 제공해주는 클래스이다.
 여기서 사용된 StringFlavor 는 java Unicode String class 을 나타낸다.
 MimeType = "application/x-java-serialized-object" 을 나타내게 된다.
if(e.isDataFlavorSupported(stringFlavor)) { String filename = (String)tr.getTransferData(stringFlavor); e.acceptDrop(DnDConstants.ACTION_COPY_OR_MOVE); // 인자로 넘어온 액션으로 drop 을 받아들인다. readFile(filename); textPane.setCaretPosition(0); // Text 의 첫줄이 TextPane 의 첫줄에 오게끔 설정한다. e.dropComplete(true); } else { e.rejectDrop(); // Drop 을 거절한다. } } catch(IOException ioe) { ioe.printStackTrace(); } catch(UnsupportedFlavorException ufe) { ufe.printStackTrace(); } } // DropTargetListener 메소드를 구현한 부분이다. public void dragEnter(DropTargetDragEvent e) { } public void dragExit(DropTargetEvent e) { } public void dragOver(DropTargetDragEvent e) { } public void dropActionChanged(DropTargetDragEvent e) { } }
< 출처 : http://www.javastudy.co.kr/docs/b612/swing/draganddrop.html >
반응형

반응형

Java Swing Events

Events are an important part in any GUI program. All GUI applications are event-driven. An application reacts to different event types which are generated during it's life. Events are generated mainly by the user of an application. But they can be generated by other means as well. e.g. internet connection, window manager, timer. In the event model, there are three participants:

  • event source
  • event object
  • event listener

The Event source is the object whose state changes. It generates Events. The Event object (Event) encapsulates the state changes in the event source. The Event listener is the object that wants to be notified. Event source object delegates the task of handling an event to the event listener.

Event handling in Java Swing toolkit is very powerful and flexible. Java uses Event Delegation Model. We specify the objects that are to be notified when a specific event occurs.

An event object

When something happens in the application, an event object is created. For example, when we click on the button or select an item from list. There are several types of events. An ActionEvent, TextEvent, FocusEvent, ComponentEvent etc. Each of them is created under specific conditions.

Event object has information about an event, that has happened. In the next example, we will analyze an ActionEvent in more detail.

import java.awt.event.ActionEvent;
import java.awt.event.ActionListener;

import java.text.DateFormat;

import java.util.Calendar;
import java.util.Date;
import java.util.Locale;

import javax.swing.DefaultListModel;
import javax.swing.JButton;
import javax.swing.JFrame;
import javax.swing.JList;
import javax.swing.JPanel;


public class EventObject extends JFrame {


    private JList list;
    private DefaultListModel model;

    public EventObject() {

        setTitle("Event Object");

        JPanel panel = new JPanel();
        panel.setLayout(null);

        model = new DefaultListModel();
        list = new JList(model);
        list.setBounds(150, 30, 220, 150);

        JButton ok = new JButton("Ok");
        ok.setBounds(30, 35, 80, 25);

        ok.addActionListener(new ActionListener() {
            public void actionPerformed(ActionEvent event) {

                Calendar cal = Calendar.getInstance();
                cal.setTimeInMillis(event.getWhen());
                Locale locale = Locale.getDefault();
                Date date = new Date();
                String s = DateFormat.getTimeInstance(DateFormat.SHORT,
                    locale).format(date);

                if ( !model.isEmpty() )
                    model.clear();

                if (event.getID() == ActionEvent.ACTION_PERFORMED)
                    model.addElement(" Event Id: ACTION_PERFORMED");

                model.addElement(" Time: " + s);

                String source = event.getSource().getClass().getName();
                model.addElement(" Source: " + source);

                int mod = event.getModifiers();

                StringBuffer buffer = new StringBuffer(" Modifiers: ");

                if ((mod & ActionEvent.ALT_MASK) > 0)
                    buffer.append("Alt ");

                if ((mod & ActionEvent.SHIFT_MASK) > 0)
                    buffer.append("Shift ");

                if ((mod & ActionEvent.META_MASK) > 0)
                    buffer.append("Meta ");

                if ((mod & ActionEvent.CTRL_MASK) > 0)
                    buffer.append("Ctrl ");

                model.addElement(buffer);
            }
        });

        panel.add(ok);
        panel.add(list);
        add(panel);

        setSize(420, 250);
        setLocationRelativeTo(null);
        setDefaultCloseOperation(EXIT_ON_CLOSE);
        setVisible(true);
    }

    public static void main(String[] args) {
        new EventObject();
    }
}

The code example shows a button and a list. If we click on the button, information about the event is displayed in the list. In our case, we are talking about an ActionEvent class. The data will be the time, when the event occured, the id of the event, the event source and the modifier keys.

 public void actionPerformed(ActionEvent event) {

Inside the action listener, we have an event parameter. It is the instance of the event, that has occured. In our case it is an ActionEvent.

 cal.setTimeInMillis(event.getWhen());

Here we get the time, when the event occured. The method returns time value in milliseconds. So we must format it appropriately.

 String source = event.getSource().getClass().getName();
 model.addElement(" Source: " + source);

Here we add the name of the source of the event to the list. In our case the source is a JButton.

 int mod = event.getModifiers();

We get the modifier keys. It is a bitwise-or of the modifier constants.

 if ((mod & ActionEvent.SHIFT_MASK) > 0)
     buffer.append("Shift ");

Here we determine, whether we have pressed a Shift key.


Event Object
Figure: Event Object

Implementation

There are several ways, how we can implement event handling in Java Swing toolkit.

  • Anonymous inner class
  • Inner class
  • Derived class

Anonymous inner class

We will illustrate these concepts on a simple event example.

import java.awt.event.ActionEvent;
import java.awt.event.ActionListener;

import javax.swing.JButton;
import javax.swing.JFrame;
import javax.swing.JPanel;


public class SimpleEvent extends JFrame {


    public SimpleEvent() {

        setTitle("Simle Event");

        JPanel panel = new JPanel();
        panel.setLayout(null);

        JButton close = new JButton("Close");
        close.setBounds(40, 50, 80, 25);

        close.addActionListener(new ActionListener() {
            public void actionPerformed(ActionEvent event) {
                System.exit(0);
            }

        });

        panel.add(close);
        add(panel);

        setSize(300, 200);
        setLocationRelativeTo(null);
        setDefaultCloseOperation(EXIT_ON_CLOSE);
        setVisible(true);
    }

    public static void main(String[] args) {
        new SimpleEvent();
    }
}

In this example, we have a button that closes the window upon clicking.

 JButton close = new JButton("Close");

The button is the event source. It will generate events.

 close.addActionListener(new ActionListener() {
     public void actionPerformed(ActionEvent event) {
         System.exit(0);
     }
 });

Here we register an action listener with the button. This way, the events are sent to the event target. The event target in our case is ActionListener class. In this code, we use an anonymous inner class.

Inner class

Here we implement the example using an inner ActionListener class.

import java.awt.event.ActionEvent;
import java.awt.event.ActionListener;

import javax.swing.JButton;
import javax.swing.JFrame;
import javax.swing.JPanel;


public class InnerClass extends JFrame {

    public InnerClass() {

        setTitle("Using inner class");

        JPanel panel = new JPanel();
        panel.setLayout(null);

        JButton close = new JButton("Close");
        close.setBounds(40, 50, 80, 25);

        ButtonListener listener = new ButtonListener();
        close.addActionListener(listener); 

        panel.add(close);
        add(panel);

        setSize(300, 200);
        setLocationRelativeTo(null);
        setDefaultCloseOperation(EXIT_ON_CLOSE);
        setVisible(true);
    }

    class ButtonListener implements ActionListener {
        public void actionPerformed(ActionEvent e)
        {
            System.exit(0);
        }
      }

    public static void main(String[] args) {
        new InnerClass();
    }
}
 ButtonListener listener = new ButtonListener();
 close.addActionListener(listener); 

Here we have a non anonymous inner class.

 class ButtonListener implements ActionListener {
    public void actionPerformed(ActionEvent e)
    {
        System.exit(0);
    }
 }

The button listener is defined here.

A derived class implementing the listener

The following example will derive a class from a component and implement an action listener inside the class.

import java.awt.event.ActionEvent;
import java.awt.event.ActionListener;

import javax.swing.JButton;
import javax.swing.JFrame;
import javax.swing.JPanel;


public class UsingInterface extends JFrame {


    public UsingInterface() {

        setTitle("Using inner class");

        JPanel panel = new JPanel();
        panel.setLayout(null);

        MyButton close = new MyButton("Close");
        close.setBounds(40, 50, 80, 25);

        panel.add(close);
        add(panel);

        setSize(300, 200);
        setLocationRelativeTo(null);
        setDefaultCloseOperation(EXIT_ON_CLOSE);
        setVisible(true);
    }

    class MyButton extends JButton implements ActionListener {

        public MyButton(String text) {
            super.setText(text);
            addActionListener(this);
        }

        public void actionPerformed(ActionEvent e)
        {
            System.exit(0);
        }

    }

    public static void main(String[] args) {
        new UsingInterface();
    }
}

In this example, we create a MyButton class, which will implement the action listener.

 MyButton close = new MyButton("Close");

Here we create the MyButton custom class.

 class MyButton extends JButton implements ActionListener {

The MyButton class is extended from the JButton class. It implements the ActionListener interface. This way, the event handling is managed within the MyButton class.

 addActionListener(this);

Here we add the action listener to the MyButton class.

Multiple sources

A listener can be plugged into several sources. This will be explained in the next example.

import java.awt.BorderLayout;
import java.awt.event.ActionEvent;
import java.awt.event.ActionListener;

import javax.swing.BorderFactory;
import javax.swing.JButton;
import javax.swing.JFrame;
import javax.swing.JLabel;
import javax.swing.JPanel;
import javax.swing.border.EtchedBorder;


public class MultipleSources extends JFrame {

    JLabel statusbar;

    public MultipleSources() {

        setTitle("Multiple Sources");
        JPanel panel = new JPanel();
        statusbar = new JLabel(" ZetCode");

        statusbar.setBorder(BorderFactory.createEtchedBorder(
                EtchedBorder.RAISED));

        panel.setLayout(null);

        JButton close = new JButton("Close");
        close.setBounds(40, 30, 80, 25);
        close.addActionListener(new ButtonListener());

        JButton open = new JButton("Open");
        open.setBounds(40, 80, 80, 25);
        open.addActionListener(new ButtonListener());

        JButton find = new JButton("Find");
        find.setBounds(40, 130, 80, 25);
        find.addActionListener(new ButtonListener());

        JButton save = new JButton("Save");
        save.setBounds(40, 180, 80, 25);
        save.addActionListener(new ButtonListener());

        panel.add(close);
        panel.add(open);
        panel.add(find);
        panel.add(save);

        add(panel);
        add(statusbar, BorderLayout.SOUTH);

        setSize(400, 300);
        setLocationRelativeTo(null);
        setDefaultCloseOperation(EXIT_ON_CLOSE);
        setVisible(true);
    }

    class ButtonListener implements ActionListener {
        public void actionPerformed(ActionEvent e)
        {
            JButton o = (JButton) e.getSource();
            String label = o.getText();
            statusbar.setText(" " + label + " button clicked");
        }
      }


    public static void main(String[] args) {
        new MultipleSources();
    }
}

We create four buttons and a statusbar. The statusbar will display an informative message upon clicking on the button.

 close.addActionListener(new ButtonListener());
 ...
 open.addActionListener(new ButtonListener());
 ...

Each button will be registered against a ButtonListener class.

 JButton o = (JButton) e.getSource();
 String label = o.getText();

Here we determine, which button was pressed.

 statusbar.setText(" " + label + " button clicked")

We update the statusbar.


Multiple Sources
Figure: Multiple Sources

Multiple listeners

We can register several listeners for one event.

import java.awt.BorderLayout;
import java.awt.event.ActionEvent;
import java.awt.event.ActionListener;

import java.util.Calendar;

import javax.swing.BorderFactory;
import javax.swing.JButton;
import javax.swing.JFrame;
import javax.swing.JLabel;
import javax.swing.JPanel;
import javax.swing.JSpinner;
import javax.swing.SpinnerModel;
import javax.swing.SpinnerNumberModel;
import javax.swing.border.EtchedBorder;


public class MultipleListeners extends JFrame {

    private JLabel statusbar;
    private JSpinner spinner;
    private static int count = 0;

    public MultipleListeners() {

        setTitle("Multiple Listeners");
        JPanel panel = new JPanel();
        statusbar = new JLabel("0");

        statusbar.setBorder(BorderFactory.createEtchedBorder(
                EtchedBorder.RAISED));

        panel.setLayout(null);

        JButton add = new JButton("+");
        add.setBounds(40, 30, 80, 25);
        add.addActionListener(new ButtonListener1());
        add.addActionListener(new ButtonListener2());

        Calendar calendar = Calendar.getInstance();
        int currentYear = calendar.get(Calendar.YEAR);

        SpinnerModel yearModel = new SpinnerNumberModel(currentYear,
                                       currentYear - 100,
                                       currentYear + 100,
                                       1);

        spinner = new JSpinner(yearModel);
        spinner.setEditor(new JSpinner.NumberEditor(spinner, "#"));

        spinner.setBounds(190, 30, 80, 25);

        panel.add(add);
        panel.add(spinner);

        add(panel);
        add(statusbar, BorderLayout.SOUTH);

        setSize(300, 200);
        setLocationRelativeTo(null);
        setDefaultCloseOperation(EXIT_ON_CLOSE);
        setVisible(true);
    }

    class ButtonListener1 implements ActionListener {
        public void actionPerformed(ActionEvent e)
        {
            Integer val = (Integer) spinner.getValue();
            spinner.setValue(++val);
        }
      }

    class ButtonListener2 implements ActionListener {
        public void actionPerformed(ActionEvent e)
        {
            statusbar.setText(Integer.toString(++count));
        }
      }


    public static void main(String[] args) {
        new MultipleListeners();
    }
}

In this example, we have a button, spinner and a statusbar. We use two button listeners for one event. One click of a button will add one year to the spinner component and update the statusbar. The statusbar will show, how many times we have clicked on the button.

 add.addActionListener(new ButtonListener1());
 add.addActionListener(new ButtonListener2());

We register two button listeners.

 SpinnerModel yearModel = new SpinnerNumberModel(currentYear,
                              currentYear - 100,
                              currentYear + 100,
                              1);
 spinner = new JSpinner(yearModel);

Here we create the spinner component. We use a year model for the spinner. The SpinnerNumberModel arguments are initial value, min, max values and the step.

 spinner.setEditor(new JSpinner.NumberEditor(spinner, "#"));

We remove the thousands separator.

 Integer val = (Integer) spinner.getValue();
 spinner.setValue(++val);

Here we increase the year number.


Multiple Listeners
Figure: Multiple Listeners

Removing listeners

The Java Swing toolkit enables us to remove the registered listeners.

import java.awt.event.ActionEvent;
import java.awt.event.ActionListener;
import java.awt.event.ItemEvent;
import java.awt.event.ItemListener;

import javax.swing.JButton;
import javax.swing.JCheckBox;
import javax.swing.JFrame;
import javax.swing.JLabel;
import javax.swing.JPanel;


public class RemoveListener extends JFrame {

    private JLabel text;
    private JButton add;
    private JCheckBox active;
    private ButtonListener buttonlistener;
    private static int count = 0;

    public RemoveListener() {

        setTitle("Remove listener");
        JPanel panel = new JPanel();

        panel.setLayout(null);

        add = new JButton("+");
        add.setBounds(40, 30, 80, 25);
        buttonlistener = new ButtonListener();

        active = new JCheckBox("Active listener");
        active.setBounds(160, 30, 140, 25);

        active.addItemListener(new ItemListener() {
            public void itemStateChanged(ItemEvent event) {
                if (active.isSelected()) {
                  add.addActionListener(buttonlistener);}
                else {
                  add.removeActionListener(buttonlistener);
                }
            }
        });

        text = new JLabel("0");
        text.setBounds(40, 80, 80, 25);

        panel.add(add);
        panel.add(active);
        panel.add(text);

        add(panel);

        setSize(310, 200);
        setLocationRelativeTo(null);
        setDefaultCloseOperation(EXIT_ON_CLOSE);
        setVisible(true);
    }

    class ButtonListener implements ActionListener {
        public void actionPerformed(ActionEvent e)
        {
            text.setText(Integer.toString(++count));
        }
      }

    public static void main(String[] args) {
        new RemoveListener();
    }
}

We have three components on the panel. A button, check box and a label. By toggling the check box, we add or remove the listener for a button.

 buttonlistener = new ButtonListener();

We have to create a non anonymous listener, if we want to later remove it. We need a reference to it.

 if (active.isSelected()) {
     add.addActionListener(buttonlistener);}
 else {
     add.removeActionListener(buttonlistener);
 }

We determine, whether the check box is selected. Then we add or remove the listener.


Remove listener
Figure: Remove listener

Moving a window

The following example will look for a position of a window on the screen.

import java.awt.Font;
import java.awt.event.ComponentEvent;
import java.awt.event.ComponentListener;

import javax.swing.JFrame;
import javax.swing.JLabel;
import javax.swing.JPanel;


public class MovingWindow extends JFrame implements ComponentListener {

    private JLabel labelx;
    private JLabel labely;

    public MovingWindow() {

        setTitle("Moving window");

        JPanel panel = new JPanel();
        panel.setLayout(null);

        labelx = new JLabel("x: ");
        labelx.setFont(new Font("Serif", Font.BOLD, 14));
        labelx.setBounds(20, 20, 60, 25);

        labely = new JLabel("y: ");
        labely.setFont(new Font("Serif", Font.BOLD, 14));
        labely.setBounds(20, 45, 60, 25);

        panel.add(labelx);
        panel.add(labely);

        add(panel);

        addComponentListener(this);

        setSize(310, 200);
        setLocationRelativeTo(null);
        setDefaultCloseOperation(EXIT_ON_CLOSE);
        setVisible(true);
    }

    public void componentResized(ComponentEvent e) {
    }

    public void componentMoved(ComponentEvent e) {
        int x = e.getComponent().getX();
        int y = e.getComponent().getY();
        labelx.setText("x: " + x);
        labely.setText("y: " + y);
    }

    public void componentShown(ComponentEvent e) {
    }

    public void componentHidden(ComponentEvent e) {
    }


    public static void main(String[] args) {
        new MovingWindow();
    }
}

The example shows the current window coordinates on the panel. To get the window position, we use the ComponentListener

 labelx.setFont(new Font("Serif", Font.BOLD, 14));

We make the font bigger, the default one is a bit small.

 int x = e.getComponent().getX();
 int y = e.getComponent().getY();

Here we get the x and the y positions.

Notice, that we have to implement all four methods, that are available in the ComponentListener. Even, if we do not use them.


Moving a window
Figure: Moving a window

Adapters

Adapters are convenient classes. In the previous code example, we had to implement all four methods of a ComponentListener class. Even if we did not use them. To avoid unnecessary coding, we can use adapters. Adapter is a class that implements all necessary methods. They are empty. We then use only those methods, that we actually need. There is no adapter for a button click event. Because there we have only one method to implement. The actionPerformed() method. We can use adapters in situations, where we have more than one method to implement.

The following example is a rewrite of the previous one, using a ComponentAdapter.

import java.awt.Font;
import java.awt.event.ComponentAdapter;
import java.awt.event.ComponentEvent;

import javax.swing.JFrame;
import javax.swing.JLabel;
import javax.swing.JPanel;


public class Adapter extends JFrame {

    private JLabel labelx;
    private JLabel labely;

    public Adapter() {

        setTitle("Adapter");

        JPanel panel = new JPanel();
        panel.setLayout(null);

        labelx = new JLabel("x: ");
        labelx.setFont(new Font("Serif", Font.BOLD, 14));
        labelx.setBounds(20, 20, 60, 25);

        labely = new JLabel("y: ");
        labely.setFont(new Font("Serif", Font.BOLD, 14));
        labely.setBounds(20, 45, 60, 25);


        panel.add(labelx);
        panel.add(labely);

        add(panel);
        addComponentListener(new MoveAdapter());

        setSize(310, 200);
        setLocationRelativeTo(null);
        setDefaultCloseOperation(EXIT_ON_CLOSE);
        setVisible(true);
    }


    class MoveAdapter extends ComponentAdapter {
      public void componentMoved(ComponentEvent e) {
          int x = e.getComponent().getX();
          int y = e.getComponent().getY();
          labelx.setText("x: " + x);
          labely.setText("y: " + y);
      }
     }

    public static void main(String[] args) {
        new Adapter();
    }
}

This example is a rewrite of the previous one. Here we use the ComponentAdapter.

 addComponentListener(new MoveAdapter());

Here we register the component listener.

 class MoveAdapter extends ComponentAdapter {
     public void componentMoved(ComponentEvent e) {
         int x = e.getComponent().getX();
	 int y = e.getComponent().getY();
	 labelx.setText("x: " + x);
         labely.setText("y: " + y);
     }
 }

Inside the MoveAdapter inner class, we define the componentMoved() method. All the other methods are left empty.

반응형

Substance look and feel - getting started

This document describes the steps to create a sample Swing application and run it under Substance look and feel.

Since Substance requires JDK 6.0 or higher, if you don't have such an installation on your machine, you need to download it from this site and install it. The command-prompt examples below assume that java executable is in the path. This executable is part of JRE (under bin folder) as well as part of JDK (under bin folder). Consult your OS manual on how to add the relevant folder to the path. Alternatively, you can put the entire path to the java executable in the scripts below.

After you have JDK 6.0+ installed on your machine, create the following Walkthrough.java class:

public class Walkthrough extends JFrame {
  public Walkthrough() {
    super("Sample app");
    this.setLayout(new FlowLayout());
    this.add(new JButton("button"));
    this.add(new JCheckBox("check"));
    this.add(new JLabel("label"));

    this.setSize(new Dimension(25080));
    this.setLocationRelativeTo(null);
    this.setDefaultCloseOperation(JFrame.EXIT_ON_CLOSE);
  }

  public static void main(String[] args) {
    JFrame.setDefaultLookAndFeelDecorated(true);

    SwingUtilities.invokeLater(new Runnable() {
      public void run() {
        Walkthrough w = new Walkthrough();
        w.setVisible(true);
      }
    });
  }
}

This is a simple frame (that does nothing) with a button, a checkbox and a label. You can create this class in your favourite IDE or in any text editor. Once this class is created, compile it. If you're using an IDE, consult the IDE help on the compilation process. If you're using a simple text editor, you can compile this class by using:

javac Walktrough.java

If you have problems, consult the online help for javac compiler. The compiled Walkthrough.class will be created in the same folder as your Walkthrough.java. In order to run it, use:

java -cp . Walkthrough

You will see the following frame under the default Ocean look and feel:

In order to run the same frame under Substance look and feel, you first need to choose the Substance skin that you would like to use (see the links at the end of this document). Suppose that you choose the Business skin. Now you have the following options:

  • Start your VM with -Dswing.defaultlaf=org.jvnet.substance.skin.SubstanceBusinessLookAndFeel
  • UIManager.setLookAndFeel(new SubstanceBusinessLookAndFeel())
  • UIManager.setLookAndFeel("org.jvnet.substance.skin.SubstanceBusinessLookAndFeel");

The first option doesn't require any code changes in the application above. Run the following script:

java -Dswing.defaultlaf=org.jvnet.substance.skin.SubstanceBusinessLookAndFeel -cp . Walkthrough

You will see the following exception:

Exception in thread "AWT-EventQueue-0" java.lang.Error: Cannot load org.jvnet.substance.skin.SubstanceBusinessLookAndFeel
	at javax.swing.UIManager.initializeDefaultLAF(UIManager.java:1345)
	at javax.swing.UIManager.initialize(UIManager.java:1432)
	at javax.swing.UIManager.maybeInitialize(UIManager.java:1420)
	at javax.swing.UIManager.getUI(UIManager.java:1007)
	at javax.swing.JPanel.updateUI(JPanel.java:109)
	at javax.swing.JPanel.(JPanel.java:69)
	at javax.swing.JPanel.(JPanel.java:92)
	at javax.swing.JPanel.(JPanel.java:100)
	at javax.swing.JRootPane.createGlassPane(JRootPane.java:527)
	at javax.swing.JRootPane.(JRootPane.java:347)
	at javax.swing.JFrame.createRootPane(JFrame.java:260)
	at javax.swing.JFrame.frameInit(JFrame.java:241)
	at javax.swing.JFrame.(JFrame.java:208)
	at Walkthrough.(Walkthrough.java:10)
	at Walkthrough$1.run(Walkthrough.java:25)
	at java.awt.event.InvocationEvent.dispatch(InvocationEvent.java:209)
	at java.awt.EventQueue.dispatchEvent(EventQueue.java:597)
	at java.awt.EventDispatchThread.pumpOneEventForFilters(EventDispatchThread.java:284)
	at java.awt.EventDispatchThread.pumpEventsForFilter(EventDispatchThread.java:184)
	at java.awt.EventDispatchThread.pumpEventsForHierarchy(EventDispatchThread.java:174)
	at java.awt.EventDispatchThread.pumpEvents(EventDispatchThread.java:169)
	at java.awt.EventDispatchThread.pumpEvents(EventDispatchThread.java:161)
	at java.awt.EventDispatchThread.run(EventDispatchThread.java:122)

This means that the org.jvnet.substance.skin.SubstanceBusinessLookAndFeel class in not found in the classpath. This class is located in the substance.jar that you need to download from the Documents & Files section of the Substance project page. For this example, we assume that the substance.jar is located under C:/temp folder. In order to run the frame under Substance, use the following script:

java -Dswing.defaultlaf=org.jvnet.substance.skin.SubstanceBusinessLookAndFeel -cp .;C:/temp/substance.jar Walkthrough

The result is the same frame under Substance look and feel:

The other two options for setting Substance require changing the code. Go back to your Java editor and replace the main() method by:

  public static void main(String[] args) {
    JFrame.setDefaultLookAndFeelDecorated(true);
    try {
      UIManager.setLookAndFeel(new SubstanceRavenGraphiteLookAndFeel());
    catch (Exception e) {
      System.out.println("Substance Raven Graphite failed to initialize");
    }
    SwingUtilities.invokeLater(new Runnable() {
      public void run() {
        Walkthrough w = new Walkthrough();
        w.setVisible(true);
      }
    });
  }

Note that here we are using another Substance skin, Raven Graphite. In order to compile the new Walkthrough.java, you need to add the substance.jar to the build path. Consult your IDE help if you're using IDE. For command-prompt compilation, use the additional -cp flag:

javac -cp c:/temp/substance.jar Walktrough.java

Now you can run your application without the -Dswing.defaultlaf JVM flag, but you still need to specify the location of the substance.jar as before:

java -cp .;C:/temp/substance.jar Walkthrough

If you don't want to create an explicit dependency on the Substance classes in your code, change your main() method to:

  public static void main(String[] args) {
    JFrame.setDefaultLookAndFeelDecorated(true);
    try {
      UIManager.setLookAndFeel("org.jvnet.substance.skin.SubstanceRavenGraphiteLookAndFeel");
    catch (Exception e) {
      System.out.println("Substance Raven Graphite failed to initialize");
    }
    SwingUtilities.invokeLater(new Runnable() {
      public void run() {
        Walkthrough w = new Walkthrough();
        w.setVisible(true);
      }
    });
  }

You can run the application the same way as before. Here is how it looks like:

Where to go from here?

  • Read the FAQ
  • Read about the VM flags
  • Read about the client properties
  • Read about the API
  • Read about using skins
  • Download the sources and study the test application in test/Check.java
  • Read the Javadocs of SubstanceLookAndFeel class.

<출처 : https://substance.dev.java.net/docs/getting-started.html >

반응형

Sun Developer Network 공식 블로그 <출처 : http://blog.sdnkorea.com/blog/239 >

대부분의 경우 개발자들은 자바 애플리케이션이 배포된 플랫폼에 딱 맞는 애플리케이션처럼 보이기를 원한다. Mac OS X와 같은 몇몇 플랫폼에서는 적절한 룩앤필이 디폴트값으로 정해지는 반면에 윈도우와 같은 플랫폼은 특정 룩앤필(look and feel)을 설정하기 위해서 다음과 같은 호출이 필요하다.

   UIManager.setLookAndFeel(
            UIManager.getSystemLookAndFeelClassName());

이번 테크팁에서는 탑재된 룩앤필을 플랫폼에 맞도록 결정하게 될 것이다. 새로이 이용 가능한 GTK+ 룩앤필을 추가하고, 라디오 버튼을 클릭해서 룩앤필을 바꿀 수 있는 애플리케이션을 만들게 될 것이다. 마지막으로, 애플리케이션에 사용자의 회사 마케팅 테마에 맞는 룩앤필을 적용하기 위해서 크로스 플랫폼 룩앤필을 사용자 정의하는 방법을 배우도록 하겠다.

인스톨된 룩앤필의 리스트를 생성하자. 정적 메소드 getInstalledLookAndFeels()를 호출하면 LookAndFeelInfo 타입의 객체의 배열을 리턴하게 된다. 인스톨된 LookAndFeels의 이름들을 배열로 얻어내려면 getName()를 이용하고, 구현된 각각의 클래스 이름을 알아내기 위해서는 getClassName()를 사용한다. 인스톨된 LookAndFeels의 이름을 배열로 디스플레이하는 다음 프로그램을 실행해 보자.

   import javax.swing.UIManager;

   public class AvailableLaF {
      public static void main(String[] args) {
        UIManager.LookAndFeelInfo[] installed =
          UIManager.getInstalledLookAndFeels();
        for (int i = 0; i < installed.length; i++) {
          System.out.println(installed[i].getName());
        }
        System.out.println(
          "\nThe current look and feel is "
          + UIManager.getLookAndFeel().getName());
      }
   }

솔라리스 운영환경이나 윈도우 2000에서 실행시켰다면 다음과 같은 출력 값을 보게 된다.

   Metal
   CDE/Motif
   Windows
   
   The current look and feel is Metal

Panther가 실행되는 Mac에서의 출력 값은 다음과 같다.

   Mac OS X
   Metal
   CDE/Motif

   The current look and feel is Mac OS X Aqua

J2SE 1.4.2에서는 GTK+ 2.0에 기반한 크로스 플랫폼 룩앤필도 존재한다. 크로스 플랫폼이 인스톨된 룩앤필의 리스트에 나타나지 않더라도, 이용 가능하다면 이를 인스톨할 수 있다. 크로스 플랫폼 룩앤필을 인스톨하기 위해서는 다음과 같은 메소드가 필요하다.

   private void installGTK() {
      try {
        String GTK =
          "com.sun.java.swing.plaf.gtk.GTKLookAndFeel";
        UIManager.setLookAndFeel(GTK);
        UIManager.installLookAndFeel("GTK", GTK);
      } catch (Exception e) {
        System.err.println("Could not install GTK");
      }
    }

GTK는 솔라리스나 Mac OS X와 같은 시스템에서 이용 가능하다. 윈도우에서는 "Could not install GTK" 과 같은 메시지를 보게 될 것이다. GTK를 지원하는 시스템에서 스윙 기반 프로그램을 실행하고자 한다면 커맨드 라인에서 룩앤필을 설정할 수도 있다. 다음은 룩앤필을 설정하는 커맨드 라인이다.

   java -Dswing.defaultlaf=
     com.sun.java.swing.plaf.gtk.GTKLookAndFeel 
     

이하의 프로그램 ChangingLaF는 라디오 버튼을 이용해서 룩앤필을 바꿀 수 있게 해준다. 만약 사용자의 시스템에서 GTK가 이용 가능하다면, 프로그램은 인스톨된 룩앤필의 리스트에 GTK를 추가하게 될 것이다. 그리고 나서 프로그램은 각각의 룩앤필을 위해 라디오 버튼을 생성하게 된다. 프로그램을 실행하고 라디오 버튼을 클릭하면 사용자 인터페이스는 지정한 룩앤필로 바뀌게 된다. 프로그램은 이너클래스의 actionPerformed() 메소드에 대한 응답으로 이를 실행하게 되는 것이다. 다음과 같은 2개의 과정이 수행된다.

   UIManager.setLookAndFeel(getText());
   SwingUtilities.updateComponentTreeUI(
     ChangingLaF.this);

룩앤필은 선택된 라디오 버튼의 텍스트 라벨로 바뀐다. 프로그램은 루트에 주어진 컴포넌트를 이용해서 트리를 새로 그리기 위해 updateComponentTreeUI()를 호출한다. updateComponentTreeUI()JFrame의 인스턴스인 객체를 호출하게 되는데, 이 때 JFrame 은 클래스 이름 뒤에 this가 붙은 형태로 식별된다. 위의 예제에서는, outer 클래스가 ChangingLaF이기 때문에 포함된 인스턴스는 ChangingLaF.this로 식별된다. 변경 가능한 룩앤필 옵션을 갖는 JFrame을 생성하기 위한 전체 ChangingLaF 프로그램을 보자.

   import javax.swing.JFrame;
   import javax.swing.JFileChooser;
   import javax.swing.JPanel;
   import javax.swing.UIManager;
   import javax.swing.JRadioButton;
   import javax.swing.ButtonGroup;
   import javax.swing.SwingUtilities;
   import javax.swing.UnsupportedLookAndFeelException;
   import java.awt.BorderLayout;
   import java.awt.GridLayout;
   import java.awt.event.ActionListener;
   import java.awt.event.ActionEvent;

   public class ChangingLaF extends JFrame {
      private static ButtonGroup group =
                                new ButtonGroup();

      public static void main(String[] args) {
        new ChangingLaF().getContentPane();
      }

      ChangingLaF() {
        JPanel myPanel = new JPanel();
        getContentPane().add(
          myPanel, BorderLayout.SOUTH);
        setLaFButtons(myPanel);
        getContentPane().add(new JFileChooser(),
          BorderLayout.CENTER);
        pack();
        setVisible(true);
      }

      private void setLaFButtons(JPanel choices) {
        installGTK();
        UIManager.LookAndFeelInfo[] laf =
          UIManager.getInstalledLookAndFeels();
        choices.setLayout(new GridLayout(laf.length, 1));
        for (int i = 0; i < laf.length; i++) {
          choices.add(new LaFButton(laf[i]));
        }
      }

      private void installGTK() {
        try {
          String GTK =
            "com.sun.java.swing.plaf.gtk.GTKLookAndFeel";
          UIManager.setLookAndFeel(GTK);
          UIManager.installLookAndFeel("GTK", GTK);
        } catch (Exception e) {
          System.err.println("Could not install GTK");
        }
      }

      private class LaFButton extends JRadioButton
        implements ActionListener {
        LaFButton(UIManager.LookAndFeelInfo laf) {
          super(laf.getClassName());
          group.add(this);
          addActionListener(this);
        }

       public void actionPerformed(ActionEvent event) {
         try {
           UIManager.setLookAndFeel(getText());
           SwingUtilities.updateComponentTreeUI(
             ChangingLaF.this);
           // call myFrame.pack() 
           // to resize frame for laf
         } catch (IllegalAccessException e) {
           // insert code to handle this exception
         } catch (UnsupportedLookAndFeelException e) {
           // insert code to handle this exception
         } catch (InstantiationException e) {
           // insert code to handle this exception
         } catch (ClassNotFoundException e) {
           // insert code to handle this exception
         }
       }
     }
   } 

ChangingLaF을 컴파일하고 실행해 보자. 플랫폼에 인스톨된 룩앤필을 쉽게 변경할 수가 있다. J2SE 1.4.2에서는 Windows XP 룩앤필도 적용할 수 있다.

사용자가 룩앤필을 사용자정의하고자 할 때가 종종 있다. 시스템이나 사용자 텍스트의 폰트를 바꾸거나, 컴포넌트를 해당 회사의 마케팅 테마에 맞는 색으로 그려야 하는 경우가 있다. 자, 룩앤필을 사용자 정의하고, 윈도우에서는 GTK가 지원되지 않는 관계로 Metal 테마를 이용하자. 이 예에서 사용하고 있는 DefaultMetalTheme는 J2SE 1.5에서는 더 이상 디폴트값으로 사용되지 않는다.

javax.swing.plaf.metal 패키지내의 클래스들을 살펴보자. MetalLookAndFeel 클래스는 Metal의 자바 구현(Java Implementation)이다. 서브클래스 DefaultMetalTheme는 기초적인 폰트 조절과, 메뉴 아이템, 시스템, 사용자 입력, 윈도우 타이틀 등을 변경하기 위해 사용된다. 이는 또한 3개의 원색과 3개의 2차 색으로 구별되는 6가지 기본 색을 변경하기 위해서도 쓰인다. 다음 CustomTheme프로그램은 DefaultMetalTheme의 서브 클래스를 생성한다. 이 프로그램은 접근 메소드들의 리턴값을 변경함으로써 오버라이드되는 색을 설정하는데, 이는 흰색을 파란색으로, 검은색을 빨강색으로 대체한다. 프로그램은 MetalLookAndFeel 클래스내의 setCurrentTheme() 메소드를 이용해서 이러한 비표준 색 테마를 선택하게 된다.

   import javax.swing.JFrame;
   import javax.swing.JFileChooser;
   import javax.swing.plaf.metal.MetalLookAndFeel;
   import javax.swing.UIManager;
   import javax.swing.UnsupportedLookAndFeelException;
   import javax.swing.plaf.metal.MetalLookAndFeel;
   import javax.swing.plaf.metal.DefaultMetalTheme;
   import javax.swing.plaf.ColorUIResource;
   import java.awt.Color;

   public class CustomTheme {

      public static void main(String[] args)
              throws UnsupportedLookAndFeelException{
        UIManager.setLookAndFeel(
          new MetalLookAndFeel());
        MetalLookAndFeel.setCurrentTheme(
          new CustomLaF());
        JFrame frame = new JFrame("Metal Theme");
        frame.getContentPane().add(new JFileChooser());
        frame.pack();
        frame.setVisible(true);
      }

      static class CustomLaF extends DefaultMetalTheme {
        protected ColorUIResource getPrimary1() {
          return new ColorUIResource(Color.MAGENTA);
        }

        public ColorUIResource getWhite() {
          return new ColorUIResource(Color.BLUE);
        }

        public ColorUIResource getBlack() {
          return new ColorUIResource(Color.RED);
        }

        public ColorUIResource getPrimaryControl() {
          return new ColorUIResource(Color.GREEN);
        }

        protected ColorUIResource getSecondary1() {
          return new ColorUIResource(Color.CYAN);
        }
      }
   }

변경된 테마를 보기 위해서는 Metal 룩앤필이 디폴트로 설정되었는지를 확인해 볼 필요가 있다. (윈도우에서는 필수적으로 확인해 보아야 한다.) 다음과 같이 커맨드 라인에서 애플리케이션을 실행할 수도 있다.

   java -Dswing.defaultlaf=
   javax.swing.plaf.metal.MetalLookAndFeel CustomTheme

스윙 룩앤필에 관한 자세한 정보는 자바 튜토리얼의 How to Set the Look and Feel를 참고하기 바란다.


반응형
스윙에서는 다양한 종류에 룩앤필을 적용할수가 있다.

일단 java api에서 UIManager 에 대해 잠깐 조사해 보자.

Look & Feel 의 지정

Look & Feel 의 지정 방법은 2 서로 통과합니다. 1 개(살)은 Look & Feel 의 클래스의 완전 지정의 이름을 지정하는 방법, 이제(벌써) 1 개(살)은 LookAndFeel 의 인스턴스를 작성해,setLookAndFeel 에 건네주는 방법입니다. 다음에, 시스템의 Look & Feel 를 Look & Feel 로서 설정하는 예를 나타냅니다.
UIManager.setLookAndFeel(UIManager.getSystemLookAndFeelClassName());
 
다음에, 클래스명을 지정해 Look & Feel 를 설정하는 예를 나타냅니다.
UIManager.setLookAndFeel("javax.swing.plaf.metal.MetalLookAndFeel");
 
Look & Feel 를 변경하면(자) 반드시, 모든 JComponents 상에서 updateUI 를 호출합니다. SwingUtilities.updateComponentTreeUI(java.awt.Component) 메소드를 사용하면(자), 포함 관계의 계층에 updateUI 를 간단하게 적용할 수 있습니다. 자세한 것은, 이 메소드를 참조해 주세요. Look & Feel 의 변경 후,updateUI 를 호출하지 않았던 경우의 정확한 동작은 지정되고 있지 않습니다. 예기치 않은 예외, 페인트의 문제, 또는 그 이상으로 곤란한 사태가 발생할 가능성이 높습니다.
-----------------  API 참조  --------------------------
try{
UIManager.setLookAndFeel(룩앤필 클래스이름);
}catch(Exception e){}

룩앤필은 익셉션을 발생시키기 때문에 try catch 문을 이용해 처리해 주면된다.

자바프로그램이 실행되는 시스템의 룩앤필을 적용하고자 할때는

룩앤필 클래스 이름: UIManager.getSystemLookAndFeelClassName()

ex)

try{
UIManager.setLookAndFeel(UIManager.getSystemLookAndFeelClassName());
}catch(Exception e){}

이렇게 해주면 되고 기타 다른 룩앤필을 적용하는 방법도 있다.

http://www.jgoodies.com/downloads/libraries.html 이 사이트에 라이브러리를 적용해
룩앤필을 적용하는것도 자기가 원하는 디자인을 표현하는 것도 좋을것이다.
반응형

Java 6 update10 에서 윈도우 Frame 투명화가 가능해졌네요.

이리저리 찾아보고 있었는데 자료를 찾았습니다. ㅎㅎ

원래 투명하게 보이는걸 좋아해서.. 내가 만든 플램도 넣고 싶었는데..

Java 라서 안되는구나.. 했는데 드디어 지원한다니 ㅋㅋ

영문 자료입니다.. 즐프 하시길..^^

How to Create Translucent and Shaped Windows

http://java.sun.com/developer/technicalArticles/GUI/translucent_shaped_windows/

The article describes a feature that allows creating applications with translucent and shaped windows.

Contents
 
Introduction
Feature Overview
 
Translucent Windows
Shaped Windows
API Overview
Using the Feature
 
Determining the Support for a Desired Effect
Making a Window Translucent
 
Setting the Opacity Level of a Window
Enabling Per-Pixel Translucency
Setting the Opacity Level of a Window
Translucent and Shaped Windows Demo
Summary
 

JavaFX Script is a capable new language that offers a set of APIs for creating RIAs. It also provides you with access to the rich features of the the standard Java language. One of the major features introduced in the Java SE 6u10 release is the ability to create translucent and shaped windows. This includes:

  • making application windows translucent (tuning the general opacity of the window and using a per-pixel translucency effect)
  • setting shapes on application windows

This feature is available for objects of the java.awt.Window class and its descendants, for example javax.swing.JFrame, javax.swing.JFDialog, java.awt.Frame.

Translucent Windows
The translucent windows capability tunes the appearance of application windows using two different effects - simple translucency and per-pixel translucency. First, we will give an overview of the simple translucency effect. The simple translucency effect is used to make a window evenly translucent. When simple translucency is applied to a window, all the pixels of the window are assigned an alpha value which determines the level of opacity from the available range. The smaller the value, the more transparent the given window becomes. The minimum opacity level provides a completely transparent window, while the maximum opacity level represents a completely non-transparent (i.e. opaque) window. The following images demonstrate the use of the effect in four cases:

Dialog window without the effect applied Evenly translucent dialog window with opacity level 85%
Figure 1. Dialog window without the effect applied
Figure 2. Evenly translucent dialog window with opacity level 85%
Evenly translucent dialog window with opacity level 45% Evenly translucent dialog window with opacity level 25%
Figure 3. Evenly translucent dialog window with opacity level 45%
Figure 4. Evenly translucent dialog window with opacity level 25%
 

The screenshots are taken from the Translucent and Shaped Windows Demo. For details, see the Demo section. For more information about the effect and its use, see Setting the Opacity Level of a Window.

Another feature new to this release is the per-pixel translucency effect. Like simple translucency, per-pixel translucency can be used to make a window evenly translucent, though it is not recommended for performance reasons. However, it also enables you to control the opacity level of each individual pixel independently in order to make the window non-uniformly translucent or transparent. A good example of the use of the per-pixel effect is a gradient effect when the opacity "strength" of the window background increases from its top to the bottom. The following images show the per-pixel translucency effect in action for two cases:

The dialog window is evenly translucent using per-pixel alpha with 50% level
A gradient effect from fully translucent (upper left corner) to fully opaque
Figure 5. The dialog window is evenly translucent using per-pixel alpha with 50% level (note that the button remains opaque)
Figure 6. A gradient effect from fully translucent (upper left corner) to fully opaque (lower right corner) has been applied to the dialog window (note that the button remains opaque)
 

Note that when the per-pixel translucency effect is applied to make a window area transparent, the area may or may not remain clickable - this is a platform dependent behavior. For more information about the effect and its use, see Enabling Per-Pixel Translucency.

To sum up, the simple translucency effect is used to make a window evenly translucent or transparent, and the per-pixel translucency effect enables you to make a window evenly or non-uniformly translucent or transparent. Both the simple translucency and the per-pixel translucency can be used to make a window evenly translucent or transparent. However, when applied, the simple translucency effect consumes fewer system resources.

Shaped Windows
The other feature introduced in release 6u10 is the window shaping effect. Using shaping you can set any shape to an undecorated window. When the effect is applied, the desired area of a window becomes transparent. Thus, the combination of transparent and non-transparent pixels form the shape of a given window. The next images demonstrate window shaping in two cases:

Oval dialog window
Rounded rectangle dialog window
Figure 7. Oval dialog window
Figure 8. Rounded rectangle dialog window
 

Note that transparent areas of the window become unclickable. For more information about the effect and its use, see Setting the Shape of a Window.

These effects can be applied in combination. For example, you can create an oval shaped translucent window or a rounded rectangle window with the gradient effect applied:

Oval evenly translucent dialog window
Rounded rectangle dialog window with the gradient effect applied
Figure 9. Oval evenly translucent dialog window
Figure 10. Rounded rectangle dialog window with the gradient effect applied
 

Note that the effects may not be supported by the underlying platform (either because of hardware or software limitations or both). Therefore, before applying the effect, make sure that the platform supports it. For more details on system support, see Determining the Support for a Desired Effect.

The translucent and shaped windows feature is available through the new com.sun.awt.AWTUtilities class.

Note: the com.sun.awt.AWTUtilities class is not part of an officially supported API and appears as an implementation detail. The API is only meant for limited use outside of the core platform. It may change drastically between update releases, and it may even be removed or be moved in some other packages or classes. The class should be used via Java Reflection. Supported and public API will appear in the next major JDK release.

Method (* all the methods in the table are public and static)
Purpose
enum Translucency
Represents the kinds of translucency supported by the underlying system
boolean isTranslucencySupported(Translucency translucencyKind)
Returns if the given level of translucency is supported by the underlying system
void setWindowOpacity(Window window, float opacity)
Sets the opacity of a window
float getWindowOpacity(Window window)
Returns the opacity of a window
Shape getWindowShape(Window window)
Returns the shape of a window
void setWindowShape(Window window, Shape shape)
Sets the shape of a window
void setWindowOpaque(Window window, boolean isOpaque)
Enables the per-pixel translucency for a window
boolean isWindowOpaque(Window window)
Returns whether the window is opaque or translucent
boolean isTranslucencyCapable(GraphicsConfiguration gc)
Verifies whether a given graphics configuration supports the per-pixel translucency
 

Determining the Support for a Desired Effect
As already mentioned, the underlying system may not support the desired effect. That is why it is necessary to perform system support validation. The simple translucency and shaping effects require only general validation which indicates whether the system supports the effect in general.

To determine whether your system supports the effect, use the AWTUtilities.isTranslucencySupported() method passing a corresponding constant value as an argument. The constants PERPIXEL_TRANSPARENT, TRANSLUCENT, PERPIXEL_TRANSLUCENT represent shaping, simple translucency, and per-pixel translucency respectively. The next example shows how to determine whether your system supports simple translucency:

if (AWTUtilities.isTranslucencySupported(AWTUtilities.Translucency.TRANSLUCENT) {
      //perform translucency operations here
}
 

The per-pixel translucency also requires a window be created using a compatible graphics configuration. To check whether the given graphics configuration supports the per-pixel translucency effect use the isTranslucencyCapable() method. The following example shows how to determine whether the default graphics configuration supports per-pixel translucency:

if ((AWTUtilities.isTranslucencySupported(AWTUtilities.Translucency.PERPIXEL_TRANSLUCENT)) &&
      (AWTUtilities.isTranslucencyCapable(defaultTranslucencyCapableGC))) {
      //perform translucency operations here
}
 

In case the default graphics configuration is not per-pixel translucency capable, you can go through all available graphics configurations and find one capable of translucency. Use the following code snippet:

GraphicsEnvironment env =
           GraphicsEnvironment.getLocalGraphicsEnvironment();
       GraphicsDevice[] devices = env.getScreenDevices();

     for (int i = 0; i < devices.length && translucencyCapableGC == null; i++) {          GraphicsConfiguration[] configs = devices[i].getConfigurations();          for (int j = 0; j < configs.length && translucencyCapableGC == null; j++) {              if (AWTUtilities.isTranslucencyCapable(configs[j])) {                  translucencyCapableGC = configs[j];              }          }      }


Once it has been determined that the system supports the desired effect, you can proceed to apply it to your top-level windows.

Making a Window Translucent
Setting the Opacity Level of a Window
The general opacity level of the application window is controlled by the the setWindowOpacity method. This method takes window and opacity variables as arguments. The window argument defines the window to apply the effect to. This argument must be an instance of the java.awt.Window class or its descendant, such as javax.swing.JFrame. The opacity argument is responsible for the level of opacity of the window. The lower its value, the more transparent the window becomes. The range of allowed values is [0f ; 1f]. If you set the value to 0f, the window becomes completely transparent (i.e. invisible). If the value is set to 1f, then the window becomes completely opaque (which is equal to a case when the effect is not applied at all). If the opacity level value is out of the range, it throws an IllegalArgumentException. Note that the effect can not be applied to full-screen windows. If you are in full screen windows mode and the opacity value is lower than 1f, you will get an IllegalArgumentException.

The following code snippet shows how to set the opacity level for your window. To make the window translucent, the example uses the setWindowOpacity method via Java Reflection, passing window and 0.75f as arguments. Window is an instance of the JFrame class, 0.75f is the value of the translucency.

Note that all the examples from this article that use the AWTUtilities class should be implemented via Java Reflection API.

try {
   Class<?> awtUtilitiesClass = Class.forName("com.sun.awt.AWTUtilities");
   Method mSetWindowOpacity = awtUtilitiesClass.getMethod("setWindowOpacity", Window.class, float.class);
   mSetWindowOpacity.invoke(null, window, Float.valueOf(0.75f));
} catch (NoSuchMethodException ex) {
   ex.printStackTrace();
} catch (SecurityException ex) {
   ex.printStackTrace();
} catch (ClassNotFoundException ex) {
   ex.printStackTrace();
} catch (IllegalAccessException ex) {
   ex.printStackTrace();
} catch (IllegalArgumentException ex) {
   ex.printStackTrace();
} catch (InvocationTargetException ex) {
   ex.printStackTrace();
}
 

When applied, the method makes the frame translucent with a 75% level of opacity.

To get the current opacity of a window, use the getWindowOpacity method passing a window object as its argument. If the opacity level has not yet been set, this method returns 1.0f. In case the method returns 0f, the window is completely transparent. The next code snippet shows how to get the current level of opacity of a window:

float opacity = AWTUtilities.getWindowOpacity(frame);
 

Enabling Per-Pixel Translucency
The setWindowOpaque method is used to enable per-pixel alpha support for the given window. The method takes the window and isOpaque variables as arguments. The window argument defines the window you apply the effect to. Note that the argument must represent a window created using an effect compatible graphics configuration. For more information on graphics configurations, see Determining the Support for a Desired Effect. Also note that the window must not be in full-screen mode when making it non-opaque, or an IllegalArgumentException is thrown.

The isOpaque parameter defines whether the window must be opaque (true), or translucent (false). Once the window becomes non-opaque (the isOpaque is set to false), the drawing sub-system starts to respect the alpha value of each individual pixel. If a pixel gets painted with an alpha color component equal to zero, it becomes visually transparent; if the alpha of the pixel is equal to 255, the pixel is fully opaque. Interim values of the alpha color component make the pixel semi-transparent (i.e. translucent). The following code snippet shows how to enable the per-pixel alpha support for your window.

AWTUtilities.setWindowOpaque(frame, false);
 

If invoking the getWarningString on the window object returns a non-null String, this method will not affect the opacity of the window.

The following code snippet shows how to achieve the gradient effect. It is done by defining the parameters of the JPanel component using the GradientPaint method:

jPanel1 = new javax.swing.JPanel() {
      protected void paintComponent(Graphics g) {
          if (g instanceof Graphics2D) {
              final int R = 240;
              final int G = 240;
              final int B = 240; 

            Paint p =             new GradientPaint(0.0f, 0.0f, new Color(R, G, B, 0),                 getWidth(), getHeight(), new Color(R, G, B, 255), true);             Graphics2D g2d = (Graphics2D)g;             g2d.setPaint(p);             g2d.fillRect(0, 0, getWidth(), getHeight());      } else {     super.paintComponent(g);      }    }  }


Then the component should be placed on the frame:

frame.add(jPanel1);
 

Setting the Shape of a Window
To apply a shape to a window use the setWindowShape method. The method uses the window argument to define the window you want to set the shape to. Additionally, it uses the shape argument to define the desired shape. The shape can be any instance of the java.awt.Shape interface, for example, Ellipse2D.Float or RoundRectangle2D.Float. The next code snippet shows how to set an oval shape on your window. In the example, the fd argument represents the JFrame window, Ellipse2D.Float creates a new instance of an Ellipse2D object that defines the shape of the window:

fd.addComponentListener(new ComponentAdapter() {
     @Override
     public void componentResized(ComponentEvent evt) {
       Shape shape = null;
       shape = new Ellipse2D.Float(0, 0, fd.getWidth(), fd.getHeight());
       AWTUtilities.setWindowShape(fd, shape);
     }
});
 

It is recommended to set the shape using the componentResized() method as this enables precise control of the shape according to the current size of the window.

When setting the shape on your window, note that the effect supports only undecorated windows. If your window is decorated and you apply the effect, you will get the original shape of the window without the effect applied to it. If the window has been created by untrusted code (i.e. the window has a non-null warning string returned by getWarningString()), the method returns without affecting the shape of the window. Also note that the window must not be in the full-screen mode when setting a non-null shape. Otherwise, an IllegalArgumentException is thrown.

To get the current value of the shape of a window, use the getWindowShape method passing a window as an argument. The getWindowShape method returns an object that implements the shape interface and represents the shape previously set . If no shape has been set yet, or the shape has been reset to null, this method returns null. In other words, the default rectangular shape is displayed when the null argument is passed. The following code demonstrates how to get the current shape of the window:

Shape currentShape = AWTUtilities.getWindowShape(frame);
 

You can see the translucency and shape features in action by running the "TranslucencyShapeDemo" example. Click the Launch button to run Demo using Java Web Start. Note that in order to start the demo you must have JDK 6u10 or later installed and properly configured on your machine. You can download release 6u10 at the java.sun.com download page.

The application enables you to choose a desired effect or a combination of effects and apply it to an undecorated dialog window. The application interface contains the following elements: a slidebar to set the level of constant alpha for the simple translucency effect from the range [0% ; 100%], three radio buttons to set the shape of a window - rectangular, with rounded corners, or oval, a check box to enable or disable the per-pixel gradient effect, Paint Gradient check box to switch the per-pixel gradient effect on and off, Display/Hide the frame and Close the Application buttons. Once the settings are defined, click the Display the frame button to display the dialog window with the desired effect applied. Note that you can also change the effect spontaneously. To do so, choose an effect type when the window is displayed, the window will automatically switch its view. The dialog window itself contains the Reshape Me button. When clicked, the window randomly changes its size and location on the desktop. To hide the dialog window, click Hide the frame, to close the application, click Close the Application button.

Launches the TranslucentShapes application

You can find the entire code for this program in ControlFrame.java, FancyFrame.java, Main.java, and AWTUtilitiesWrapper.java, all of which are packed in the TranslucentShapes NetBeans project. Note that the application uses the Java Reflection API. The Reflection mechanism is implemented through the AWTUtilitiesWrapper class. You can download the TransclucentShapes NetBeans project as a zip file.

This article provides a description of the translucent and shaped windows feature. It includes an overview, discusses the feature API, and offers practical examples. The demo attached to the article shows the use of each featured effect individually as well as the use of the effects in combination.

+ Recent posts