1. Introduction: Custom Models and Renderers
The idea of custom data models and cell renderers was covered in detail in the Swing tutorial section on JList. JTree is another component that commonly uses these techniques. This section will illustrate the basic use of JTree, show how to respond to node selection events, give an example of a custom model (a tree that builds the children "on the fly") and show how replace the icons that appear at the tree nodes.
2. Simple JTree
The simplest and most common way to use JTree is to create objects of type DefaultMutableTreeNode to act as the nodes of the tree. Nodes that have no children will be displayed as leaves. You supply a value, known as the "user object", to the DefaultMutableTreeNode constructor, to act as the value at each node. The toString method of that user object is what is displayed for each node.
Once you have some nodes, you hook them together in a tree structure via parentNode.add(childNode). Finally, you pass the node to the JTree constructor. Note that, since trees can change size based upon user input (expanding and collapsing nodes), trees are usually placed inside a JScrollPane. For example, here is a very simple tree:
DefaultMutableTreeNode root = new DefaultMutableTreeNode("Root");
DefaultMutableTreeNode child1 = new DefaultMutableTreeNode("Child 1");
root.add(child1);
DefaultMutableTreeNode child2 = new DefaultMutableTreeNode("Child 2");
root.add(child2);
JTree tree = new JTree(root);
someWindow.add(new JScrollPane(tree));
For more complicated trees, it is sometimes tedious and hard to maintain if you hook everything together "by hand". So you may find it useful to first make a simple tree-like data structure, then build nodes and hook them together automatically from that data structure. Here's an example that uses nested arrays to define the data structure.
2.1 Simple JTree Example: Source Code (Download source code)
import java.awt.*;
import javax.swing.*;
import javax.swing.tree.*;
public class SimpleTree extends JFrame {
public static void main(String[] args) {
new SimpleTree();
}
public SimpleTree() {
super("Creating a Simple JTree");
WindowUtilities.setNativeLookAndFeel();
addWindowListener(new ExitListener());
Container content = getContentPane();
Object[] hierarchy =
{ "javax.swing",
"javax.swing.border",
"javax.swing.colorchooser",
"javax.swing.event",
"javax.swing.filechooser",
new Object[] { "javax.swing.plaf",
"javax.swing.plaf.basic",
"javax.swing.plaf.metal",
"javax.swing.plaf.multi" },
"javax.swing.table",
new Object[] { "javax.swing.text",
new Object[] { "javax.swing.text.html",
"javax.swing.text.html.parser" },
"javax.swing.text.rtf" },
"javax.swing.tree",
"javax.swing.undo" };
DefaultMutableTreeNode root = processHierarchy(hierarchy);
JTree tree = new JTree(root);
content.add(new JScrollPane(tree), BorderLayout.CENTER);
setSize(275, 300);
setVisible(true);
}
/** Small routine that will make node out of the first entry
* in the array, then make nodes out of subsequent entries
* and make them child nodes of the first one. The process is
* repeated recursively for entries that are arrays.
*/
private DefaultMutableTreeNode processHierarchy(Object[] hierarchy) {
DefaultMutableTreeNode node =
new DefaultMutableTreeNode(hierarchy[0]);
DefaultMutableTreeNode child;
for(int i=1; i<hierarchy.length; i++) {
Object nodeSpecifier = hierarchy[i];
if (nodeSpecifier instanceof Object[]) // Ie node with children
child = processHierarchy((Object[])nodeSpecifier);
else
child = new DefaultMutableTreeNode(nodeSpecifier); // Ie Leaf
node.add(child);
}
return(node);
}
}
Note: also requires WindowUtilities.java and ExitListener.java, shown earlier.
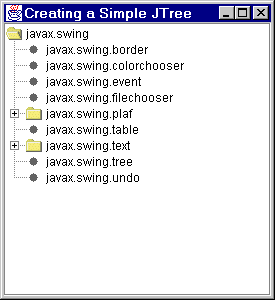
2.2. Simple JTree Example: Initial Result
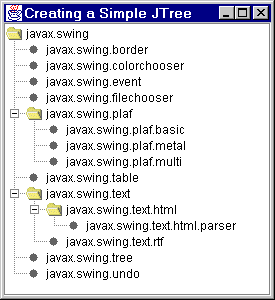
2.2. Simple JTree Example: Expanded Result
3. Handling JTree Events
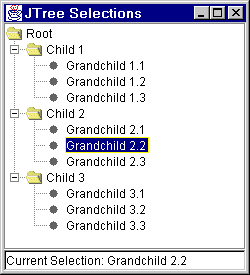
To handle selection events, attach a TreeSelectionListener. The TreeSelectionListener interface requires a single method; valueChanged. You extract the currently selected node via tree.getLastSelectedPathComponent, then casting that to your node type (usually DefaultMutableTreeNode), then extracting the user object via getUserObject. However, if all you want is the node label, you can just call toString on the result of tree.getLastSelectedPathComponent. Here's an example:
3.1 JTree with Selectable Nodes: Source Code (Download source code)
import java.awt.*;
import javax.swing.*;
import javax.swing.tree.*;
import javax.swing.event.*;
public class SelectableTree extends JFrame
implements TreeSelectionListener {
public static void main(String[] args) {
new SelectableTree();
}
private JTree tree;
private JTextField currentSelectionField;
public SelectableTree() {
super("JTree Selections");
WindowUtilities.setNativeLookAndFeel();
addWindowListener(new ExitListener());
Container content = getContentPane();
DefaultMutableTreeNode root =
new DefaultMutableTreeNode("Root");
DefaultMutableTreeNode child;
DefaultMutableTreeNode grandChild;
for(int childIndex=1; childIndex<4; childIndex++) {
child = new DefaultMutableTreeNode("Child " + childIndex);
root.add(child);
for(int grandChildIndex=1; grandChildIndex<4; grandChildIndex++) {
grandChild =
new DefaultMutableTreeNode("Grandchild " + childIndex +
"." + grandChildIndex);
child.add(grandChild);
}
}
tree = new JTree(root);
tree.addTreeSelectionListener(this);
content.add(new JScrollPane(tree), BorderLayout.CENTER);
currentSelectionField = new JTextField("Current Selection: NONE");
content.add(currentSelectionField, BorderLayout.SOUTH);
setSize(250, 275);
setVisible(true);
}
public void valueChanged(TreeSelectionEvent event) {
currentSelectionField.setText
("Current Selection: " +
tree.getLastSelectedPathComponent().toString());
}
}
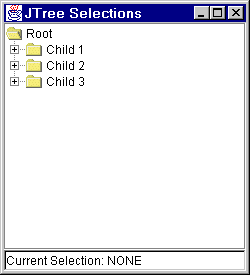
3.2. Selectable JTree Example: Initial Result
3.3. Selectable JTree Example: Result after Expanding Tree and Selecting Node
4. Custom Models and Dynamic Trees
A JTree uses a TreeModel to get its data. As with JList, you can replace the model altogether, specifying how to extract data from the custom model. See the tutorial section on JList for an example of this general approach.
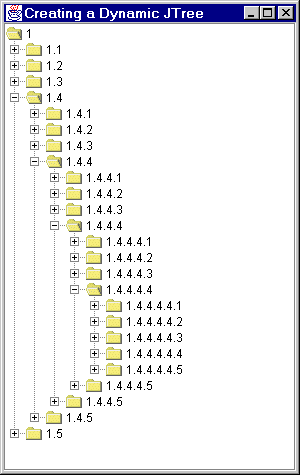
In the case of JTree, however, the default TreeModel uses a TreeNode to store data associated with the tree, and it is more common to leave the TreeModel unchanged and instead make a custom TreeNode. The easiest approach for that is to start with DefaultMutableTreeNode. One of the common cases where this is useful is when you don't want to explicitly lay out each node in the tree, but instead you have some sort of algorithm that describes the children of a given node, and you want to build the tree dynamically, only actually generating children for places that the user expands. For instance, in the following example the tree is potentially infinite, with each node describing a section in an outline. The root will be "1", the first-level children will be 1.1, 1.2, 1.3, etc., the second-level children will be 1.1.1, 1.1.2, etc., and so forth. The actual number of children of each node will be determined by a command-line argument to the program.
The key to building a JTree dynamically is to observe that getChildCount (a method in DefaultMutableTreeNode) will be called before any of the children will actually be retrieved. So you keep a flag indicating whether children have ever been built. So you wait until getChildCount is called, then, if the flag is false, build the children and add them. To keep the tree from trying to count the children (and thus build the nodes) in order to determine which nodes are leaf nodes, override isLeaf to always return false.
import java.awt.*;
import javax.swing.*;
public class DynamicTree extends JFrame {
public static void main(String[] args) {
int n = 5; // Number of children to give each node
if (args.length > 0)
try {
n = Integer.parseInt(args[0]);
} catch(NumberFormatException nfe) {
System.out.println("Can't parse number; using default of " + n);
}
new DynamicTree(n);
}
public DynamicTree(int n) {
super("Creating a Dynamic JTree");
WindowUtilities.setNativeLookAndFeel();
addWindowListener(new ExitListener());
Container content = getContentPane();
JTree tree = new JTree(new OutlineNode(1, n));
content.add(new JScrollPane(tree), BorderLayout.CENTER);
setSize(300, 475);
setVisible(true);
}
}
import java.awt.*;
import javax.swing.*;
import javax.swing.tree.*;
public class OutlineNode extends DefaultMutableTreeNode {
private boolean areChildrenDefined = false;
private int outlineNum;
private int numChildren;
public OutlineNode(int outlineNum, int numChildren) {
this.outlineNum = outlineNum;
this.numChildren = numChildren;
}
public boolean isLeaf() {
return(false);
}
public int getChildCount() {
if (!areChildrenDefined)
defineChildNodes();
return(super.getChildCount());
}
private void defineChildNodes() {
// You must set the flag before defining children if you
// use "add" for the new children. Otherwise you get an infinite
// recursive loop, since add results in a call to getChildCount.
// However, you could use "insert" in such a case.
areChildrenDefined = true;
for(int i=0; i<numChildren; i++)
add(new OutlineNode(i+1, numChildren));
}
public String toString() {
TreeNode parent = getParent();
if (parent == null)
return(String.valueOf(outlineNum));
else
return(parent.toString() + "." + outlineNum);
}
}
4.3. Dynamic Tree: Initial Result
4.4. Dynamic Tree: Result After Expanding A Few Nodes
5. Replacing the Icons at the Tree Nodes
Defining a custom method of drawing a node in a
JTree is little different than it was for a JList. See the
tutorial section on JList for an example of this general approach. However, one very common task is to simply to change the three icons shown to indicate unexpanded internal (ie non-leaf) nodes, expanded internal nodes, and leaf nodes. This is quite simple -- just make a
DefaultTreeCellRenderer, call
setOpenIcon,
setClosedIcon, and
setLeafIcon either with the
Icon of interest (usually an
ImageIcon made from a small image file) or null to just turn off node icons. Then associate this cell renderer with the tree via
setCellRenderer.
5.1 Replacing the Icons: Example Code (Download source code)
import java.awt.*;
import java.awt.event.*;
import javax.swing.*;
import javax.swing.tree.*;
/** JTree with missing or custom icons at the tree nodes.
* 1999 Marty Hall, http://www.apl.jhu.edu/~hall/java/
*/
public class CustomIcons extends JFrame {
public static void main(String[] args) {
new CustomIcons();
}
private Icon customOpenIcon = new ImageIcon("images/Circle_1.gif");
private Icon customClosedIcon = new ImageIcon("images/Circle_2.gif");
private Icon customLeafIcon = new ImageIcon("images/Circle_3.gif");
public CustomIcons() {
super("JTree Selections");
WindowUtilities.setNativeLookAndFeel();
addWindowListener(new ExitListener());
Container content = getContentPane();
content.setLayout(new FlowLayout());
DefaultMutableTreeNode root =
new DefaultMutableTreeNode("Root");
DefaultMutableTreeNode child;
DefaultMutableTreeNode grandChild;
for(int childIndex=1; childIndex<4; childIndex++) {
child = new DefaultMutableTreeNode("Child " + childIndex);
root.add(child);
for(int grandChildIndex=1; grandChildIndex<4; grandChildIndex++) {
grandChild =
new DefaultMutableTreeNode("Grandchild " + childIndex +
"." + grandChildIndex);
child.add(grandChild);
}
}
JTree tree1 = new JTree(root);
tree1.expandRow(1); // Expand children to illustrate leaf icons
JScrollPane pane1 = new JScrollPane(tree1);
pane1.setBorder(BorderFactory.createTitledBorder("Standard Icons"));
content.add(pane1);
JTree tree2 = new JTree(root);
tree2.expandRow(2); // Expand children to illustrate leaf icons
DefaultTreeCellRenderer renderer2 = new DefaultTreeCellRenderer();
renderer2.setOpenIcon(null);
renderer2.setClosedIcon(null);
renderer2.setLeafIcon(null);
tree2.setCellRenderer(renderer2);
JScrollPane pane2 = new JScrollPane(tree2);
pane2.setBorder(BorderFactory.createTitledBorder("No Icons"));
content.add(pane2);
JTree tree3 = new JTree(root);
tree3.expandRow(3); // Expand children to illustrate leaf icons
DefaultTreeCellRenderer renderer3 = new DefaultTreeCellRenderer();
renderer3.setOpenIcon(customOpenIcon);
renderer3.setClosedIcon(customClosedIcon);
renderer3.setLeafIcon(customLeafIcon);
tree3.setCellRenderer(renderer3);
JScrollPane pane3 = new JScrollPane(tree3);
pane3.setBorder(BorderFactory.createTitledBorder("Custom Icons"));
content.add(pane3);
pack();
setVisible(true);
}
}
5.2. Replacing the Icons: Result
