반응형
|
| |||||||||||||||||||||||||||||||||||||||||||||||||||||||||||||||||||||||||||||||||||||||||||||||||||||||||||||||||||||||||||||||||||||||||||||||||||||||||||||||
| |||||||||||||||||||||||||||||||||||||||||||||||||||||||||||||||||||||||||||||||||||||||||||||||||||||||||||||||||||||||||||||||||||||||||||||||||||||||||||||||
Java 6 update10 에서 윈도우 Frame 투명화가 가능해졌네요.
이리저리 찾아보고 있었는데 자료를 찾았습니다. ㅎㅎ
원래 투명하게 보이는걸 좋아해서.. 내가 만든 플램도 넣고 싶었는데..
Java 라서 안되는구나.. 했는데 드디어 지원한다니 ㅋㅋ
영문 자료입니다.. 즐프 하시길..^^
How to Create Translucent and Shaped Windows
http://java.sun.com/developer/technicalArticles/GUI/translucent_shaped_windows/
The article describes a feature that allows creating applications with translucent and shaped windows.
JavaFX Script is a capable new language that offers a set of APIs for creating RIAs. It also provides you with access to the rich features of the the standard Java language. One of the major features introduced in the Java SE 6u10 release is the ability to create translucent and shaped windows. This includes:
This feature is available for objects of the java.awt.Window class and its descendants, for example javax.swing.JFrame, javax.swing.JFDialog, java.awt.Frame.
Translucent Windows
The translucent windows capability tunes the appearance of application windows using two different effects - simple translucency and per-pixel translucency. First, we will give an overview of the simple translucency effect. The simple translucency effect is used to make a window evenly translucent. When simple translucency is applied to a window, all the pixels of the window are assigned an alpha value which determines the level of opacity from the available range. The smaller the value, the more transparent the given window becomes. The minimum opacity level provides a completely transparent window, while the maximum opacity level represents a completely non-transparent (i.e. opaque) window. The following images demonstrate the use of the effect in four cases:
 |
 |
|
Figure 1. Dialog window without the effect applied |
Figure 2. Evenly translucent dialog window with opacity level 85% |
 |
 |
|
Figure 3. Evenly translucent dialog window with opacity level 45% |
Figure 4. Evenly translucent dialog window with opacity level 25% |
The screenshots are taken from the Translucent and Shaped Windows Demo. For details, see the Demo section. For more information about the effect and its use, see Setting the Opacity Level of a Window.
Another feature new to this release is the per-pixel translucency effect. Like simple translucency, per-pixel translucency can be used to make a window evenly translucent, though it is not recommended for performance reasons. However, it also enables you to control the opacity level of each individual pixel independently in order to make the window non-uniformly translucent or transparent. A good example of the use of the per-pixel effect is a gradient effect when the opacity "strength" of the window background increases from its top to the bottom. The following images show the per-pixel translucency effect in action for two cases:
 |
 to fully opaque") |
|
Figure 5. The dialog window is evenly translucent using per-pixel alpha with 50% level (note that the button remains opaque) |
Figure 6. A gradient effect from fully translucent (upper left corner) to fully opaque (lower right corner) has been applied to the dialog window (note that the button remains opaque) |
Note that when the per-pixel translucency effect is applied to make a window area transparent, the area may or may not remain clickable - this is a platform dependent behavior. For more information about the effect and its use, see Enabling Per-Pixel Translucency.
To sum up, the simple translucency effect is used to make a window evenly translucent or transparent, and the per-pixel translucency effect enables you to make a window evenly or non-uniformly translucent or transparent. Both the simple translucency and the per-pixel translucency can be used to make a window evenly translucent or transparent. However, when applied, the simple translucency effect consumes fewer system resources.
Shaped Windows
The other feature introduced in release 6u10 is the window shaping effect. Using shaping you can set any shape to an undecorated window. When the effect is applied, the desired area of a window becomes transparent. Thus, the combination of transparent and non-transparent pixels form the shape of a given window. The next images demonstrate window shaping in two cases:
 |
 |
|
Figure 7. Oval dialog window |
Figure 8. Rounded rectangle dialog window |
Note that transparent areas of the window become unclickable. For more information about the effect and its use, see Setting the Shape of a Window.
These effects can be applied in combination. For example, you can create an oval shaped translucent window or a rounded rectangle window with the gradient effect applied:
 |
 |
|
Figure 9. Oval evenly translucent dialog window |
Figure 10. Rounded rectangle dialog window with the gradient effect applied |
Note that the effects may not be supported by the underlying platform (either because of hardware or software limitations or both). Therefore, before applying the effect, make sure that the platform supports it. For more details on system support, see Determining the Support for a Desired Effect.
The translucent and shaped windows feature is available through the new com.sun.awt.AWTUtilities class.
Note: the com.sun.awt.AWTUtilities class is not part of an officially supported API and appears as an implementation detail. The API is only meant for limited use outside of the core platform. It may change drastically between update releases, and it may even be removed or be moved in some other packages or classes. The class should be used via Java Reflection. Supported and public API will appear in the next major JDK release.
|
Method (* all the methods in the table are public and static) |
Purpose |
|---|---|
enum Translucency |
Represents the kinds of translucency supported by the underlying system |
boolean isTranslucencySupported(Translucency translucencyKind) |
Returns if the given level of translucency is supported by the underlying system |
void setWindowOpacity(Window window, float opacity) |
Sets the opacity of a window |
float getWindowOpacity(Window window) |
Returns the opacity of a window |
Shape getWindowShape(Window window) |
Returns the shape of a window |
void setWindowShape(Window window, Shape shape) |
Sets the shape of a window |
void setWindowOpaque(Window window, boolean isOpaque) |
Enables the per-pixel translucency for a window |
boolean isWindowOpaque(Window window) |
Returns whether the window is opaque or translucent |
boolean isTranslucencyCapable(GraphicsConfiguration gc) |
Verifies whether a given graphics configuration supports the per-pixel translucency |
Determining the Support for a Desired Effect
As already mentioned, the underlying system may not support the desired effect. That is why it is necessary to perform system support validation. The simple translucency and shaping effects require only general validation which indicates whether the system supports the effect in general.
To determine whether your system supports the effect, use the AWTUtilities.isTranslucencySupported() method passing a corresponding constant value as an argument. The constants PERPIXEL_TRANSPARENT, TRANSLUCENT, PERPIXEL_TRANSLUCENT represent shaping, simple translucency, and per-pixel translucency respectively. The next example shows how to determine whether your system supports simple translucency:
if (AWTUtilities.isTranslucencySupported(AWTUtilities.Translucency.TRANSLUCENT) {
      //perform translucency operations here
}
|
The per-pixel translucency also requires a window be created using a compatible graphics configuration. To check whether the given graphics configuration supports the per-pixel translucency effect use the isTranslucencyCapable() method. The following example shows how to determine whether the default graphics configuration supports per-pixel translucency:
if ((AWTUtilities.isTranslucencySupported(AWTUtilities.Translucency.PERPIXEL_TRANSLUCENT)) &&
      (AWTUtilities.isTranslucencyCapable(defaultTranslucencyCapableGC))) {
      //perform translucency operations here
}
|
In case the default graphics configuration is not per-pixel translucency capable, you can go through all available graphics configurations and find one capable of translucency. Use the following code snippet:
GraphicsEnvironment env = GraphicsEnvironment.getLocalGraphicsEnvironment(); GraphicsDevice[] devices = env.getScreenDevices(); |
Once it has been determined that the system supports the desired effect, you can proceed to apply it to your top-level windows.
Making a Window Translucent
Setting the Opacity Level of a Window
The general opacity level of the application window is controlled by the the setWindowOpacity method. This method takes window and opacity variables as arguments. The window argument defines the window to apply the effect to. This argument must be an instance of the java.awt.Window class or its descendant, such as javax.swing.JFrame. The opacity argument is responsible for the level of opacity of the window. The lower its value, the more transparent the window becomes. The range of allowed values is [0f ; 1f]. If you set the value to 0f, the window becomes completely transparent (i.e. invisible). If the value is set to 1f, then the window becomes completely opaque (which is equal to a case when the effect is not applied at all). If the opacity level value is out of the range, it throws an IllegalArgumentException. Note that the effect can not be applied to full-screen windows. If you are in full screen windows mode and the opacity value is lower than 1f, you will get an IllegalArgumentException.
The following code snippet shows how to set the opacity level for your window. To make the window translucent, the example uses the setWindowOpacity method via Java Reflection, passing window and 0.75f as arguments. Window is an instance of the JFrame class, 0.75f is the value of the translucency.
Note that all the examples from this article that use the AWTUtilities class should be implemented via Java Reflection API.
try {
   Class<?> awtUtilitiesClass = Class.forName("com.sun.awt.AWTUtilities");
   Method mSetWindowOpacity = awtUtilitiesClass.getMethod("setWindowOpacity", Window.class, float.class);
   mSetWindowOpacity.invoke(null, window, Float.valueOf(0.75f));
} catch (NoSuchMethodException ex) {
   ex.printStackTrace();
} catch (SecurityException ex) {
   ex.printStackTrace();
} catch (ClassNotFoundException ex) {
   ex.printStackTrace();
} catch (IllegalAccessException ex) {
   ex.printStackTrace();
} catch (IllegalArgumentException ex) {
   ex.printStackTrace();
} catch (InvocationTargetException ex) {
   ex.printStackTrace();
}
|
When applied, the method makes the frame translucent with a 75% level of opacity.
To get the current opacity of a window, use the getWindowOpacity method passing a window object as its argument. If the opacity level has not yet been set, this method returns 1.0f. In case the method returns 0f, the window is completely transparent. The next code snippet shows how to get the current level of opacity of a window:
float opacity = AWTUtilities.getWindowOpacity(frame); |
Enabling Per-Pixel Translucency
The setWindowOpaque method is used to enable per-pixel alpha support for the given window. The method takes the window and isOpaque variables as arguments. The window argument defines the window you apply the effect to. Note that the argument must represent a window created using an effect compatible graphics configuration. For more information on graphics configurations, see Determining the Support for a Desired Effect. Also note that the window must not be in full-screen mode when making it non-opaque, or an IllegalArgumentException is thrown.
The isOpaque parameter defines whether the window must be opaque (true), or translucent (false). Once the window becomes non-opaque (the isOpaque is set to false), the drawing sub-system starts to respect the alpha value of each individual pixel. If a pixel gets painted with an alpha color component equal to zero, it becomes visually transparent; if the alpha of the pixel is equal to 255, the pixel is fully opaque. Interim values of the alpha color component make the pixel semi-transparent (i.e. translucent). The following code snippet shows how to enable the per-pixel alpha support for your window.
AWTUtilities.setWindowOpaque(frame, false); |
If invoking the getWarningString on the window object returns a non-null String, this method will not affect the opacity of the window.
The following code snippet shows how to achieve the gradient effect. It is done by defining the parameters of the JPanel component using the GradientPaint method:
jPanel1 = new javax.swing.JPanel() {
protected void paintComponent(Graphics g) {
if (g instanceof Graphics2D) {
final int R = 240;
final int G = 240;
final int B = 240;
|
Then the component should be placed on the frame:
frame.add(jPanel1); |
Setting the Shape of a Window
To apply a shape to a window use the setWindowShape method. The method uses the window argument to define the window you want to set the shape to. Additionally, it uses the shape argument to define the desired shape. The shape can be any instance of the java.awt.Shape interface, for example, Ellipse2D.Float or RoundRectangle2D.Float. The next code snippet shows how to set an oval shape on your window. In the example, the fd argument represents the JFrame window, Ellipse2D.Float creates a new instance of an Ellipse2D object that defines the shape of the window:
fd.addComponentListener(new ComponentAdapter() {
     @Override
     public void componentResized(ComponentEvent evt) {
       Shape shape = null;
       shape = new Ellipse2D.Float(0, 0, fd.getWidth(), fd.getHeight());
       AWTUtilities.setWindowShape(fd, shape);
     }
});
|
It is recommended to set the shape using the componentResized() method as this enables precise control of the shape according to the current size of the window.
When setting the shape on your window, note that the effect supports only undecorated windows. If your window is decorated and you apply the effect, you will get the original shape of the window without the effect applied to it. If the window has been created by untrusted code (i.e. the window has a non-null warning string returned by getWarningString()), the method returns without affecting the shape of the window. Also note that the window must not be in the full-screen mode when setting a non-null shape. Otherwise, an IllegalArgumentException is thrown.
To get the current value of the shape of a window, use the getWindowShape method passing a window as an argument. The getWindowShape method returns an object that implements the shape interface and represents the shape previously set . If no shape has been set yet, or the shape has been reset to null, this method returns null. In other words, the default rectangular shape is displayed when the null argument is passed. The following code demonstrates how to get the current shape of the window:
Shape currentShape = AWTUtilities.getWindowShape(frame); |
You can see the translucency and shape features in action by running the "TranslucencyShapeDemo" example. Click the Launch button to run Demo using Java Web Start. Note that in order to start the demo you must have JDK 6u10 or later installed and properly configured on your machine. You can download release 6u10 at the java.sun.com download page.
The application enables you to choose a desired effect or a combination of effects and apply it to an undecorated dialog window. The application interface contains the following elements: a slidebar to set the level of constant alpha for the simple translucency effect from the range [0% ; 100%], three radio buttons to set the shape of a window - rectangular, with rounded corners, or oval, a check box to enable or disable the per-pixel gradient effect, Paint Gradient check box to switch the per-pixel gradient effect on and off, Display/Hide the frame and Close the Application buttons. Once the settings are defined, click the Display the frame button to display the dialog window with the desired effect applied. Note that you can also change the effect spontaneously. To do so, choose an effect type when the window is displayed, the window will automatically switch its view. The dialog window itself contains the Reshape Me button. When clicked, the window randomly changes its size and location on the desktop. To hide the dialog window, click Hide the frame, to close the application, click Close the Application button.
You can find the entire code for this program in ControlFrame.java, FancyFrame.java, Main.java, and AWTUtilitiesWrapper.java, all of which are packed in the TranslucentShapes NetBeans project. Note that the application uses the Java Reflection API. The Reflection mechanism is implemented through the AWTUtilitiesWrapper class. You can download the TransclucentShapes NetBeans project as a zip file.
This article provides a description of the translucent and shaped windows feature. It includes an overview, discusses the feature API, and offers practical examples. The demo attached to the article shows the use of each featured effect individually as well as the use of the effects in combination.


 iBastis.NET 과

 사이텍미디어(지앤선)
 한국마이크로소프트 ("당신을 만나고 싶습니다" Hero 블로그 지원 -
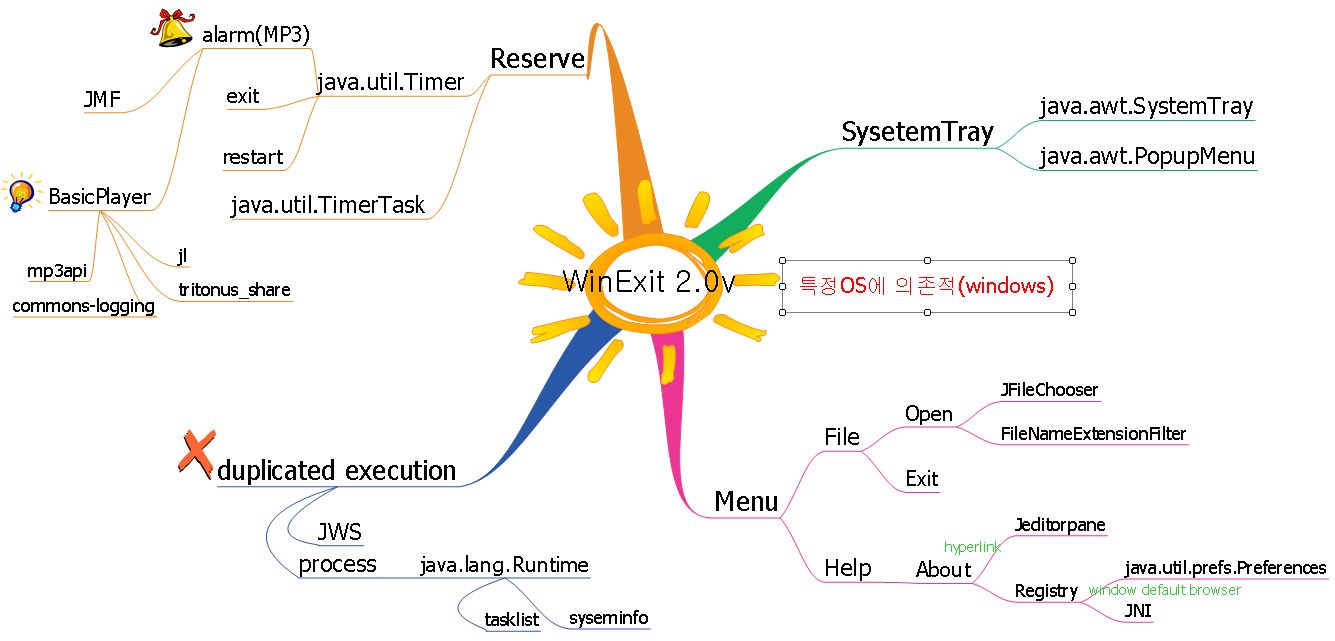
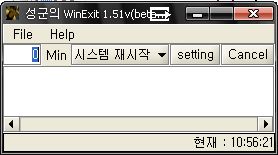
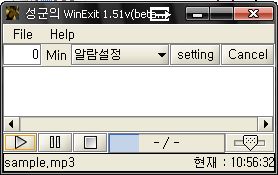
 WinExit1.51v.zip